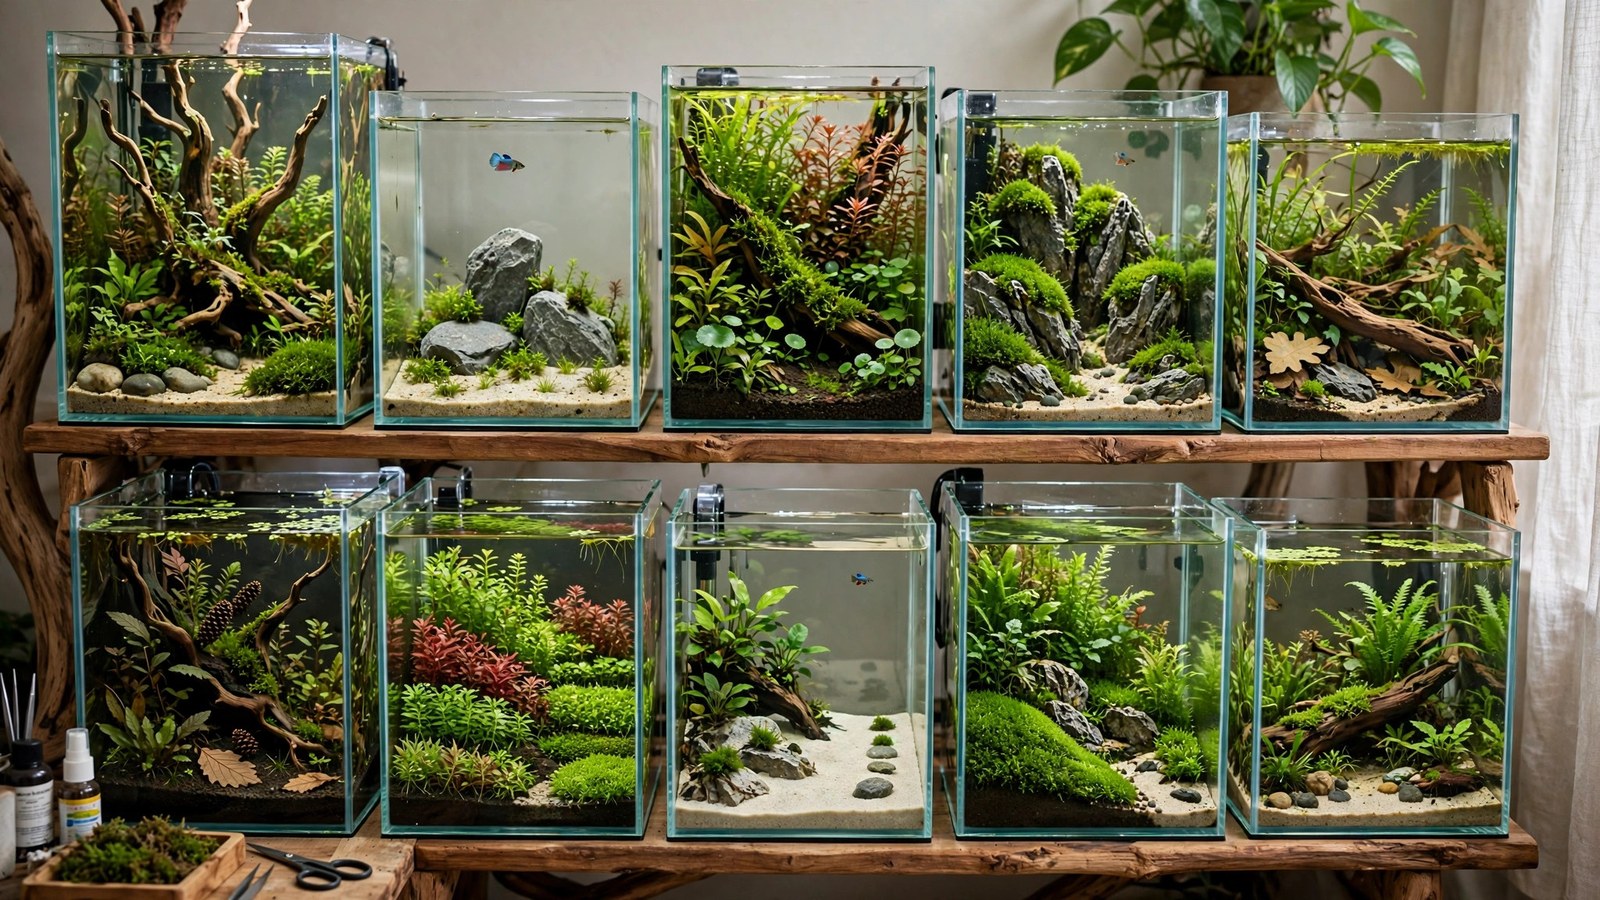
Bettas are the most commonly kept fish in the hobby and the most commonly under-scaped — too many live in bare tanks with a plastic plant and a cartoon castle. But a betta's natural habitat (shallow, warm, vegetation-choked Southeast Asian waters) is practically begging for thoughtful aquascaping, and bettas themselves are spectacular against a well-planted layout. Aquascaping a betta tank means designing around one fish's specific needs: calm water, surface access, resting spots, and sightline breaks. Here are 10 layout ideas plus the betta-specific rules that make them work.
Betta-First Design Rules
Before the ideas, the non-negotiables — every layout below obeys these:
- Gentle flow: bettas are poor swimmers with heavy fins. Baffle filter outflows, choose sponge filters or gentle HOBs, and avoid layouts requiring strong current.
- Surface access: bettas breathe air. Keep the waterline 2–3 cm below the rim and never let floating plants cover 100% of the surface — leave breathing gaps.
- Resting spots near the surface: broad leaves (Anubias, Amazon sword) or a betta hammock positioned 2–3 cm below the surface. Bettas rest; give them furniture.
- Sightline breaks: bettas are territorial and stress at constant reflections or activity. Hardscape and tall plants breaking up sightlines calm them — and a background on the tank reduces reflection stress.
- No sharp edges: flowing fins tear on rough stone and jagged wood. Choose smooth stones, sanded wood, and silk-smooth plant choices; run pantyhose over hardscape — if it snags, it snags fins.
- Warm, stable water: 78–80°F. Layouts must accommodate a heater discreetly (behind hardscape, in a back corner).
10 Betta Tank Layout Ideas
1. The jungle corner
Dense Cryptocoryne and Anubias mass in one back corner, open swimming space in front — the classic from our low-tech jungle guide, scaled to 5–10 gallons. The betta patrols the open water and retreats into the thicket. Easiest idea on this list; hardest to mess up.
2. Single driftwood arch
One arching piece of spider wood (see single-wood layouts) planted with Anubias 'Petite' and java moss, carpet of Monte Carlo below. The arch creates a "doorway" the betta swims through — endlessly entertaining — and moss-draped branches give surface-adjacent resting spots.
3. The betta biotope
Southeast Asian blackwater: leaf litter, twisted roots, dim light, floating plants. Our blackwater guide and biotope guide combine here — wild-type bettas come from exactly this water, and domestic bettas show their best color and behavior in it. Tannins, catappa leaves, the works.
4. Iwagumi nano
Three small stones, one carpet species, minimalist — our Iwagumi guide shrunk to 5 gallons. The stark simplicity makes the betta the undeniable star; the fish becomes the layout's color accent. Keep the carpet immaculate — minimalism shows every flaw.
5. The floating garden
Water lettuce, frogbit, and red root floaters covering 60–70% of the surface, roots dangling deep, sparse planting below. Bettas adore root tangles — they weave through them, rest in them, and build bubblenests under them. Keep a clear corner for feeding and breathing. Stunning top-down view.
6. Dutch micro-streets
Ordered rows of 4–6 stem species in a 10-gallon, Dutch-style in miniature. The "streets" between plant groups give the betta patrol lanes. Demanding (Dutch = trimming discipline per our trimming guide) but spectacular — a tiny formal garden with a living jewel.
7. The root tangle riverbank
Red moor root mass along the back, sand foreground, a few crypts — a riverbank slice. Tannin-tinted water optional. The root maze gives the betta endless exploration; the open sand foreground shows off finnage. Excellent for long-finned males who need rest stops — roots at multiple heights serve as perches.
8. Moss cliff paludarium-lite
In a tank with a lowered waterline, build a moss-covered foam or cork background rising above the water (see paludarium plants for technique). Emersed moss and small ferns above, betta below. The vertical garden backdrop is striking, and the humid air above the waterline suits bubblenest building.
9. The zen sand garden
Open pale sand, one smooth stone (one-rock principles), a single Anubias cluster, one betta. Maximum negative space, maximum fish focus. Deceptively hard to keep clean (every speck shows on sand) but meditative — and the betta's colors against pale sand are electric.
10. The wabi-kusa island
Place a planted wabi-kusa ball as an island in a shallow 5-gallon — emersed growth above, betta cruising around it. The island's roots dangle into the water as grazing and resting structure. The most unusual idea here; guaranteed conversation piece.
Plant Shortlist for Betta Tanks
- Anubias (all varieties): broad resting leaves, unkillable, attach to hardscape — the #1 betta plant.
- Java fern: same virtues, feathery texture contrast.
- Cryptocoryne wendtii: bushy midground thickets for retreat.
- Amazon sword (compact varieties): big leaf hammocks near the surface.
- Floating plants: frogbit, water lettuce, Salvinia — security cover that triggers natural behavior.
- Marimo moss balls: the cliché betta toy — harmless, and bettas do push them around.
- Avoid: sharp-edged plants (some swords have serrated edges — check), plastic plants (fin shredders), and anything needing strong current or CO2-driven chaos that fights the calm-water requirement.
Tank Size and Layout Scaling
- 5 gallon: the practical minimum for a scaped betta tank. One idea executed well (jungle corner, Iwagumi nano, floating garden). See our 5-gallon aquascape ideas.
- 10 gallon: the sweet spot — room for real composition (Dutch micro-streets, driftwood arch, biotope). See our 10-gallon layout ideas.
- 20 gallon long: a betta palace — full 20-long scape with territories, or a sorority-adjacent heavily planted community (females only, heavily researched — not for beginners).
Bigger is genuinely better for bettas despite the "betta in a bowl" myth — more water means more stable parameters and more layout room. A betta in a well-scaped 10-gallon behaves like a different animal than one in a bare 2-gallon: more active, more colorful, more interactive.
The Betta-Safe Weekly Routine
Betta tanks need the same maintenance as any planted tank, adjusted for one sensitive resident. Water changes: 25% weekly with temperature-matched, dechlorinated water — pour gently (over your hand or a dish) so the current doesn't toss the betta around; sudden flow panics them. Glass: magnetic cleaner on the front and sides weekly; bettas flare at their reflection in algae-filmed glass, so clean glass genuinely reduces stress. Trimming: keep sightline breaks intact but don't let floaters seal the surface — clear a breathing zone every week, and thin stem plants before they shade the lower levels into gloom. Filter: rinse sponge media monthly in old tank water; check baffles haven't shifted and current is still gentle. Observation: the real maintenance — watch your betta for two minutes daily. Clamped fins, faded color, or hiding signal water or stress problems days before tests do. A betta that greets you at the glass and patrols confidently is the best water-quality test ever invented.
Frequently Asked Questions
Can I keep tank mates with a betta in a scaped tank?
Sometimes. Peaceful, non-flashy bottom dwellers (a small group of Corydoras, otos) or shrimp (ghost/cherry — may become snacks) can work in 10+ gallons with heavy planting and sightline breaks. No other bettas (males), no fin-nippers (tiger barbs), no flashy long-finned fish that trigger aggression. Always have a backup tank ready — betta temperament is individual.
Do bettas need a filter in a planted tank?
Yes — plants help, but they don't replace filtration. Use a gentle sponge filter or a baffled nano HOB. The "plants filter everything" claim is overstated; a betta's bioload in 5–10 gallons needs mechanical and biological filtration, just with minimal current.
Will a betta destroy my aquascape?
Rarely. Bettas don't dig or eat plants (unlike cichlids or goldfish). Long-finned males may rest on delicate plants and flatten them, and bubblenests can trap floating-plant roots — both harmless. The main risk is the betta's bulk disturbing a fresh dry-start carpet before it's rooted; let carpets establish first.
What's the best substrate for a betta tank?
Smooth sand or fine aquasoil — bettas sometimes rest on the bottom, and coarse gravel is uncomfortable and traps waste. Dark substrate makes betta colors pop dramatically. If planting heavily, aquasoil wins; for hardscape-focused layouts, sand is fine with root tabs.
How do I baffle a strong filter for a betta?
Options: a pre-filter sponge over the intake (also protects fins), a spray bar aimed at the glass to dissipate flow, a water-bottle baffle on HOB outflows, or simply switching to a sponge filter — the betta keeper's default. Test with food flakes: they should drift gently, not race around the tank.
Can bettas live in a high-tech CO2 aquascape?
Yes, with care — bettas tolerate CO2-injected tanks fine as long as levels stay reasonable (drop checker green, not yellow) and surface agitation provides oxygen exchange. The bigger question is whether the high-tech layout's strong light and flow suit the betta; design the scape around calm water first, high-tech second.
Design for the Fish You Have
A betta tank done right is proof that aquascaping serves livestock, not the other way around: calm water, broken sightlines, resting leaves, dim corners, and a layout that makes one fish look like the most beautiful animal in the room. Pick one of the ten ideas, obey the betta-first rules, and photograph the result with our aquascape photography tips — a betta flaring against a dark planted background is one of the hobby's great images. When the layout matures and needs shaping, our trimming maintenance guide keeps it sharp without stressing the resident.
Tissue-culture plants are the exception — they’re grown in sterile gel and adapt with minimal melting, which is part of what you’re paying for. Plants bought submersed from another hobbyist’s tank also transition with little melt, since they’re already in the right form.
Which Plants Melt Most (and Least)
Heavy melters (expect significant leaf loss)
- Cryptocorynes — infamous for “crypt melt,” sometimes dropping every leaf after any disturbance. They almost always recover from the roots within weeks.
- Stem plants grown emersed — rotala, ludwigia, and hygrophila often shed lower emersed leaves while the growing tips transition.
- Amazon swords — emersed-grown swords typically lose their broad oval aerial leaves and replace them with longer submersed ribbon leaves.
Light melters
- Anubias, java fern, bucephalandra — slow-growing rhizome plants transition gradually; occasional old-leaf melt but rarely dramatic.
- Vallisneria — usually transitions well, though it dislikes the move itself and may sulk for a week.
- Floating plants — minimal melt since their leaves were already at the air-water interface.
The Acclimation Protocol
Step 1: Quarantine or dip first
Before acclimating to your tank’s conditions, make sure you’re not acclimating pests along with the plant. Run new arrivals through our quarantine and dip protocol — it adds days upfront but prevents months of regret.
Step 2: Float to temperature-match (30 minutes)
Float the bag or container in your tank for 20–30 minutes to equalize temperature. Plants are less temperature-sensitive than fish, but a 10°F shock on top of transplant stress is an avoidable insult.
Step 3: Trim before planting
Remove any leaves that are already damaged, yellowing, or heavily algae-covered — they won’t recover and they’ll rot in your tank, feeding algae. For stem plants, trim off the bottom inch and any emersed leaves that look unlikely to adapt; the plant wastes energy maintaining leaves it’s going to shed anyway. Keep the healthy growing tips — that’s where recovery starts.
Step 4: Plant correctly the first time
Follow our planting guide — right depth, crown exposed on rosettes, rhizomes unburied on epiphytes. Every uprooting and replanting restarts the acclimation clock, so get placement right on the first attempt. Decide where each plant goes before it goes in the water.
Step 5: Run a gentle first week
For the first 7 days after planting:
- Moderate light — run your normal photoperiod but consider dropping intensity 20–30% if your light is dimmable. Blast-level light on a melting plant grows algae on the dying leaves, not recovery.
- Stable CO2 — if you inject CO2, keep it consistent. Fluctuating CO2 during acclimation is a melt accelerator. If you’re low-tech, this doesn’t apply — see growing without CO2.
- Half-strength fertilizer — new plants with damaged leaves can’t use full dosing, and the excess feeds algae. Ramp to full strength over 2–3 weeks per our fertilizer schedule.
- No disturbance — don’t move, trim, or “check on” new plants for at least two weeks. Every touch resets root establishment. This is especially critical for crypts.
Step 6: Remove melt, keep the base
As emersed leaves melt, remove the mushy material promptly — decaying leaves release ammonia and grow fungus that can spread to healthy tissue. But never discard the plant while the crown, rhizome, or roots are firm and alive. A crypt that’s lost every leaf but has firm roots is a plant that’s about to recover, not a dead plant. Give it 3–4 weeks before judging.
Telling Normal Melt From Real Problems
Normal transition melt:
- Affects oldest/emersed leaves first, newest growth last
- New submersed leaves emerge even as old ones dissolve
- Roots and crown stay firm and white/green
- Timeline: 1–4 weeks, then obvious new growth
Concerning melt (see our full melting diagnosis guide):
- New growth also melts or emerges deformed
- Rhizome or crown turns mushy and brown — this is rot, not transition
- Entire plant dissolves within days with no new growth after 4+ weeks
- Melting spreads to established plants that weren’t recently moved
Buying Tips to Minimize Melt
- Buy submersed-grown when available — hobbyist-grown cuttings transition with almost no melt.
- Choose tissue culture for sensitive species — crypts and delicate stems establish far more reliably from sterile cups.
- Avoid plants already melting in the store tank — some melt is normal, but a plant that’s mostly mush at purchase has less energy for recovery.
- Transport carefully — keep plants damp and out of direct sun/heat. A plant that dries out or cooks in a hot car melts far worse than one transported properly.
The First-Month Timeline: What to Expect Week by Week
Knowing what’s normal when removes most acclimation anxiety. Here’s the typical timeline for a healthy plant adapting to a new tank:
Week 1: The quiet week
Almost nothing visible happens. The plant is growing roots you can’t see and assessing its new environment. Some species (vallisneria, stem plants) may start shedding their lowest leaves. This is normal. Resist the urge to “help” — no moving, no extra fertilizer, no light changes. The most common beginner mistake is intervening during a week when the correct action is nothing.
Week 2: Melt peaks
This is when emersed leaves give up in earnest. Crypts may drop everything; swords shed their broad aerial leaves; stem plants lose lower foliage. It looks catastrophic and it’s usually fine. Keep removing mushy material, keep conditions stable, and watch the crown and growing tips — if those are firm and green, recovery is already underway.
Week 3: The turn
New submersed-adapted leaves emerge — smaller, thinner, often a slightly different shade of green than the emersed foliage. Stem plant tips start growing visibly; crypts push tiny curled leaves from the crown; swords unfurl narrow ribbon leaves. This is the moment most beginners exhale for the first time.
Week 4+: Established
New growth outpaces melt, and the plant is functionally yours. You can resume full-strength fertilizer, normal trimming, and stop treating it as fragile. Some slow growers (anubias, bucephalandra) take 6–8 weeks to show obvious progress — that’s their normal speed, not a problem.
Acclimating Different Plant Formats
Tissue-culture cups
Sterile, pest-free, and already adapted to high-humidity (not emersed) growth — tissue cultures melt the least of any format. Rinse the agar gel off gently (leftover gel rots and feeds fungus), split the portion into small plantlets, and plant per our planting guide. They establish slowly for the first two weeks, then accelerate. No dip needed, minimal acclimation stress — this is the premium experience you’re paying for.
Potted plants
Remove the pot and strip away the rockwool completely — leftover rockwool traps debris and rots. Tease the root mass apart gently; if it’s a dense mat, splitting it into 2–3 smaller portions actually establishes faster than planting one big clump (more growing points, better water flow around roots). Potted plants are usually emersed-grown, so expect the standard 2–4 week melt cycle.
Bare-root / bunched stems
Typically sold as weighted bunches. Remove any bands, foam, or weights, strip the lower leaves, and plant stems individually or in small groups. Bunched stems from the store are often already transitioning — check for new submersed growth at the tips, which tells you the plant is mid-adaptation and will settle quickly.
Hobbyist cuttings
Already submersed-grown and the fastest to establish — often showing new growth within days. The main acclimation factor is water-parameter difference between the two tanks. Float to temperature-match, plant promptly, and they’ll usually take off with minimal melt. This is why experienced hobbyists prefer trading cuttings over buying potted plants.
Frequently Asked Questions
Should I use a “plant starter” or transplant fertilizer?
Products marketed for transplant shock are mostly B-vitamins and mild hormones. They don’t hurt, but there’s no strong evidence they help aquarium plants specifically. Stable conditions and patience outperform any bottle. Save the money for more plants.
My new plant melted completely — bare crown, no leaves. Is it dead?
Probably not, if the crown or rhizome is firm. Crypts and swords routinely lose 100% of their leaves and regrow from the base within a month. The test is firmness: firm and pale/green means alive; mushy and brown/black means rot. Give firm-but-leafless plants a full 4 weeks before declaring them dead.
Can I speed up acclimation with extra light or CO2?
No — and trying usually backfires. A melting plant can’t use extra light; the excess just grows algae on its dying leaves. Keep light moderate and CO2 stable (not boosted) during acclimation. Growth speed comes from the plant’s own adaptation timeline, which you can’t rush, only avoid delaying.
Should new plants go straight into my main display tank?
After quarantine/dipping, yes — there’s no benefit to a separate “growing-in” tank for most plants. They acclimate to your water fastest in the tank they’ll live in. The exception is very delicate species going into a tank with boisterous fish; give those a few weeks in a calm corner or breeder box first.
The Patience Rule
The single most important acclimation skill is restraint: plant it right, set gentle conditions, remove decay, and then leave it alone for a month. The hobbyists with the best plant growth aren’t doing something clever in week one — they’re simply not interfering in weeks two through four while the plants do what they’ve evolved to do. Melt looks like failure and feels like failure, but in most cases it’s the visible part of a plant successfully becoming yours.