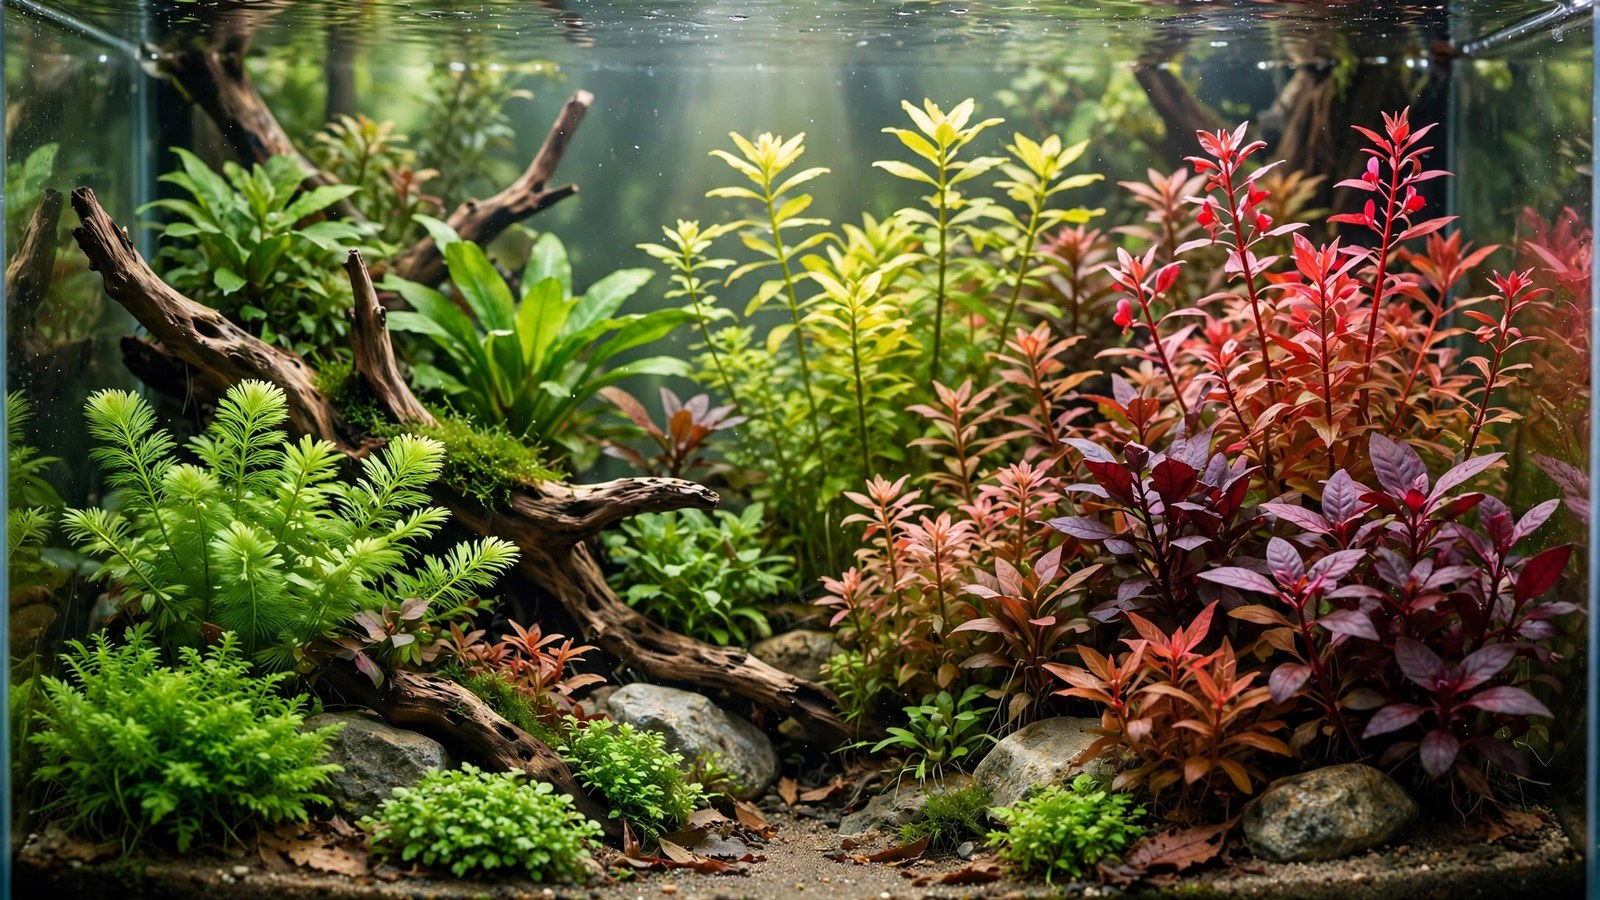
Color is the most misused tool in aquascaping. Beginners plant every red species they can find, creating a chaotic rainbow; masters use one red drift against green and achieve ten times the impact. Color theory for aquascapers isn't about art-school jargon — it's practical rules for which plants go where so colors amplify each other instead of fighting. Learn the palette logic, and your layouts gain the chromatic confidence of contest winners.
The 80/15/5 Rule: Green Does the Work
The foundational rule of aquascape color: ~80% green, ~15% secondary color, ~5% accent. Green is the landscape — the meadows, forests, and fields. It recedes, calms, and unifies. The secondary color (often red, orange, or yellow-green) provides warmth and interest in one or two defined areas. The accent (a vivid red bunch, golden foliage) is punctuation — a single exclamation point.
Why this works: human vision is most sensitive to green (we evolved in green landscapes), so green-dominant scenes feel natural and restful. Colors deviating from green advance visually — reds and oranges jump forward, demanding attention. A layout that's 50% red has nowhere for the eye to rest; every area shouts, so nothing is heard. Restraint isn't timidity — it's giving each color the space to matter.
The Aquascaper's Palette: What Each Color Does
- Greens (the base): the full range — deep Anubias green, bright Monte Carlo green, blue-green hairgrass, yellow-green Rotala tips. Vary green tones for richness without adding hues: dark background greens against bright foreground greens create depth through tonal contrast alone. Most award-winning layouts are 85%+ green.
- Reds (the classic accent): Rotala 'Colorata'/wallichii, Ludwigia 'Super Red', Alternanthera reineckii, red tiger lotus. Red advances aggressively — place it at focal points or the composition's destination (see focal placement), never scattered randomly. One red group = drama; five red groups = noise.
- Oranges and pinks: Ludwigia inclinata 'Cuba', Rotala macrandra — warmer, softer than pure red. Beautiful as the secondary color bridging green masses and red accents.
- Yellows and golds: golden Lysimachia nummularia 'Aurea', yellow-green Limnophila — luminous, eye-catching. Use sparingly; yellow in large masses looks artificial (few natural landscapes are yellow-dominant).
- Whites and pale tones: pale sand paths, white-variegated Anubias 'Pinto', light stone — the "light" in the composition. Pale elements reflect light and create breathing room; a sand path through green is the classic light-dark play.
- Dark tones: dark stone (Manten, Frodo), black background, shadow areas — the "weight." Dark elements anchor compositions and make adjacent colors glow by contrast.
Placement Rules: Where Colors Live
- Warm colors advance, cool colors recede: place reds/oranges toward the focal point or foreground-midground where you want the eye to land; keep background masses green/blue-green to push them back. Reversing this (red background, green foreground) flattens depth — the eye can't decide what's near.
- One red zone per layout (two maximum in large tanks, placed asymmetrically). The red group's position should coincide with the compositional destination — the high end of a diagonal, the dominant wall of a valley, the golden-ratio point.
- Grade color intensity with depth: the most saturated reds at the focal area, softening to green with distance — mimics atmospheric perspective (distant things look desaturated). A red bunch in the far back corner looks wrong because nature doesn't do that.
- Repeat the accent color in tiny echoes: one small red crypt or a few red stems near (not at) the main red group creates rhythm — the eye bounces between them. But keep echoes small; they're grace notes, not a second solo.
- Consider the fish: cardinal tetras' red/blue, ember tetras' orange — livestock are color elements. A red-accent layout with red fish competes; with blue/green fish it harmonizes. Plan fish and plant color together.
- Background color matters: black backgrounds make every color ignite (maximum saturation, dramatic); white/frosted backgrounds soften and brighten (airy, natural). Choose the background that serves your palette — see our photography guide's background notes.
Color and Light: The Hidden Variable
Colors don't exist independently of light. Light spectrum shifts everything: warm-white LEDs (6000–7000K) render reds richly; cool-white (8000K+) washes reds toward pink and makes greens look sterile. If your red plants photograph orange, check your light's spectrum before blaming the plants. Intensity affects pigmentation directly: red plants need strong light to stay red — the same Rotala that's crimson under high light goes green-pink under moderate light. This is why red-plant layouts are high-tech layouts: the color is the light. Photoperiod consistency matters too — fluctuating light grows inconsistent color.
Classic Palettes That Always Work
- Amano classic: 90% varied greens + one Rotala wallichii pink-red drift at the focal point. Timeless, contest-proven, the Nature Aquarium default.
- Dutch sunset: green base streets + Ludwigia 'Super Red' + orange Rotala macrandra + golden accents — the Dutch formal palette, organized in rows.
- Blackwater ember: deep greens + tannin-amber water + ember tetra orange + red root floater blush — color from water and fish, not just plants. See blackwater.
- Monochrome green: 100% greens in varied tones — the connoisseur's choice. Demands perfect texture contrast to avoid monotony, but when it works it's sublime.
- High-contrast minimal: green carpet + dark stone + one red group — the one-rock palette. Maximum impact per color.
Color Mistakes That Scream Beginner
- Rainbow planting: one red, one orange, one yellow, one pink — scattered. The nursery look. Pick one warm accent and commit.
- Red everywhere: red background + red midground + red foreground = visual shouting match. Red is a spice, not a staple.
- Ignoring tone: all mid-tone greens with no darks or lights — flat, muddy. Every palette needs tonal range: dark anchors, mid masses, light accents.
- Clashing with hardscape: orange-red laterite stone + red plants + red fish = monochrome accident. Let hardscape and plants contrast (grey stone + red plants) rather than match.
- Chasing red without the light: planting red species under moderate light, getting pink-green mush, and blaming the plant. Match the palette to the equipment honestly.
One more practical note: photograph your palette under the tank's own light before finalizing. Phone cameras reveal color relationships your eyes normalize — a combination that looks fine in person may photograph as muddy or clashing. A quick test photo of plant candidates grouped together (even in their pots, held against the tank) previews the palette honestly and has saved countless aquascapers from clashing layouts.
Frequently Asked Questions
How do I make red plants actually red?
Four factors: strong light (high PAR — reds are light-hungry), CO2 (healthy fast growth colors up; stunted plants stay dull), nitrate limitation (slightly lean nitrates intensify reds in many species — the well-known "low nitrate = redder" effect, but don't starve the tank), and iron (adequate, not excessive — iron deficiency pales plants, but dumping iron doesn't create red from nothing). Genetics first: some species are just redder (Ludwigia 'Super Red' > Ludwigia repens).
Can I do an all-red aquascape?
You can, but it's extremely difficult to make beautiful — without green contrast, reds lose their punch and the layout looks monochromatic in the wrong way. The few successful "red" scapes are actually red-dominant (60–70%) with green structural masses providing relief. For a first color statement, the 80/15/5 rule is far more forgiving.
Do colored gravel/substrates have a place?
Rarely in serious aquascaping — blue gravel, neon substrates, and rainbow mixes fight every naturalistic palette and date the tank instantly. Substrate should be a neutral stage (dark aquasoil, natural sand) that lets plant and hardscape colors speak. The one exception: pale sand as a deliberate light element in an otherwise dark composition.
How does color theory differ for biotope tanks?
Biotopes restrict you to nature's palette for that habitat — which is the point. A Rio Negro biotope's colors (amber water, deep greens, tetra red/blue) are predetermined; your job is arrangement, not selection. See our biotope guide — authenticity replaces invention, and the discipline is satisfying in its own way.
Should I plan colors on paper before planting?
Yes — even a crude sketch with colored pencils (or a digital mockup) prevents the #1 color mistake: buying plants by individual beauty rather than compositional role. Assign each planned species a role (base green / secondary / accent) before shopping. The five minutes of planning saves months of a clashing layout.
Why do my plants look different colors in photos vs. real life?
White balance and spectrum — cameras interpret aquarium lighting differently than eyes do. Shoot RAW and correct white balance in post (see our photography guide). Also, tank lights render colors differently than room light — judge plant colors under the tank's own light, which is the only context that matters.
Restraint Is the Boldest Color
The aquascaper's color journey goes: rainbow enthusiasm → muddy disappointment → green-dominant discipline → confident accent placement. Skip to the end: 80% green in varied tones, one warm secondary, one vivid accent at the focal point, tonal range from dark anchors to light breathing room. It's the palette behind nearly every layout you've ever admired, from Amano's classics to modern contest winners. Master it, then — and only then — break it deliberately. For the other half of visual richness, study texture contrast next: color gets the eye's attention, but texture keeps it.
Tissue-culture plants are the exception — they’re grown in sterile gel and adapt with minimal melting, which is part of what you’re paying for. Plants bought submersed from another hobbyist’s tank also transition with little melt, since they’re already in the right form.
Which Plants Melt Most (and Least)
Heavy melters (expect significant leaf loss)
- Cryptocorynes — infamous for “crypt melt,” sometimes dropping every leaf after any disturbance. They almost always recover from the roots within weeks.
- Stem plants grown emersed — rotala, ludwigia, and hygrophila often shed lower emersed leaves while the growing tips transition.
- Amazon swords — emersed-grown swords typically lose their broad oval aerial leaves and replace them with longer submersed ribbon leaves.
Light melters
- Anubias, java fern, bucephalandra — slow-growing rhizome plants transition gradually; occasional old-leaf melt but rarely dramatic.
- Vallisneria — usually transitions well, though it dislikes the move itself and may sulk for a week.
- Floating plants — minimal melt since their leaves were already at the air-water interface.
The Acclimation Protocol
Step 1: Quarantine or dip first
Before acclimating to your tank’s conditions, make sure you’re not acclimating pests along with the plant. Run new arrivals through our quarantine and dip protocol — it adds days upfront but prevents months of regret.
Step 2: Float to temperature-match (30 minutes)
Float the bag or container in your tank for 20–30 minutes to equalize temperature. Plants are less temperature-sensitive than fish, but a 10°F shock on top of transplant stress is an avoidable insult.
Step 3: Trim before planting
Remove any leaves that are already damaged, yellowing, or heavily algae-covered — they won’t recover and they’ll rot in your tank, feeding algae. For stem plants, trim off the bottom inch and any emersed leaves that look unlikely to adapt; the plant wastes energy maintaining leaves it’s going to shed anyway. Keep the healthy growing tips — that’s where recovery starts.
Step 4: Plant correctly the first time
Follow our planting guide — right depth, crown exposed on rosettes, rhizomes unburied on epiphytes. Every uprooting and replanting restarts the acclimation clock, so get placement right on the first attempt. Decide where each plant goes before it goes in the water.
Step 5: Run a gentle first week
For the first 7 days after planting:
- Moderate light — run your normal photoperiod but consider dropping intensity 20–30% if your light is dimmable. Blast-level light on a melting plant grows algae on the dying leaves, not recovery.
- Stable CO2 — if you inject CO2, keep it consistent. Fluctuating CO2 during acclimation is a melt accelerator. If you’re low-tech, this doesn’t apply — see growing without CO2.
- Half-strength fertilizer — new plants with damaged leaves can’t use full dosing, and the excess feeds algae. Ramp to full strength over 2–3 weeks per our fertilizer schedule.
- No disturbance — don’t move, trim, or “check on” new plants for at least two weeks. Every touch resets root establishment. This is especially critical for crypts.
Step 6: Remove melt, keep the base
As emersed leaves melt, remove the mushy material promptly — decaying leaves release ammonia and grow fungus that can spread to healthy tissue. But never discard the plant while the crown, rhizome, or roots are firm and alive. A crypt that’s lost every leaf but has firm roots is a plant that’s about to recover, not a dead plant. Give it 3–4 weeks before judging.
Telling Normal Melt From Real Problems
Normal transition melt:
- Affects oldest/emersed leaves first, newest growth last
- New submersed leaves emerge even as old ones dissolve
- Roots and crown stay firm and white/green
- Timeline: 1–4 weeks, then obvious new growth
Concerning melt (see our full melting diagnosis guide):
- New growth also melts or emerges deformed
- Rhizome or crown turns mushy and brown — this is rot, not transition
- Entire plant dissolves within days with no new growth after 4+ weeks
- Melting spreads to established plants that weren’t recently moved
Buying Tips to Minimize Melt
- Buy submersed-grown when available — hobbyist-grown cuttings transition with almost no melt.
- Choose tissue culture for sensitive species — crypts and delicate stems establish far more reliably from sterile cups.
- Avoid plants already melting in the store tank — some melt is normal, but a plant that’s mostly mush at purchase has less energy for recovery.
- Transport carefully — keep plants damp and out of direct sun/heat. A plant that dries out or cooks in a hot car melts far worse than one transported properly.
The First-Month Timeline: What to Expect Week by Week
Knowing what’s normal when removes most acclimation anxiety. Here’s the typical timeline for a healthy plant adapting to a new tank:
Week 1: The quiet week
Almost nothing visible happens. The plant is growing roots you can’t see and assessing its new environment. Some species (vallisneria, stem plants) may start shedding their lowest leaves. This is normal. Resist the urge to “help” — no moving, no extra fertilizer, no light changes. The most common beginner mistake is intervening during a week when the correct action is nothing.
Week 2: Melt peaks
This is when emersed leaves give up in earnest. Crypts may drop everything; swords shed their broad aerial leaves; stem plants lose lower foliage. It looks catastrophic and it’s usually fine. Keep removing mushy material, keep conditions stable, and watch the crown and growing tips — if those are firm and green, recovery is already underway.
Week 3: The turn
New submersed-adapted leaves emerge — smaller, thinner, often a slightly different shade of green than the emersed foliage. Stem plant tips start growing visibly; crypts push tiny curled leaves from the crown; swords unfurl narrow ribbon leaves. This is the moment most beginners exhale for the first time.
Week 4+: Established
New growth outpaces melt, and the plant is functionally yours. You can resume full-strength fertilizer, normal trimming, and stop treating it as fragile. Some slow growers (anubias, bucephalandra) take 6–8 weeks to show obvious progress — that’s their normal speed, not a problem.
Acclimating Different Plant Formats
Tissue-culture cups
Sterile, pest-free, and already adapted to high-humidity (not emersed) growth — tissue cultures melt the least of any format. Rinse the agar gel off gently (leftover gel rots and feeds fungus), split the portion into small plantlets, and plant per our planting guide. They establish slowly for the first two weeks, then accelerate. No dip needed, minimal acclimation stress — this is the premium experience you’re paying for.
Potted plants
Remove the pot and strip away the rockwool completely — leftover rockwool traps debris and rots. Tease the root mass apart gently; if it’s a dense mat, splitting it into 2–3 smaller portions actually establishes faster than planting one big clump (more growing points, better water flow around roots). Potted plants are usually emersed-grown, so expect the standard 2–4 week melt cycle.
Bare-root / bunched stems
Typically sold as weighted bunches. Remove any bands, foam, or weights, strip the lower leaves, and plant stems individually or in small groups. Bunched stems from the store are often already transitioning — check for new submersed growth at the tips, which tells you the plant is mid-adaptation and will settle quickly.
Hobbyist cuttings
Already submersed-grown and the fastest to establish — often showing new growth within days. The main acclimation factor is water-parameter difference between the two tanks. Float to temperature-match, plant promptly, and they’ll usually take off with minimal melt. This is why experienced hobbyists prefer trading cuttings over buying potted plants.
Frequently Asked Questions
Should I use a “plant starter” or transplant fertilizer?
Products marketed for transplant shock are mostly B-vitamins and mild hormones. They don’t hurt, but there’s no strong evidence they help aquarium plants specifically. Stable conditions and patience outperform any bottle. Save the money for more plants.
My new plant melted completely — bare crown, no leaves. Is it dead?
Probably not, if the crown or rhizome is firm. Crypts and swords routinely lose 100% of their leaves and regrow from the base within a month. The test is firmness: firm and pale/green means alive; mushy and brown/black means rot. Give firm-but-leafless plants a full 4 weeks before declaring them dead.
Can I speed up acclimation with extra light or CO2?
No — and trying usually backfires. A melting plant can’t use extra light; the excess just grows algae on its dying leaves. Keep light moderate and CO2 stable (not boosted) during acclimation. Growth speed comes from the plant’s own adaptation timeline, which you can’t rush, only avoid delaying.
Should new plants go straight into my main display tank?
After quarantine/dipping, yes — there’s no benefit to a separate “growing-in” tank for most plants. They acclimate to your water fastest in the tank they’ll live in. The exception is very delicate species going into a tank with boisterous fish; give those a few weeks in a calm corner or breeder box first.
The Patience Rule
The single most important acclimation skill is restraint: plant it right, set gentle conditions, remove decay, and then leave it alone for a month. The hobbyists with the best plant growth aren’t doing something clever in week one — they’re simply not interfering in weeks two through four while the plants do what they’ve evolved to do. Melt looks like failure and feels like failure, but in most cases it’s the visible part of a plant successfully becoming yours.