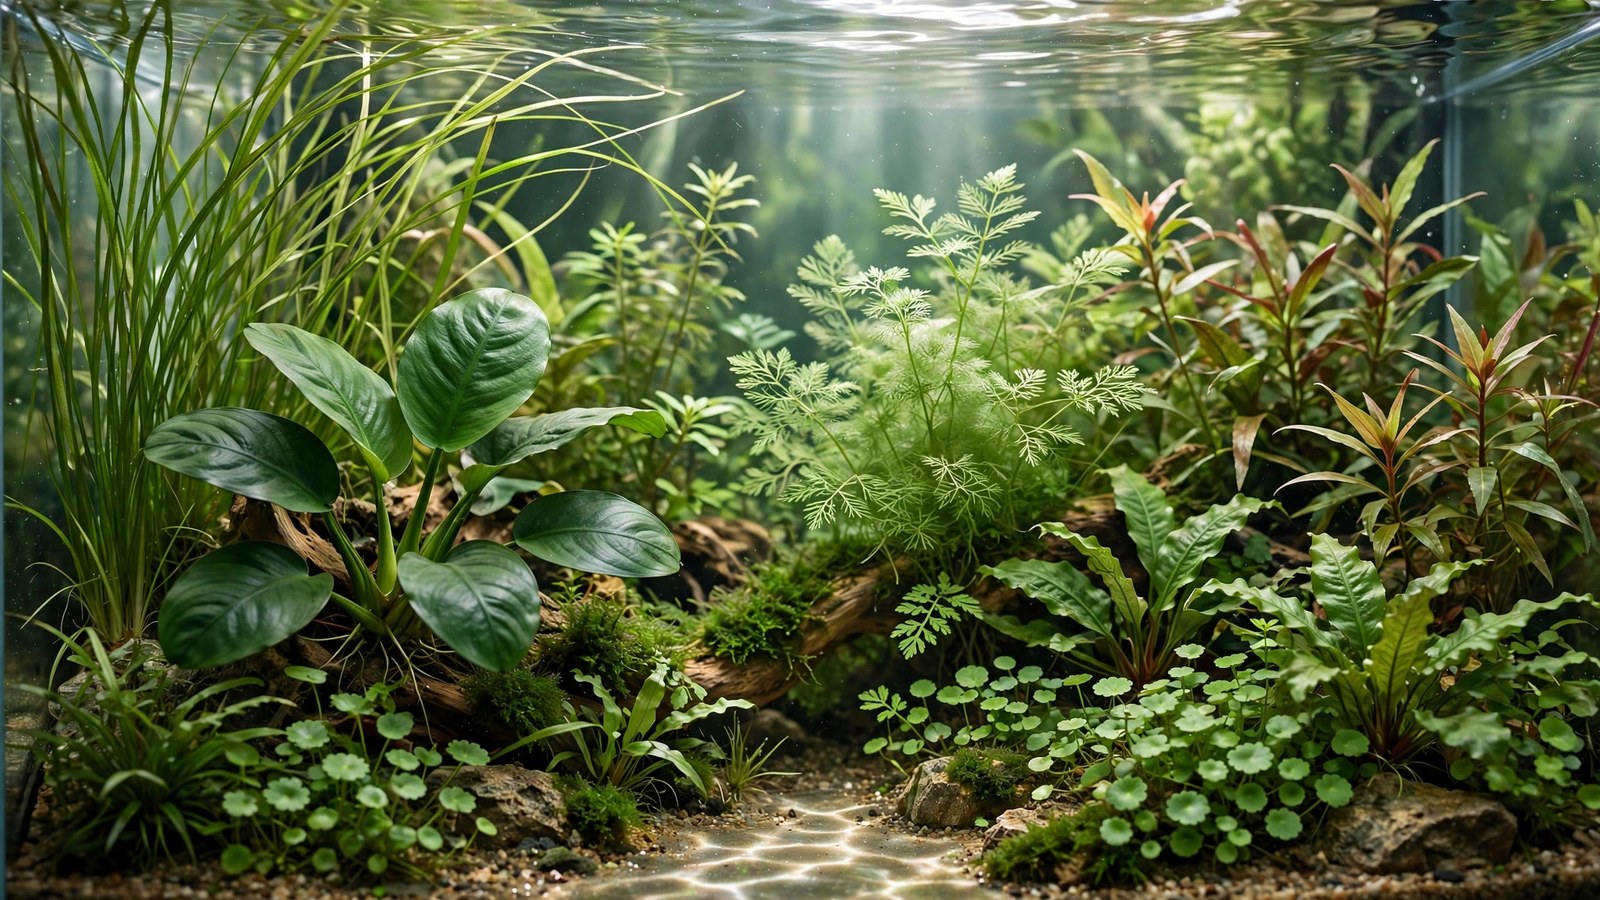
Two layouts can use identical colors and still feel completely different — the difference is texture. Texture contrast in aquascaping is the deliberate pairing of different leaf shapes, sizes, and surface qualities: feathery against broad, fine against bold, delicate against architectural. It's the reason a tank of ten green species can look rich instead of monotonous, and it's the skill that separates lush from merely green. While color theory gets the eye's attention, texture is what keeps it exploring.
The Texture Vocabulary: Leaf Shapes
Think of plant textures in four families:
- Fine/feathery: Myriophyllum, Cabomba, Limnophila sessiliflora, Rotala wallichii, mosses — thousands of tiny leaflets creating soft, cloud-like masses. Reads as delicate, airy, distant.
- Grassy/linear: Vallisneria, Eleocharis (hairgrass), Cyperus helferi, Blyxa — vertical lines and blades. Reads as meadow, movement, elegance.
- Broad/round: Anubias, Echinodorus (swords), Nymphaea (lotus), Lobelia cardinalis — big solid leaves. Reads as bold, architectural, near.
- Lacy/pinnate: Bolbitis heudelotii, java fern 'Trident', Hygrophila pinnatifida — divided, fern-like fronds. Reads as forest, complexity, midground richness.
- Mounding/cushion: Hemianthus callitrichoides, Monte Carlo, Staurogyne repens, Cryptocoryne parva — dense low domes. Reads as ground, foundation, calm.
The rule: adjacent plant groups should come from different families. Feathery Rotala next to broad Anubias: contrast. Feathery Rotala next to feathery Myriophyllum: mush — the eye can't tell where one ends and the other begins, so both lose definition.
Contrast Pairings That Always Work
- Bold + fine (the classic): broad Anubias or swords against feathery stems or moss — the single most reliable contrast in the hobby. The bold leaves anchor; the fine texture softens. Use it at every hardscape junction: bold epiphytes on wood, fine moss around them.
- Linear + mounding: hairgrass or Vallisneria rising behind a Monte Carlo or HC Cuba carpet — vertical lines against the horizontal cushion. The meadow-and-reeds pairing; gorgeous and natural.
- Lacy + solid: Bolbitis or Trident fern against smooth stone or broad crypt leaves — the fern's complexity pops against simplicity. This is the Nature Aquarium forest-understory formula.
- Fine + fine (with a gap): two feathery species can coexist if separated by a contrasting band — Rotala wallichii | Staurogyne mound | Myriophyllum. The cushion between them gives each feathery mass its own frame.
- Scale contrast within families: large-leaf Anubias barteri next to tiny Anubias 'Petite' — same genus, wildly different scale. The size difference is the contrast; sophisticated and subtle.
Texture and Depth: Size as Distance
Texture does perspective work. Fine textures recede; bold textures advance — the same principle as warm/cool color, applied to leaf size:
- Background: fine and medium textures (feathery stems, small-leaf masses) — they read as distant foliage, like trees seen from afar.
- Midground: medium-bold (crypts, mid-size Anubias, lacy ferns) — the middle distance.
- Foreground: bold small (Anubias 'Petite', Bucephalandra) or fine carpet — interesting up close, where the viewer actually inspects.
Reversing this (bold swords in back, fine moss in front) flattens the tank — big leaves far away confuse the eye's distance cues. There's an exception: a single bold background specimen (a red tiger lotus, a giant sword) as a deliberate focal anchor — but it's the exception, used once, not a pattern.
Leaf-size gradation amplifies depth: plant the same genus in decreasing sizes toward the back (large crypts front-mid, small crypts back) and the eye reads it as atmospheric perspective — identical to how landscape painters shrink detail with distance.
Texture on Hardscape: The Third Material
Hardscape has texture too, and it participates in the contrast system:
- Rough stone + soft moss: craggy dragon stone softened by moss in its pits — the signature pairing. The stone's harshness makes the moss look lusher; the moss's softness makes the stone look more dramatic. Each improves the other.
- Smooth stone + feathery plants: sleek Seiryu against fine Rotala — refined, architectural contrast.
- Bark-textured wood + broad leaves: rough manzanita bark against smooth Anubias — tactile contrast that photographs beautifully in close-up.
- Sand (fine) + carpet (dense): the foreground's own texture dialogue — smooth open sand against the nubby carpet. Keep the boundary crisp; a ragged sand-carpet edge looks accidental.
When attaching epiphytes (see driftwood and rock guides), match the plant's texture to the hardscape's character: delicate moss and 'Petite' anubias on intricate wood; bold barteri on massive stone. Delicate plants on massive stone look lost; bold plants on twiggy wood look clumsy.
Building a Texture Plan
Before buying plants, assign textures:
- List your planned species and tag each with its texture family (fine, grassy, broad, lacy, mounding).
- Check adjacency: every pair of neighboring groups should differ in family. Rearrange the planting plan until they do.
- Check the ratio: aim for at least 3 texture families in any layout; 4–5 in larger tanks. Two families can work in strict minimalism (one-rock layouts often use just mounding + one accent).
- Check depth logic: fine toward the back, bold toward the front (with the focal-anchor exception).
- Leave one surprise: a single unexpected texture — feathery tuft among broad leaves, one grass blade cluster in a moss field — creates the "discovery" moments that make layouts memorable. Just one; surprises are spices.
Texture Mistakes
- The green smoothie: six fine-textured stem species together — individually pretty, collectively mush. The most common texture failure.
- Bold overload: swords + big anubias + lotus + large crypts — a tank of dinner plates. Bold needs fine neighbors.
- Texture without color discipline: perfect texture contrast in clashing colors still fails — texture and color must be planned together, not separately.
- Ignoring the carpet: the carpet is 30%+ of the visible layout — its texture (fine HC Cuba vs. grassy hairgrass vs. clover Marsilea) sets the foreground's entire character. Choose it as deliberately as any midground specimen.
- Static texture: textures change as plants grow — fine stems get leggy, mosses mat down. Trimming isn't just shaping; it's texture maintenance. A neglected fine texture becomes a stringy mess that contrasts with nothing.
Texture Through the Seasons
A layout's texture changes as it matures — and the wise aquascaper plans for it. Freshly planted fine stems look delicate; three months later they're dense bushes with a coarser presence. Moss starts as a soft haze and becomes a matted mass. Anticipate the mature texture, not the planting-day texture: choose species whose grown-in forms contrast, and schedule thinning before textures converge into uniformity. Photograph the layout monthly and compare — when two neighboring groups start looking like one, it's thinning time, not rescape time. The best texture contrast is maintained, not planted.
Frequently Asked Questions
Can I have too much texture contrast?
Yes — every group screaming a different texture creates visual chaos, the textural equivalent of rainbow planting. The fix is the same as color's 80/15/5: a dominant texture (usually the carpet + main stem masses), a secondary, and accents. Contrast between neighbors, harmony across the whole.
What's the easiest texture upgrade for an existing tank?
Add one bold epiphyte cluster (Anubias 'Petite' or Bucephalandra) to your hardscape if the tank is all fine stems, or one feathery stem group behind a tank of bold plants. Single well-placed contrasts transform layouts — you don't need to rescape, just introduce the missing family. See our rescape guide for surgical additions.
Do red plants count as texture or color?
Both — and that's why they're powerful. A red Rotala bunch contributes feathery texture and warm color simultaneously. When planning, account for both roles: the red group is your accent color and a fine-texture mass, so its neighbors should be broad/green for double contrast.
How does texture work in Dutch layouts?
Dutch style is built on texture contrast — the "streets" separate groups precisely so each texture reads distinctly. Our Dutch guide covers the formal structure; the texture rule there is even stricter: adjacent streets must contrast in leaf shape, full stop. It's the style where texture planning is most explicit.
Should hardscape texture match or contrast plant texture?
Contrast, generally — rough stone with soft plants, smooth wood with feathery moss. Matching (rough stone + coarse plants) doubles down on harshness; contrasting balances. The exception is deliberate theme-building: an all-delicate layout (smooth stone, fine plants, soft moss) can be exquisitely refined — but it's a conscious choice, not an accident.
Does texture matter in low-tech tanks?
Even more — low-tech layouts can't rely on vivid red colors (which need high light), so texture carries the visual interest. A low-tech tank with five green textures (moss, fern, anubias, crypt, hairgrass) looks rich; one with five similar fine stems looks flat. See our low-tech jungle guide for texture-first plant lists.
Touch With Your Eyes
Texture is the dimension of aquascaping you feel rather than see — the feathery softness, the architectural boldness, the meadow's sway. Plan it as deliberately as color: tag every species by family, contrast every adjacency, graduate sizes with depth, and let hardscape join the dialogue. Combined with color discipline, texture contrast is what makes a layout of "just green plants" hold a viewer's gaze for minutes instead of seconds — and holding the gaze is the whole game. Photograph your textures in close-up with our photography guide; macro shots of contrasting leaves are among the hobby's most beautiful images.
Tissue-culture plants are the exception — they’re grown in sterile gel and adapt with minimal melting, which is part of what you’re paying for. Plants bought submersed from another hobbyist’s tank also transition with little melt, since they’re already in the right form.
Which Plants Melt Most (and Least)
Heavy melters (expect significant leaf loss)
- Cryptocorynes — infamous for “crypt melt,” sometimes dropping every leaf after any disturbance. They almost always recover from the roots within weeks.
- Stem plants grown emersed — rotala, ludwigia, and hygrophila often shed lower emersed leaves while the growing tips transition.
- Amazon swords — emersed-grown swords typically lose their broad oval aerial leaves and replace them with longer submersed ribbon leaves.
Light melters
- Anubias, java fern, bucephalandra — slow-growing rhizome plants transition gradually; occasional old-leaf melt but rarely dramatic.
- Vallisneria — usually transitions well, though it dislikes the move itself and may sulk for a week.
- Floating plants — minimal melt since their leaves were already at the air-water interface.
The Acclimation Protocol
Step 1: Quarantine or dip first
Before acclimating to your tank’s conditions, make sure you’re not acclimating pests along with the plant. Run new arrivals through our quarantine and dip protocol — it adds days upfront but prevents months of regret.
Step 2: Float to temperature-match (30 minutes)
Float the bag or container in your tank for 20–30 minutes to equalize temperature. Plants are less temperature-sensitive than fish, but a 10°F shock on top of transplant stress is an avoidable insult.
Step 3: Trim before planting
Remove any leaves that are already damaged, yellowing, or heavily algae-covered — they won’t recover and they’ll rot in your tank, feeding algae. For stem plants, trim off the bottom inch and any emersed leaves that look unlikely to adapt; the plant wastes energy maintaining leaves it’s going to shed anyway. Keep the healthy growing tips — that’s where recovery starts.
Step 4: Plant correctly the first time
Follow our planting guide — right depth, crown exposed on rosettes, rhizomes unburied on epiphytes. Every uprooting and replanting restarts the acclimation clock, so get placement right on the first attempt. Decide where each plant goes before it goes in the water.
Step 5: Run a gentle first week
For the first 7 days after planting:
- Moderate light — run your normal photoperiod but consider dropping intensity 20–30% if your light is dimmable. Blast-level light on a melting plant grows algae on the dying leaves, not recovery.
- Stable CO2 — if you inject CO2, keep it consistent. Fluctuating CO2 during acclimation is a melt accelerator. If you’re low-tech, this doesn’t apply — see growing without CO2.
- Half-strength fertilizer — new plants with damaged leaves can’t use full dosing, and the excess feeds algae. Ramp to full strength over 2–3 weeks per our fertilizer schedule.
- No disturbance — don’t move, trim, or “check on” new plants for at least two weeks. Every touch resets root establishment. This is especially critical for crypts.
Step 6: Remove melt, keep the base
As emersed leaves melt, remove the mushy material promptly — decaying leaves release ammonia and grow fungus that can spread to healthy tissue. But never discard the plant while the crown, rhizome, or roots are firm and alive. A crypt that’s lost every leaf but has firm roots is a plant that’s about to recover, not a dead plant. Give it 3–4 weeks before judging.
Telling Normal Melt From Real Problems
Normal transition melt:
- Affects oldest/emersed leaves first, newest growth last
- New submersed leaves emerge even as old ones dissolve
- Roots and crown stay firm and white/green
- Timeline: 1–4 weeks, then obvious new growth
Concerning melt (see our full melting diagnosis guide):
- New growth also melts or emerges deformed
- Rhizome or crown turns mushy and brown — this is rot, not transition
- Entire plant dissolves within days with no new growth after 4+ weeks
- Melting spreads to established plants that weren’t recently moved
Buying Tips to Minimize Melt
- Buy submersed-grown when available — hobbyist-grown cuttings transition with almost no melt.
- Choose tissue culture for sensitive species — crypts and delicate stems establish far more reliably from sterile cups.
- Avoid plants already melting in the store tank — some melt is normal, but a plant that’s mostly mush at purchase has less energy for recovery.
- Transport carefully — keep plants damp and out of direct sun/heat. A plant that dries out or cooks in a hot car melts far worse than one transported properly.
The First-Month Timeline: What to Expect Week by Week
Knowing what’s normal when removes most acclimation anxiety. Here’s the typical timeline for a healthy plant adapting to a new tank:
Week 1: The quiet week
Almost nothing visible happens. The plant is growing roots you can’t see and assessing its new environment. Some species (vallisneria, stem plants) may start shedding their lowest leaves. This is normal. Resist the urge to “help” — no moving, no extra fertilizer, no light changes. The most common beginner mistake is intervening during a week when the correct action is nothing.
Week 2: Melt peaks
This is when emersed leaves give up in earnest. Crypts may drop everything; swords shed their broad aerial leaves; stem plants lose lower foliage. It looks catastrophic and it’s usually fine. Keep removing mushy material, keep conditions stable, and watch the crown and growing tips — if those are firm and green, recovery is already underway.
Week 3: The turn
New submersed-adapted leaves emerge — smaller, thinner, often a slightly different shade of green than the emersed foliage. Stem plant tips start growing visibly; crypts push tiny curled leaves from the crown; swords unfurl narrow ribbon leaves. This is the moment most beginners exhale for the first time.
Week 4+: Established
New growth outpaces melt, and the plant is functionally yours. You can resume full-strength fertilizer, normal trimming, and stop treating it as fragile. Some slow growers (anubias, bucephalandra) take 6–8 weeks to show obvious progress — that’s their normal speed, not a problem.
Acclimating Different Plant Formats
Tissue-culture cups
Sterile, pest-free, and already adapted to high-humidity (not emersed) growth — tissue cultures melt the least of any format. Rinse the agar gel off gently (leftover gel rots and feeds fungus), split the portion into small plantlets, and plant per our planting guide. They establish slowly for the first two weeks, then accelerate. No dip needed, minimal acclimation stress — this is the premium experience you’re paying for.
Potted plants
Remove the pot and strip away the rockwool completely — leftover rockwool traps debris and rots. Tease the root mass apart gently; if it’s a dense mat, splitting it into 2–3 smaller portions actually establishes faster than planting one big clump (more growing points, better water flow around roots). Potted plants are usually emersed-grown, so expect the standard 2–4 week melt cycle.
Bare-root / bunched stems
Typically sold as weighted bunches. Remove any bands, foam, or weights, strip the lower leaves, and plant stems individually or in small groups. Bunched stems from the store are often already transitioning — check for new submersed growth at the tips, which tells you the plant is mid-adaptation and will settle quickly.
Hobbyist cuttings
Already submersed-grown and the fastest to establish — often showing new growth within days. The main acclimation factor is water-parameter difference between the two tanks. Float to temperature-match, plant promptly, and they’ll usually take off with minimal melt. This is why experienced hobbyists prefer trading cuttings over buying potted plants.
Frequently Asked Questions
Should I use a “plant starter” or transplant fertilizer?
Products marketed for transplant shock are mostly B-vitamins and mild hormones. They don’t hurt, but there’s no strong evidence they help aquarium plants specifically. Stable conditions and patience outperform any bottle. Save the money for more plants.
My new plant melted completely — bare crown, no leaves. Is it dead?
Probably not, if the crown or rhizome is firm. Crypts and swords routinely lose 100% of their leaves and regrow from the base within a month. The test is firmness: firm and pale/green means alive; mushy and brown/black means rot. Give firm-but-leafless plants a full 4 weeks before declaring them dead.
Can I speed up acclimation with extra light or CO2?
No — and trying usually backfires. A melting plant can’t use extra light; the excess just grows algae on its dying leaves. Keep light moderate and CO2 stable (not boosted) during acclimation. Growth speed comes from the plant’s own adaptation timeline, which you can’t rush, only avoid delaying.
Should new plants go straight into my main display tank?
After quarantine/dipping, yes — there’s no benefit to a separate “growing-in” tank for most plants. They acclimate to your water fastest in the tank they’ll live in. The exception is very delicate species going into a tank with boisterous fish; give those a few weeks in a calm corner or breeder box first.
The Patience Rule
The single most important acclimation skill is restraint: plant it right, set gentle conditions, remove decay, and then leave it alone for a month. The hobbyists with the best plant growth aren’t doing something clever in week one — they’re simply not interfering in weeks two through four while the plants do what they’ve evolved to do. Melt looks like failure and feels like failure, but in most cases it’s the visible part of a plant successfully becoming yours.