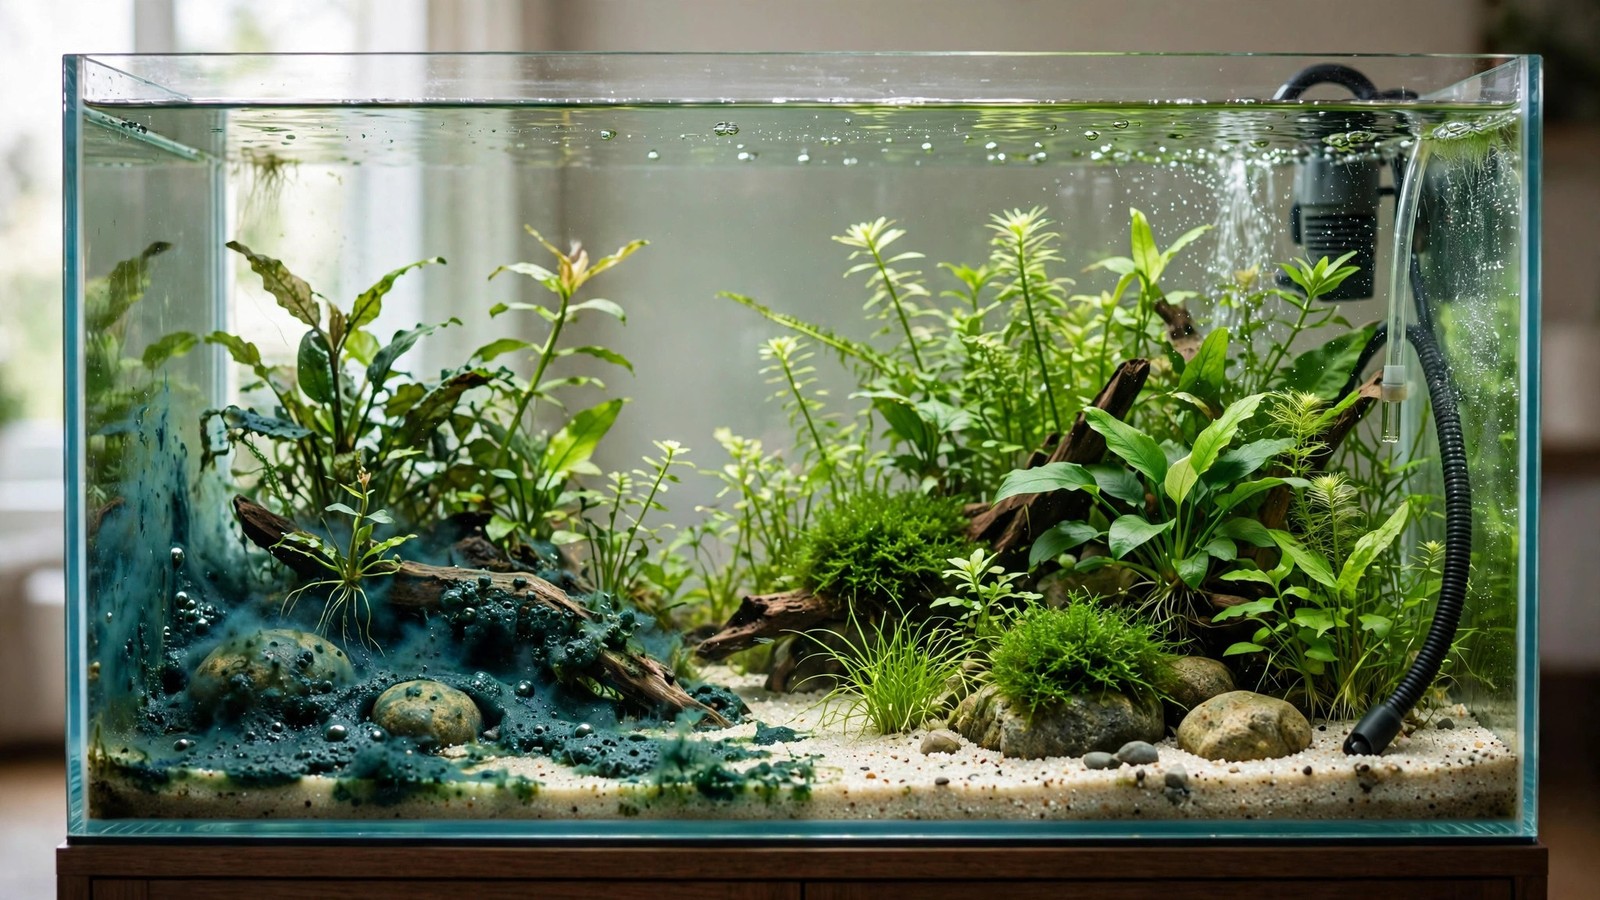
A slimy blue-green sheet is creeping across your substrate, climbing plant leaves, and smelling faintly like a swamp. This isn't algae at all — it's cyanobacteria, ancient photosynthetic bacteria masquerading as algae, and it plays by bacterial rules. That changes the treatment completely: what works on true algae often fails on cyano, and what kills cyano (antibiotics) would be absurd against algae. Identify it correctly, treat it as bacteria, fix the low-flow and organic conditions it exploits, and it leaves.
Identifying Cyanobacteria: The Three Tests
Test 1: Appearance
Cyano forms flat, slimy sheets or mats in blue-green, dark green, or sometimes reddish-brown. It spreads across substrate like a carpet, climbs glass in sheets, and coats plant leaves in a slimy film. Early colonies look like dark smudges; mature mats develop visible texture and may trap oxygen bubbles underneath (photosynthesis bubbles caught in the slime).
Test 2: The smell
Peel up a patch and sniff it. Cyanobacteria smells distinctly swampy, musty, or earthy — unmistakable once you've smelled it. No true aquarium algae smells like this. If it stinks like a pond, it's cyano.
Test 3: The peel
Cyano mats peel off in sheets, like wet tissue paper lifting off a surface. True algae smears, crumbles, or resists; cyano lifts as a coherent slimy layer. If it peels, it's bacterial.
Rule out: diatoms (brown dust, no sheets, no smell — see our diatom guide), green dust algae (thin film on glass, no mats, no smell — our GDA guide), and green spot algae (hard spots, not slime).
Why Cyanobacteria Appears: The Cause Map
Low flow / dead spots (the primary trigger)
Cyano thrives where water barely moves — behind hardscape, in carpet corners, along the front glass where the filter current doesn't reach. Stagnant micro-zones let it establish undisturbed. Tanks with a single gentle filter and dense hardscape are classic victims. If your cyano is always in the same still areas, flow is your problem.
Excess dissolved organics
Overfeeding, decaying plant matter, detritus-choked substrate, infrequent water changes — cyano feeds on dissolved organic waste more directly than true algae does. Neglected tanks get cyano; well-maintained tanks rarely do.
Low nitrates (the paradox)
Counterintuitively, cyano often blooms when nitrates read zero. Many cyanobacteria species fix atmospheric nitrogen, so they thrive precisely where true algae and plants starve for nitrogen. The ultra-lean, "clean" tank with undetectable nitrates is paradoxically vulnerable. If your nitrates are zero and cyano appears, the fix includes adding nitrogen — see our nitrogen deficiency guide.
Old or depleted substrate
Exhausted aquasoil or compacted, anaerobic substrate pockets release the organic compounds cyano loves. Deep, never-vacuumed gravel beds are reservoirs.
New tanks
Cycling and recently cycled tanks get cyano during the instability window — fluctuating bacteria, unsettled plants, immature flow patterns. Usually self-resolving as the tank matures, provided maintenance is consistent.
Treatment Protocol: Phase by Phase
Phase 1 — Manual removal (immediate)
- Peel and siphon every visible mat. Use the siphon to lift sheets — they come up easily. Do this before any chemical step; dead cyano rotting in the tank feeds the next wave.
- Gravel-vacuum the substrate thoroughly, especially under and around where mats grew. You're removing the organic reservoir.
- Trim smothered leaves — leaves coated in cyano slime rarely recover; remove them to export the biomass.
- Repeat every 2–3 days. Cyano regrows fast; stay ahead of it.
Phase 2 — Fix flow and organics (week 1)
- Eliminate dead spots: reposition the filter outlet, add a small circulation pump, or rearrange hardscape that's blocking flow. Every square centimeter should see gentle water movement.
- Deep-clean gently: vacuum detritus, rinse mechanical filter media in old tank water, remove decaying plant matter. Don't sterilize the biofilter — just remove the organic load.
- Increase water changes to 40–50% weekly during treatment. Dilution is your friend.
- Feed less: what fish eat in 60 seconds, once daily, until cyano is gone.
Phase 3 — Correct nitrates (week 1)
- Test nitrates. If zero (or near-zero) in a planted tank, dose nitrogen to maintain 5–10 ppm. This single step resolves a surprising number of cyano cases — you're removing its nitrogen-fixing advantage.
- Maintain complete fertilization otherwise; starving the tank helps nothing.
Phase 4 — Blackout (if phases 1–3 stall after 2 weeks)
A 3-day total blackout (tank fully covered, zero light) kills cyano effectively — bacteria have minimal energy reserves compared to plants. Keep filter and heater running, add an air stone, don't feed. After uncovering, do a large water change and siphon the dead mats. Plants tolerate 3 days of darkness well.
Phase 5 — Antibiotics (last resort)
Erythromycin kills cyanobacteria reliably because — remember — it's bacteria. But it's the nuclear option:
- It can harm your biofilter — the nitrifying bacteria are bacteria too. Dose precisely, monitor ammonia daily for two weeks after.
- It contributes to antibiotic resistance — a genuine ecological concern, not just hobbyist hand-wringing.
- It treats the symptom; cyano returns if flow, organics, and nitrates aren't fixed.
- Use only after manual + flow + nitrate correction + blackout have all failed, and only with a plan to fix the underlying causes simultaneously.
Hydrogen peroxide spot-treatment has limited effect on cyano — it damages surface mats but rarely penetrates to the base layer. Manual removal plus cause-correction outperforms chemicals here. And if your tank is fighting multiple issues at once — say cyano mats plus the leaf damage described in our plants dying after water changes guide — fix water quality first; everything else gets easier with clean, stable water.
Cyanobacteria and Livestock Safety
Some cyanobacteria species produce cyanotoxins harmful to fish, shrimp, and even humans in sufficient concentration. In aquariums, severe, long-standing mats have been linked to livestock stress and unexplained deaths. Practical guidance:
- Don't let mats grow unchecked for weeks — remove them.
- If fish show distress (gasping, lethargy) coinciding with a heavy bloom, prioritize removal and water changes.
- Wash hands after handling mats. Don't ingest tank water during a bloom (good advice generally).
- The risk in typical hobby tanks is low, but it's real enough to treat cyano promptly rather than tolerating it.
Prevention: The Cyano-Proof Tank
- Flow everywhere — the single best prevention. No dead spots, no cyano footholds.
- Keep nitrates detectable — 5–20 ppm in planted tanks. Zero nitrates invite nitrogen-fixers.
- Regular detritus removal — vacuum visible waste, trim decaying leaves, don't let organics accumulate.
- Consistent water changes — 30% weekly, without fail. Skipped maintenance is the most common cyano invitation.
- Don't over-clean the biofilter — a crashed bacterial colony creates the instability cyano exploits. Rinse media gently, never replace it all at once.
Cyanobacteria in Shrimp Tanks
Shrimp tanks deserve special caution with cyano. Shrimp graze biofilm constantly, and they'll graze cyanobacteria mats too — ingesting whatever cyanotoxins the colony produces. While most hobby cyano strains are mildly toxic at worst, unexplained shrimp deaths coinciding with a heavy bloom should make you suspect the mats, not just water parameters.
Treatment adjustments for shrimp tanks: manual removal and flow fixes are unchanged and completely shrimp-safe. Blackouts are safe (shrimp handle darkness fine for three days). But be extra conservative with any chemical step — shrimp are far more sensitive to erythromycin's biofilter side effects than fish are, because even a minor ammonia spike is lethal to them. If you must use antibiotics in a shrimp tank, have a cycled quarantine container ready as a livestock refuge during treatment and recovery. In practice, shrimp keepers clear cyano with flow, vacuuming, and nitrate correction alone in the vast majority of cases — the nuclear option is rarely needed.
Frequently Asked Questions
Is blue-green algae actually algae?
No — cyanobacteria are photosynthetic bacteria, among Earth's oldest life forms. The misnomer stuck because they look and behave like algae in the aquarium. The distinction matters practically: algaecides target algae biochemistry and often fail on cyano, while antibacterial approaches (erythromycin) work on cyano but would be pointless against true algae. Identify first, then treat accordingly.
Will cyanobacteria kill my aquarium plants?
It smothers rather than poisons. Mats block light from leaves and trap detritus against them, causing the covered foliage to melt — which releases organics that feed more cyano. Remove mats promptly and trim smothered leaves; healthy uncovered growth recovers quickly. Long-ignored cyano can defoliate slow growers like anubias, so don't wait.
Why does cyanobacteria keep coming back in the same spot?
Because the conditions in that spot haven't changed — it's still a low-flow, detritus-collecting zone, possibly still at zero nitrates. Recurrence in one location is diagnostic: fix the flow to that specific area (redirect an outlet, add a nano pump, move the hardscape creating the eddy) and the cyano loses its foothold. Treating the mat without treating the spot guarantees a sequel.
Can I use a UV sterilizer against cyanobacteria?
Minimally effective. UV kills free-floating organisms, but cyano lives in attached mats — the sterilizer never touches the colony. UV helps prevent spread via waterborne cells during manual removal, but it won't clear an established mat. Spend the effort on flow, organics, and nitrates instead.
Is erythromycin safe for shrimp and snails?
Erythromycin at cyano-treatment doses is generally tolerated by shrimp and snails, but the biofilter risk threatens everything in the tank — an ammonia spike from damaged nitrifying bacteria kills shrimp faster than the antibiotic ever could. If you must use it, dose exactly, test ammonia and nitrite daily for two weeks, and have Prime or equivalent ready. And fix the underlying causes simultaneously, or you'll repeat the treatment.
Treat the Bacteria Like Bacteria
Cyanobacteria loses its mystery once you stop thinking of it as algae. It's a bacterium exploiting still water, organic waste, and zero nitrates — so you beat it with flow, cleanliness, and detectable nitrogen, backed by relentless manual removal. The keepers who clear cyano fastest aren't the ones with the strongest chemicals; they're the ones who aimed a powerhead at the dead spot and started vacuuming like they meant it.
Tissue-culture plants are the exception — they’re grown in sterile gel and adapt with minimal melting, which is part of what you’re paying for. Plants bought submersed from another hobbyist’s tank also transition with little melt, since they’re already in the right form.
Which Plants Melt Most (and Least)
Heavy melters (expect significant leaf loss)
- Cryptocorynes — infamous for “crypt melt,” sometimes dropping every leaf after any disturbance. They almost always recover from the roots within weeks.
- Stem plants grown emersed — rotala, ludwigia, and hygrophila often shed lower emersed leaves while the growing tips transition.
- Amazon swords — emersed-grown swords typically lose their broad oval aerial leaves and replace them with longer submersed ribbon leaves.
Light melters
- Anubias, java fern, bucephalandra — slow-growing rhizome plants transition gradually; occasional old-leaf melt but rarely dramatic.
- Vallisneria — usually transitions well, though it dislikes the move itself and may sulk for a week.
- Floating plants — minimal melt since their leaves were already at the air-water interface.
The Acclimation Protocol
Step 1: Quarantine or dip first
Before acclimating to your tank’s conditions, make sure you’re not acclimating pests along with the plant. Run new arrivals through our quarantine and dip protocol — it adds days upfront but prevents months of regret.
Step 2: Float to temperature-match (30 minutes)
Float the bag or container in your tank for 20–30 minutes to equalize temperature. Plants are less temperature-sensitive than fish, but a 10°F shock on top of transplant stress is an avoidable insult.
Step 3: Trim before planting
Remove any leaves that are already damaged, yellowing, or heavily algae-covered — they won’t recover and they’ll rot in your tank, feeding algae. For stem plants, trim off the bottom inch and any emersed leaves that look unlikely to adapt; the plant wastes energy maintaining leaves it’s going to shed anyway. Keep the healthy growing tips — that’s where recovery starts.
Step 4: Plant correctly the first time
Follow our planting guide — right depth, crown exposed on rosettes, rhizomes unburied on epiphytes. Every uprooting and replanting restarts the acclimation clock, so get placement right on the first attempt. Decide where each plant goes before it goes in the water.
Step 5: Run a gentle first week
For the first 7 days after planting:
- Moderate light — run your normal photoperiod but consider dropping intensity 20–30% if your light is dimmable. Blast-level light on a melting plant grows algae on the dying leaves, not recovery.
- Stable CO2 — if you inject CO2, keep it consistent. Fluctuating CO2 during acclimation is a melt accelerator. If you’re low-tech, this doesn’t apply — see growing without CO2.
- Half-strength fertilizer — new plants with damaged leaves can’t use full dosing, and the excess feeds algae. Ramp to full strength over 2–3 weeks per our fertilizer schedule.
- No disturbance — don’t move, trim, or “check on” new plants for at least two weeks. Every touch resets root establishment. This is especially critical for crypts.
Step 6: Remove melt, keep the base
As emersed leaves melt, remove the mushy material promptly — decaying leaves release ammonia and grow fungus that can spread to healthy tissue. But never discard the plant while the crown, rhizome, or roots are firm and alive. A crypt that’s lost every leaf but has firm roots is a plant that’s about to recover, not a dead plant. Give it 3–4 weeks before judging.
Telling Normal Melt From Real Problems
Normal transition melt:
- Affects oldest/emersed leaves first, newest growth last
- New submersed leaves emerge even as old ones dissolve
- Roots and crown stay firm and white/green
- Timeline: 1–4 weeks, then obvious new growth
Concerning melt (see our full melting diagnosis guide):
- New growth also melts or emerges deformed
- Rhizome or crown turns mushy and brown — this is rot, not transition
- Entire plant dissolves within days with no new growth after 4+ weeks
- Melting spreads to established plants that weren’t recently moved
Buying Tips to Minimize Melt
- Buy submersed-grown when available — hobbyist-grown cuttings transition with almost no melt.
- Choose tissue culture for sensitive species — crypts and delicate stems establish far more reliably from sterile cups.
- Avoid plants already melting in the store tank — some melt is normal, but a plant that’s mostly mush at purchase has less energy for recovery.
- Transport carefully — keep plants damp and out of direct sun/heat. A plant that dries out or cooks in a hot car melts far worse than one transported properly.
The First-Month Timeline: What to Expect Week by Week
Knowing what’s normal when removes most acclimation anxiety. Here’s the typical timeline for a healthy plant adapting to a new tank:
Week 1: The quiet week
Almost nothing visible happens. The plant is growing roots you can’t see and assessing its new environment. Some species (vallisneria, stem plants) may start shedding their lowest leaves. This is normal. Resist the urge to “help” — no moving, no extra fertilizer, no light changes. The most common beginner mistake is intervening during a week when the correct action is nothing.
Week 2: Melt peaks
This is when emersed leaves give up in earnest. Crypts may drop everything; swords shed their broad aerial leaves; stem plants lose lower foliage. It looks catastrophic and it’s usually fine. Keep removing mushy material, keep conditions stable, and watch the crown and growing tips — if those are firm and green, recovery is already underway.
Week 3: The turn
New submersed-adapted leaves emerge — smaller, thinner, often a slightly different shade of green than the emersed foliage. Stem plant tips start growing visibly; crypts push tiny curled leaves from the crown; swords unfurl narrow ribbon leaves. This is the moment most beginners exhale for the first time.
Week 4+: Established
New growth outpaces melt, and the plant is functionally yours. You can resume full-strength fertilizer, normal trimming, and stop treating it as fragile. Some slow growers (anubias, bucephalandra) take 6–8 weeks to show obvious progress — that’s their normal speed, not a problem.
Acclimating Different Plant Formats
Tissue-culture cups
Sterile, pest-free, and already adapted to high-humidity (not emersed) growth — tissue cultures melt the least of any format. Rinse the agar gel off gently (leftover gel rots and feeds fungus), split the portion into small plantlets, and plant per our planting guide. They establish slowly for the first two weeks, then accelerate. No dip needed, minimal acclimation stress — this is the premium experience you’re paying for.
Potted plants
Remove the pot and strip away the rockwool completely — leftover rockwool traps debris and rots. Tease the root mass apart gently; if it’s a dense mat, splitting it into 2–3 smaller portions actually establishes faster than planting one big clump (more growing points, better water flow around roots). Potted plants are usually emersed-grown, so expect the standard 2–4 week melt cycle.
Bare-root / bunched stems
Typically sold as weighted bunches. Remove any bands, foam, or weights, strip the lower leaves, and plant stems individually or in small groups. Bunched stems from the store are often already transitioning — check for new submersed growth at the tips, which tells you the plant is mid-adaptation and will settle quickly.
Hobbyist cuttings
Already submersed-grown and the fastest to establish — often showing new growth within days. The main acclimation factor is water-parameter difference between the two tanks. Float to temperature-match, plant promptly, and they’ll usually take off with minimal melt. This is why experienced hobbyists prefer trading cuttings over buying potted plants.
Frequently Asked Questions
Should I use a “plant starter” or transplant fertilizer?
Products marketed for transplant shock are mostly B-vitamins and mild hormones. They don’t hurt, but there’s no strong evidence they help aquarium plants specifically. Stable conditions and patience outperform any bottle. Save the money for more plants.
My new plant melted completely — bare crown, no leaves. Is it dead?
Probably not, if the crown or rhizome is firm. Crypts and swords routinely lose 100% of their leaves and regrow from the base within a month. The test is firmness: firm and pale/green means alive; mushy and brown/black means rot. Give firm-but-leafless plants a full 4 weeks before declaring them dead.
Can I speed up acclimation with extra light or CO2?
No — and trying usually backfires. A melting plant can’t use extra light; the excess just grows algae on its dying leaves. Keep light moderate and CO2 stable (not boosted) during acclimation. Growth speed comes from the plant’s own adaptation timeline, which you can’t rush, only avoid delaying.
Should new plants go straight into my main display tank?
After quarantine/dipping, yes — there’s no benefit to a separate “growing-in” tank for most plants. They acclimate to your water fastest in the tank they’ll live in. The exception is very delicate species going into a tank with boisterous fish; give those a few weeks in a calm corner or breeder box first.
The Patience Rule
The single most important acclimation skill is restraint: plant it right, set gentle conditions, remove decay, and then leave it alone for a month. The hobbyists with the best plant growth aren’t doing something clever in week one — they’re simply not interfering in weeks two through four while the plants do what they’ve evolved to do. Melt looks like failure and feels like failure, but in most cases it’s the visible part of a plant successfully becoming yours.