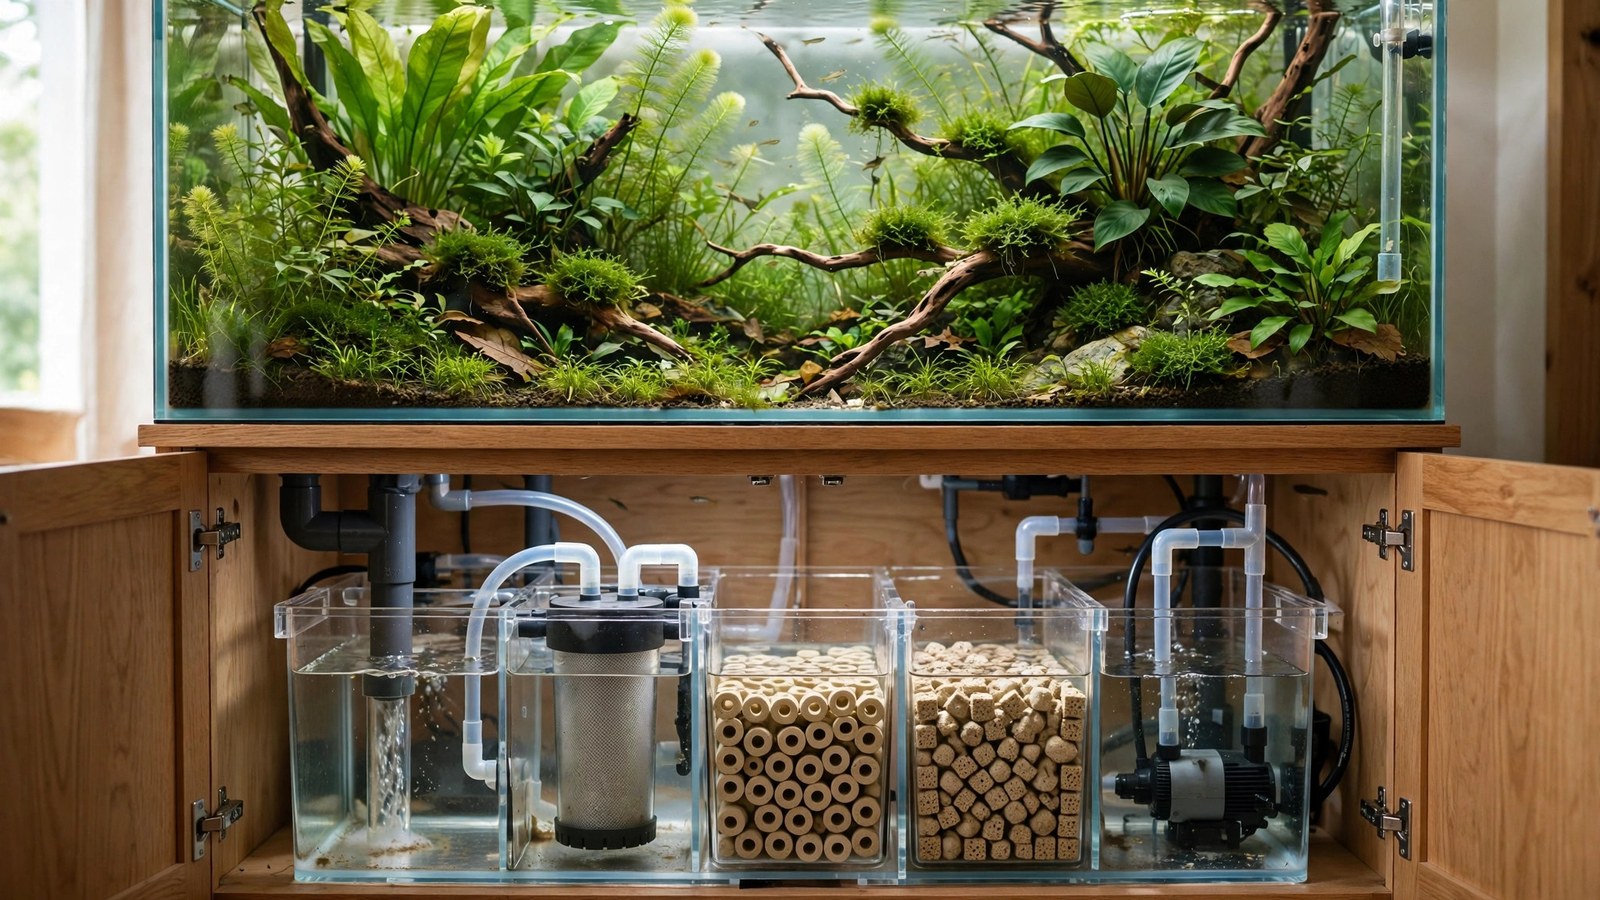
Sumps — the separate filtration tanks hidden in the cabinet below — are reef-keeping's standard and freshwater's underused secret. A planted tank with a sump gets massive filtration capacity, hidden equipment, increased water volume for stability, and a refugium zone for extra plant filtration. It's the filtration upgrade that changes what's possible: heavier stocking, cleaner water, and a display tank with nothing visible but the scape.
What a Sump Actually Does
A sump is a second tank (typically 20–40 gallons) sitting in the stand, connected to the display via an overflow and return pump. Water drains from the display into the sump, passes through filter media chambers, and gets pumped back up. The benefits for planted tanks:
- Filtration capacity: a sump holds vastly more media than any canister — mechanical, biological, and chemical stages with room to spare.
- Equipment hideout: heaters, CO2 diffusers, probes, dosing pumps all live in the sump — the display shows only plants, fish, and hardscape.
- Water volume: a 75-gallon display with a 30-gallon sump is effectively 105 gallons of stability — parameter swings flatten dramatically.
- Surface skimming: overflows pull from the surface, eliminating the protein film that plagues planted tanks.
- Refugium zone: a lit chamber growing fast plants or algae specifically for nutrient export — a second planted filter inside the filter.
- Easy maintenance: swap filter socks, dose fertilizers, and adjust equipment at standing height in the cabinet, not hunched over the display.
Is a Sump Right for Your Planted Tank?
Sumps shine at 40+ gallons — below that, a canister does the job with less complexity. Consider a sump when:
- You're running 55+ gallons and want maximum water quality (discus, large communities)
- You want all equipment hidden for a clean aquascape aesthetic
- You're running high-tech with CO2 and want precise, hidden diffusion
- You want a refugium for nutrient export or shrimp breeding
- You're tired of canister maintenance gymnastics
Skip the sump for nano tanks, simple low-tech setups, or if plumbing intimidates you — a quality canister serves smaller tanks perfectly well. Our 75-gallon build is the natural sump candidate; our 20-gallon setup doesn't need one.
Sump Design for Planted Tanks
A freshwater planted sump typically has 3–4 chambers divided by baffles:
- Inlet / mechanical chamber: water enters here — filter socks or floss pads catch particulates. Socks get swapped every few days; keep spares.
- Biological chamber: ceramic media, lava rock, or bio-balls — massive surface area for nitrifying bacteria. This chamber does the heavy lifting.
- Refugium chamber (optional but recommended): a lit section growing fast nutrient-export plants — pothos roots dangling in, guppy grass, or even a chaeto-style algae mass. A cheap grow light on a reverse daylight schedule (on when display lights are off) also stabilizes nighttime pH.
- Return chamber: houses the return pump, heaters, CO2 diffusion, and dosing lines. Keep water level stable here — it's where evaporation shows.
Size the sump at 25–40% of display volume: a 20–30 gallon sump for a 75-gallon display. Baffle heights set the operating water level; leave enough empty volume above to contain the display's drain-down when the pump stops (critical flood-prevention math — calculate it, don't guess).
Overflow and Return: The Plumbing
Getting water down: overflows
- Drilled overflow (best): holes drilled in the display (or a reef-ready tank bought pre-drilled) with bulkheads — silent, reliable, no siphon to break. If buying a new big tank for a sump, buy reef-ready.
- Hang-on-back overflow box: siphon-based; works on undrilled tanks but the siphon can break (usually from air accumulation) — use a model with a siphon-break failsafe and an aqua-lifter pump maintaining the siphon.
Getting water back up: the return pump
Size the pump for 4–6x display turnover at the actual head height (pump specs list flow at zero head; 4 feet of lift cuts it significantly — check the pump curve). Use a ball valve on the return line to tune flow. Split the return into two outlets at opposite ends of the tank for even circulation.
Flood prevention (non-negotiable)
- Siphon break: drill a small hole in the return line just below the water surface — when the pump stops, it breaks suction instead of back-siphoning the display.
- Sump capacity: the sump must hold the entire drain-down volume (display drains to the overflow's low point when the pump stops). Test by unplugging the pump before livestock goes in.
- Check valve: on the return line as backup — not as the primary defense (they fail), but as redundancy.
- ATO (auto top-off): evaporation shows in the return chamber; an ATO with a float switch keeps it stable. Highly recommended.
CO2 in a Sump System
Sumps and CO2 have a known tension: the overflow's turbulence and the sump's surface agitation off-gas CO2 faster than a sealed canister loop. Manage it:
- Inject into the return pump intake — the pump chops bubbles finely and the return line dissolves them under pressure. Most efficient sump CO2 method.
- Use a reactor on the return line — fully dissolves CO2 before it reaches the display; the gold standard for big sump systems.
- Minimize sump turbulence — calm baffle flow, submerged returns, no waterfalls inside the sump. Every splash is CO2 leaving.
- Expect higher usage — budget 30–50% more CO2 than a canister-filtered tank of the same size. Our high-tech guide covers system sizing.
The Refugium: A Plant Filter Inside the Filter
The refugium chamber is the planted tanker's secret weapon — a dedicated nutrient-export zone:
- Fast growers: guppy grass, hornwort, water sprite — harvest handfuls monthly; every harvest is nitrate permanently removed.
- Emersed plants: pothos or peace lily with roots in the refugium water — emersed growth pulls nutrients 5–10x faster than submerged. Our riparium guide covers the technique.
- Reverse lighting: refugium light on when display lights are off — the plants consume CO2 and produce oxygen at night, flattening the pH swing.
- Shrimp colony: many keepers run cherry shrimp in the refugium — they breed freely, clean the chambers, and provide a live-food/hobby backup colony. Our shrimp setup applies.
Maintenance: Easier Than Canisters
- Filter socks: swap every 3–5 days (keep a rotation of 4–6 socks; wash in bulk).
- Refugium harvest: monthly — remove fast-grower excess.
- Return chamber: top off / check ATO weekly; wipe pump intake monthly.
- Biological media: rinse annually in tank water — never replace all at once.
- Overflow teeth: clear of algae/plants weekly — a clogged overflow is a flood risk.
- Test the failsafes quarterly: unplug the pump and verify the sump contains the drain-down. Paranoia is professionalism here.
Frequently Asked Questions
Will a sump off-gas all my CO2?
It off-gasses more than a canister, but it's entirely manageable: inject into the return pump or a reactor, minimize sump turbulence, and increase the bubble rate to compensate. Thousands of high-tech planted tanks run sumps with lush growth. The CO2 cost is real (30–50% more usage) but it's a cost, not a barrier.
Can I add a sump to an existing undrilled tank?
Yes — hang-on-back overflow boxes work on undrilled tanks. Choose a quality box with siphon-failsafe design, maintain the siphon meticulously (an aqua-lifter pump prevents air-lock breaks), and size everything conservatively. Drilled is better, but HOB overflows have run reliably for decades when properly maintained.
How loud is a sump system?
A well-tuned sump is nearly silent — the display overflow gurgles only if poorly tuned (standpipes like the Durso or Herbie designs silence it), and the return pump hums inside the closed cabinet. A badly tuned sump gurgles and splashes audibly. Spend the tuning time during setup; silence is achievable and expected.
What's the minimum tank size for a sump?
Practically, 40 gallons — below that, the plumbing complexity and cabinet space outweigh the benefits versus a good canister. The sweet spot is 55–125 gallons. Nano sumps exist but they're hobbyist projects, not practical upgrades. Match the tool to the tank.
Do I still need a canister with a sump?
No — the sump is the filtration, with far more capacity than any canister. Running both is redundant unless you want the canister for a specific purpose (e.g., dedicated chemical filtration or UV). Simplify: sump handles everything, and maintenance gets easier, not harder.
Can the refugium replace water changes?
No — it reduces nitrate accumulation and stabilizes chemistry, which can stretch intervals slightly, but water changes also remove dissolved organics, hormones, and replenish minerals that no filter removes. Keep the regular water-change schedule; treat the refugium as a powerful buffer, not a replacement.
The Sump Payoff
A planted tank with a sump is the hobby's professional grade — invisible equipment, massive filtration, rock-stable water, and a refugium working as a second plant filter. It's more planning, more plumbing, and more upfront cost than a canister. But for big planted tanks, it's the filtration that finally matches the ambition of the scape above it. Plumb it carefully, test the failsafes, stock the refugium with fast growers, and enjoy the cleanest, most stable water your plants have ever had — the sump is the upgrade that keeps paying back every single week.
For the plant science that drives sump sizing decisions, see the 2Hr Aquarist aquarium plant care guides.
Tissue-culture plants are the exception — they’re grown in sterile gel and adapt with minimal melting, which is part of what you’re paying for. Plants bought submersed from another hobbyist’s tank also transition with little melt, since they’re already in the right form.
Which Plants Melt Most (and Least)
Heavy melters (expect significant leaf loss)
- Cryptocorynes — infamous for “crypt melt,” sometimes dropping every leaf after any disturbance. They almost always recover from the roots within weeks.
- Stem plants grown emersed — rotala, ludwigia, and hygrophila often shed lower emersed leaves while the growing tips transition.
- Amazon swords — emersed-grown swords typically lose their broad oval aerial leaves and replace them with longer submersed ribbon leaves.
Light melters
- Anubias, java fern, bucephalandra — slow-growing rhizome plants transition gradually; occasional old-leaf melt but rarely dramatic.
- Vallisneria — usually transitions well, though it dislikes the move itself and may sulk for a week.
- Floating plants — minimal melt since their leaves were already at the air-water interface.
The Acclimation Protocol
Step 1: Quarantine or dip first
Before acclimating to your tank’s conditions, make sure you’re not acclimating pests along with the plant. Run new arrivals through our quarantine and dip protocol — it adds days upfront but prevents months of regret.
Step 2: Float to temperature-match (30 minutes)
Float the bag or container in your tank for 20–30 minutes to equalize temperature. Plants are less temperature-sensitive than fish, but a 10°F shock on top of transplant stress is an avoidable insult.
Step 3: Trim before planting
Remove any leaves that are already damaged, yellowing, or heavily algae-covered — they won’t recover and they’ll rot in your tank, feeding algae. For stem plants, trim off the bottom inch and any emersed leaves that look unlikely to adapt; the plant wastes energy maintaining leaves it’s going to shed anyway. Keep the healthy growing tips — that’s where recovery starts.
Step 4: Plant correctly the first time
Follow our planting guide — right depth, crown exposed on rosettes, rhizomes unburied on epiphytes. Every uprooting and replanting restarts the acclimation clock, so get placement right on the first attempt. Decide where each plant goes before it goes in the water.
Step 5: Run a gentle first week
For the first 7 days after planting:
- Moderate light — run your normal photoperiod but consider dropping intensity 20–30% if your light is dimmable. Blast-level light on a melting plant grows algae on the dying leaves, not recovery.
- Stable CO2 — if you inject CO2, keep it consistent. Fluctuating CO2 during acclimation is a melt accelerator. If you’re low-tech, this doesn’t apply — see growing without CO2.
- Half-strength fertilizer — new plants with damaged leaves can’t use full dosing, and the excess feeds algae. Ramp to full strength over 2–3 weeks per our fertilizer schedule.
- No disturbance — don’t move, trim, or “check on” new plants for at least two weeks. Every touch resets root establishment. This is especially critical for crypts.
Step 6: Remove melt, keep the base
As emersed leaves melt, remove the mushy material promptly — decaying leaves release ammonia and grow fungus that can spread to healthy tissue. But never discard the plant while the crown, rhizome, or roots are firm and alive. A crypt that’s lost every leaf but has firm roots is a plant that’s about to recover, not a dead plant. Give it 3–4 weeks before judging.
Telling Normal Melt From Real Problems
Normal transition melt:
- Affects oldest/emersed leaves first, newest growth last
- New submersed leaves emerge even as old ones dissolve
- Roots and crown stay firm and white/green
- Timeline: 1–4 weeks, then obvious new growth
Concerning melt (see our full melting diagnosis guide):
- New growth also melts or emerges deformed
- Rhizome or crown turns mushy and brown — this is rot, not transition
- Entire plant dissolves within days with no new growth after 4+ weeks
- Melting spreads to established plants that weren’t recently moved
Buying Tips to Minimize Melt
- Buy submersed-grown when available — hobbyist-grown cuttings transition with almost no melt.
- Choose tissue culture for sensitive species — crypts and delicate stems establish far more reliably from sterile cups.
- Avoid plants already melting in the store tank — some melt is normal, but a plant that’s mostly mush at purchase has less energy for recovery.
- Transport carefully — keep plants damp and out of direct sun/heat. A plant that dries out or cooks in a hot car melts far worse than one transported properly.
The First-Month Timeline: What to Expect Week by Week
Knowing what’s normal when removes most acclimation anxiety. Here’s the typical timeline for a healthy plant adapting to a new tank:
Week 1: The quiet week
Almost nothing visible happens. The plant is growing roots you can’t see and assessing its new environment. Some species (vallisneria, stem plants) may start shedding their lowest leaves. This is normal. Resist the urge to “help” — no moving, no extra fertilizer, no light changes. The most common beginner mistake is intervening during a week when the correct action is nothing.
Week 2: Melt peaks
This is when emersed leaves give up in earnest. Crypts may drop everything; swords shed their broad aerial leaves; stem plants lose lower foliage. It looks catastrophic and it’s usually fine. Keep removing mushy material, keep conditions stable, and watch the crown and growing tips — if those are firm and green, recovery is already underway.
Week 3: The turn
New submersed-adapted leaves emerge — smaller, thinner, often a slightly different shade of green than the emersed foliage. Stem plant tips start growing visibly; crypts push tiny curled leaves from the crown; swords unfurl narrow ribbon leaves. This is the moment most beginners exhale for the first time.
Week 4+: Established
New growth outpaces melt, and the plant is functionally yours. You can resume full-strength fertilizer, normal trimming, and stop treating it as fragile. Some slow growers (anubias, bucephalandra) take 6–8 weeks to show obvious progress — that’s their normal speed, not a problem.
Acclimating Different Plant Formats
Tissue-culture cups
Sterile, pest-free, and already adapted to high-humidity (not emersed) growth — tissue cultures melt the least of any format. Rinse the agar gel off gently (leftover gel rots and feeds fungus), split the portion into small plantlets, and plant per our planting guide. They establish slowly for the first two weeks, then accelerate. No dip needed, minimal acclimation stress — this is the premium experience you’re paying for.
Potted plants
Remove the pot and strip away the rockwool completely — leftover rockwool traps debris and rots. Tease the root mass apart gently; if it’s a dense mat, splitting it into 2–3 smaller portions actually establishes faster than planting one big clump (more growing points, better water flow around roots). Potted plants are usually emersed-grown, so expect the standard 2–4 week melt cycle.
Bare-root / bunched stems
Typically sold as weighted bunches. Remove any bands, foam, or weights, strip the lower leaves, and plant stems individually or in small groups. Bunched stems from the store are often already transitioning — check for new submersed growth at the tips, which tells you the plant is mid-adaptation and will settle quickly.
Hobbyist cuttings
Already submersed-grown and the fastest to establish — often showing new growth within days. The main acclimation factor is water-parameter difference between the two tanks. Float to temperature-match, plant promptly, and they’ll usually take off with minimal melt. This is why experienced hobbyists prefer trading cuttings over buying potted plants.
Frequently Asked Questions
Should I use a “plant starter” or transplant fertilizer?
Products marketed for transplant shock are mostly B-vitamins and mild hormones. They don’t hurt, but there’s no strong evidence they help aquarium plants specifically. Stable conditions and patience outperform any bottle. Save the money for more plants.
My new plant melted completely — bare crown, no leaves. Is it dead?
Probably not, if the crown or rhizome is firm. Crypts and swords routinely lose 100% of their leaves and regrow from the base within a month. The test is firmness: firm and pale/green means alive; mushy and brown/black means rot. Give firm-but-leafless plants a full 4 weeks before declaring them dead.
Can I speed up acclimation with extra light or CO2?
No — and trying usually backfires. A melting plant can’t use extra light; the excess just grows algae on its dying leaves. Keep light moderate and CO2 stable (not boosted) during acclimation. Growth speed comes from the plant’s own adaptation timeline, which you can’t rush, only avoid delaying.
Should new plants go straight into my main display tank?
After quarantine/dipping, yes — there’s no benefit to a separate “growing-in” tank for most plants. They acclimate to your water fastest in the tank they’ll live in. The exception is very delicate species going into a tank with boisterous fish; give those a few weeks in a calm corner or breeder box first.
The Patience Rule
The single most important acclimation skill is restraint: plant it right, set gentle conditions, remove decay, and then leave it alone for a month. The hobbyists with the best plant growth aren’t doing something clever in week one — they’re simply not interfering in weeks two through four while the plants do what they’ve evolved to do. Melt looks like failure and feels like failure, but in most cases it’s the visible part of a plant successfully becoming yours.