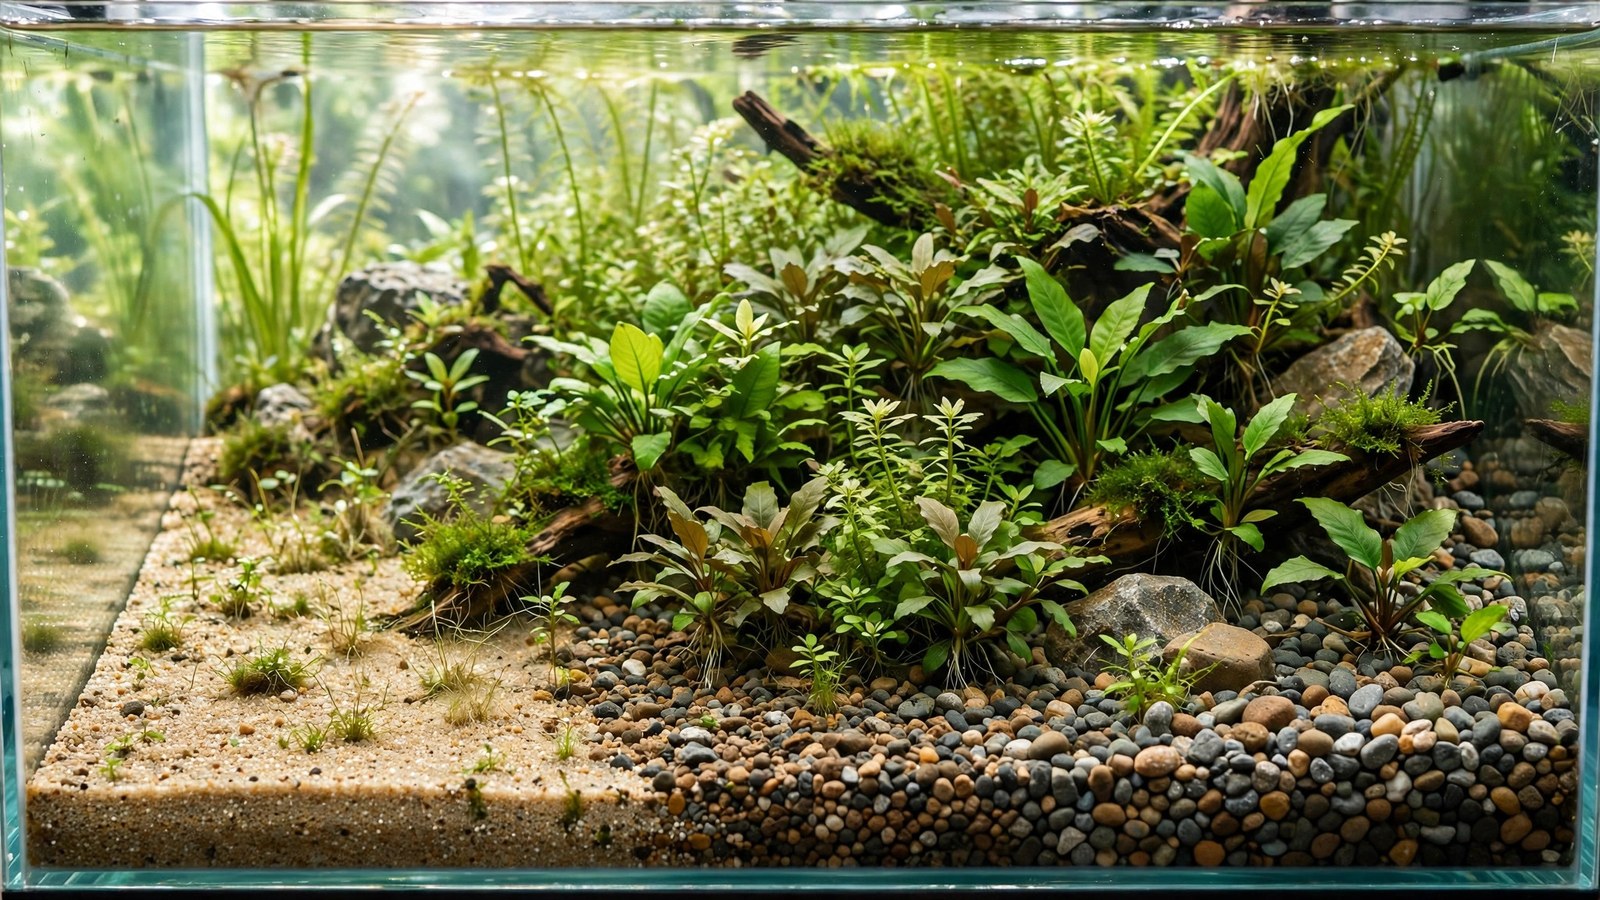
Walk into any fish store and you'll see gravel in every size from powder-fine to chunky pebbles — and most of it is sold with zero guidance about which actually works for plants. Gravel size matters more than gravel brand: too fine and the bed compacts and suffocates roots; too coarse and small plants can't anchor, detritus falls into unreachable voids, and root tabs dissolve into the gaps. This guide nails down the right gravel size for planted tanks and how to work with what you've got.
The Sweet Spot: 2–3 mm
For most planted tanks, 2–3 mm grain size is the sweet spot. Here's why it works:
- Roots penetrate easily — fine feeder roots of stem plants, carpets, and crypts thread between 2–3 mm grains without resistance.
- Water flows through the bed — oxygen reaches the root zone, preventing the anaerobic dead zones that plague finer substrates.
- Stems stay planted — grains are heavy and angular enough to grip a freshly planted stem cutting until roots establish.
- Detritus stays accessible — waste sits on top of or just inside the bed where your siphon (and Malaysian trumpet snails) can reach it, instead of vanishing into deep voids.
- Root tabs stay put — tabs pushed into 2–3 mm gravel dissolve slowly into the surrounding bed rather than washing straight through.
This is roughly the size of coarse sand edging into fine gravel — think "large couscous," not peas. If you're choosing between products, look for bags labeled 2–4 mm or "fine gravel" and check that most grains fall in the 2–3 mm band.
What Goes Wrong at the Extremes
Too fine (under 1 mm): compaction city
Powder-fine gravel and play sand pack down under their own weight, especially deeper than 2 inches. Water stops circulating, oxygen can't reach roots, and anaerobic bacteria take over — producing hydrogen sulfide (rotten-egg smell) and stunting root growth. Fine beds also cap poorly: replanting stirs up clouds of silt. If you love the look of fine substrate, keep it shallow (1.5–2 inches max) and consider our pool filter sand guide — its uniform ~0.5 mm grains resist compaction better than irregular fine gravel.
Too coarse (over 5 mm): the void problem
Chunky gravel looks natural in a river-biotope sense, but it's hostile to most aquarium plants. Small stems fall between the gaps instead of being gripped; carpeting plants can't spread across boulder fields; detritus sinks deep where no siphon reaches it, slowly rotting and spiking nitrates. Root tabs are nearly useless — they dissolve into the voids and wash away. Coarse gravel suits epiphyte-only tanks (anubias, java fern, buce tied to rock/wood) where nothing needs to root in the bed, but it's a poor choice for a real planted tank.
Gravel Size by Plant Type
| Plant type | Ideal grain size | Notes |
|---|---|---|
| Carpeting plants (HC Cuba, Monte Carlo, hairgrass) | 1–3 mm | Fine enough for tiny roots and runners to grip; needs CO2 more than specific gravel |
| Stem plants | 2–4 mm | Needs enough weight to hold cuttings; replant often, so avoid ultra-fine |
| Rosettes (swords, crypts, vallisneria) | 2–5 mm | Tolerate coarser beds; big root systems power through |
| Bulbs (aponogeton, tiger lotus) | 2–5 mm | Bulb sits on/in the bed; coarse is fine |
| Epiphytes (anubias, fern, buce) | Any | Don't root in substrate at all — size irrelevant |
Shape Matters Too: Angular vs Rounded
Size gets the attention, but grain shape affects performance:
- Angular gravel (crushed stone) locks together, holding slopes and gripping stems better. It also has more surface area for beneficial bacteria. Downside: sharp edges can bother delicate bottom-dwellers.
- Rounded gravel (river-polished) is gentler on corydoras barbels and loach bellies, and siphons cleanly. It shifts more on slopes and grips stems slightly less well.
- Mixed sizes (poorly sorted bags) actually perform well — small grains fill gaps between large ones, creating a stable, plantable bed. The "natural river gravel" mixes sold for aquariums are often excellent planted substrates for this reason.
For a corydoras or loach tank, prioritize smooth and rounded even if it costs a little planting convenience. For a pure aquascape, angular 2–3 mm gravel is the technician's choice.
Working With Gravel You Already Have
Already running coarse gravel and don't want to tear down? You have options:
- Top-dress with finer gravel. Add 1–1.5 inches of 2–3 mm gravel over the existing bed. Plants root in the fine top layer; the coarse base provides drainage. Don't exceed 3–4 inches total depth.
- Go epiphyte-heavy. Design around plants that don't care about substrate — anubias, java fern, bucephalandra on your driftwood and rocks. Gorgeous tanks have been built on bare glass with epiphytes alone.
- Use plant baskets or pots. Bury small pots of aquasoil or fine gravel in the coarse bed for heavy root feeders — the plant gets ideal substrate, the tank keeps its look.
- Feed the water column. Coarse gravel + comprehensive liquid fertilizer grows stem plants and epiphytes just fine; reserve root tabs for the few plants that truly need them, pushed deep near their crowns.
Depth Guidelines for Gravel Beds
Size and depth interact: fine gravel should run shallower (compaction risk), coarse gravel can run deeper (but wastes space and traps detritus). General rules, expanded in our substrate depth guide:
- 2–3 mm gravel: 2–3 inches front, 3–4 inches back — the standard planted depth.
- Under 2 mm: keep it to 1.5–2.5 inches; add Malaysian trumpet snails to fight compaction.
- Over 4 mm: 2 inches is plenty — deeper just creates unreachable detritus voids.
Gravel vs Sand vs Aquasoil: Where Gravel Wins
Gravel's advantages are durability and maintenance: it never breaks down, never exhausts, vacuums beautifully, and survives digging cichlids that would destroy aquasoil in months. Its disadvantage is purely nutritional — it's inert, so you're running the two-channel feeding system (root tabs + liquid ferts) from day one. For low-tech tanks, hard-water setups, and livestock that dig, that trade is excellent. Our soil vs gravel comparison lays out the full decision.
One more consideration: color. Dark gravel (black, dark brown) makes green plants and colorful fish pop and hides detritus; light gravel shows every speck but brightens the tank and suits biotope styles. There's no horticultural difference — pick what looks right to you. If you want the dark look on a budget, our black blasting sand guide is worth a read.
How to Measure Grain Size When Shopping
Bag labels are unreliable — "fine gravel" means different things to different manufacturers. Here's how to check what you're actually buying:
- The pinch test: pinch a few grains between thumb and forefinger. If individual grains are clearly visible and distinct (like coarse ground pepper or larger), you're in the 2–4 mm zone. If it feels like powder with no distinct grains, it's under 1 mm.
- The coin test: a US dime is ~1.35 mm thick; a penny ~1.55 mm. Grains roughly dime-thickness to double that are your target band.
- Ask for the mesh or mm spec at landscaping suppliers — they grade aggregate precisely, and their "pea" vs "fine" designations are standardized in a way aquarium brands aren't.
- Buy a small bag first. For a large tank, test-plant a few stems in a bucket of the candidate gravel before committing to 100 lbs. Five minutes of testing beats a full rescape.
Coated and Dyed Gravels: A Warning
Brightly colored gravel — neon blue, hot pink, rainbow mixes — is almost always epoxy-coated. The coating is inert when intact, but it chips over time, especially under digging fish or aggressive vacuuming, exposing the (usually white) stone beneath and looking shabby. More importantly, cheap dyed gravels can leach color into the water for weeks. If you want colored substrate, buy gravel that's colored through (natural stone in that hue — black basalt, red lava, white quartz) rather than coated. Your tank will look better in year three, not just week one.
Frequently Asked Questions
Can I mix gravel sizes in one tank?
Yes — and it often works better than uniform gravel. A base of slightly coarser gravel with a finer top layer gives drainage below and plantability above. Avoid mixing very fine sand with coarse gravel long-term, though: the sand sifts down through the gaps and you end up with a compacted fine layer underneath anyway.
Is pea gravel okay for planted tanks?
Pea gravel (typically 5–10 mm) is too coarse for most planted setups — stems won't anchor and detritus vanishes into the voids. It works for epiphyte-focused tanks or as a decorative top layer, but for a real planted tank, top-dress it with 2–3 mm gravel or choose a finer product.
Do I need to rinse gravel before use?
Yes. Even "pre-washed" gravel carries dust that will cloud your tank for days. Rinse in a bucket until the runoff is mostly clear — it takes 5 minutes and saves a week of hazy water. This applies to every gravel and sand product.
Will gravel scratch my glass or acrylic tank?
Glass: no, gravel is softer than glass. Acrylic: yes, it can — pour acrylic-tank substrate over a plate, never dump it, and be careful with magnetic cleaners near the substrate line where trapped grains scratch. This is a property of the tank, not the gravel size.
How often should I vacuum a gravel planted tank?
Lightly every 1–2 weeks: hover over open areas and gently work around (not through) plant root zones. Deep-churn only small sections at a time to avoid uprooting everything and releasing a nutrient pulse. Details in our substrate cleaning guide.
Size It Right, Then Stop Worrying
Gravel size is one of those details that's worth getting right once and then forgetting about. Land in the 2–3 mm band, keep depth sensible, feed roots with tabs and leaves with liquid fertilizer, and your gravel bed will quietly do its job for a decade. The plants don't care about the brand on the bag — they care about grain size, water flow, and whether dinner shows up on schedule.
Tissue-culture plants are the exception — they’re grown in sterile gel and adapt with minimal melting, which is part of what you’re paying for. Plants bought submersed from another hobbyist’s tank also transition with little melt, since they’re already in the right form.
Which Plants Melt Most (and Least)
Heavy melters (expect significant leaf loss)
- Cryptocorynes — infamous for “crypt melt,” sometimes dropping every leaf after any disturbance. They almost always recover from the roots within weeks.
- Stem plants grown emersed — rotala, ludwigia, and hygrophila often shed lower emersed leaves while the growing tips transition.
- Amazon swords — emersed-grown swords typically lose their broad oval aerial leaves and replace them with longer submersed ribbon leaves.
Light melters
- Anubias, java fern, bucephalandra — slow-growing rhizome plants transition gradually; occasional old-leaf melt but rarely dramatic.
- Vallisneria — usually transitions well, though it dislikes the move itself and may sulk for a week.
- Floating plants — minimal melt since their leaves were already at the air-water interface.
The Acclimation Protocol
Step 1: Quarantine or dip first
Before acclimating to your tank’s conditions, make sure you’re not acclimating pests along with the plant. Run new arrivals through our quarantine and dip protocol — it adds days upfront but prevents months of regret.
Step 2: Float to temperature-match (30 minutes)
Float the bag or container in your tank for 20–30 minutes to equalize temperature. Plants are less temperature-sensitive than fish, but a 10°F shock on top of transplant stress is an avoidable insult.
Step 3: Trim before planting
Remove any leaves that are already damaged, yellowing, or heavily algae-covered — they won’t recover and they’ll rot in your tank, feeding algae. For stem plants, trim off the bottom inch and any emersed leaves that look unlikely to adapt; the plant wastes energy maintaining leaves it’s going to shed anyway. Keep the healthy growing tips — that’s where recovery starts.
Step 4: Plant correctly the first time
Follow our planting guide — right depth, crown exposed on rosettes, rhizomes unburied on epiphytes. Every uprooting and replanting restarts the acclimation clock, so get placement right on the first attempt. Decide where each plant goes before it goes in the water.
Step 5: Run a gentle first week
For the first 7 days after planting:
- Moderate light — run your normal photoperiod but consider dropping intensity 20–30% if your light is dimmable. Blast-level light on a melting plant grows algae on the dying leaves, not recovery.
- Stable CO2 — if you inject CO2, keep it consistent. Fluctuating CO2 during acclimation is a melt accelerator. If you’re low-tech, this doesn’t apply — see growing without CO2.
- Half-strength fertilizer — new plants with damaged leaves can’t use full dosing, and the excess feeds algae. Ramp to full strength over 2–3 weeks per our fertilizer schedule.
- No disturbance — don’t move, trim, or “check on” new plants for at least two weeks. Every touch resets root establishment. This is especially critical for crypts.
Step 6: Remove melt, keep the base
As emersed leaves melt, remove the mushy material promptly — decaying leaves release ammonia and grow fungus that can spread to healthy tissue. But never discard the plant while the crown, rhizome, or roots are firm and alive. A crypt that’s lost every leaf but has firm roots is a plant that’s about to recover, not a dead plant. Give it 3–4 weeks before judging.
Telling Normal Melt From Real Problems
Normal transition melt:
- Affects oldest/emersed leaves first, newest growth last
- New submersed leaves emerge even as old ones dissolve
- Roots and crown stay firm and white/green
- Timeline: 1–4 weeks, then obvious new growth
Concerning melt (see our full melting diagnosis guide):
- New growth also melts or emerges deformed
- Rhizome or crown turns mushy and brown — this is rot, not transition
- Entire plant dissolves within days with no new growth after 4+ weeks
- Melting spreads to established plants that weren’t recently moved
Buying Tips to Minimize Melt
- Buy submersed-grown when available — hobbyist-grown cuttings transition with almost no melt.
- Choose tissue culture for sensitive species — crypts and delicate stems establish far more reliably from sterile cups.
- Avoid plants already melting in the store tank — some melt is normal, but a plant that’s mostly mush at purchase has less energy for recovery.
- Transport carefully — keep plants damp and out of direct sun/heat. A plant that dries out or cooks in a hot car melts far worse than one transported properly.
The First-Month Timeline: What to Expect Week by Week
Knowing what’s normal when removes most acclimation anxiety. Here’s the typical timeline for a healthy plant adapting to a new tank:
Week 1: The quiet week
Almost nothing visible happens. The plant is growing roots you can’t see and assessing its new environment. Some species (vallisneria, stem plants) may start shedding their lowest leaves. This is normal. Resist the urge to “help” — no moving, no extra fertilizer, no light changes. The most common beginner mistake is intervening during a week when the correct action is nothing.
Week 2: Melt peaks
This is when emersed leaves give up in earnest. Crypts may drop everything; swords shed their broad aerial leaves; stem plants lose lower foliage. It looks catastrophic and it’s usually fine. Keep removing mushy material, keep conditions stable, and watch the crown and growing tips — if those are firm and green, recovery is already underway.
Week 3: The turn
New submersed-adapted leaves emerge — smaller, thinner, often a slightly different shade of green than the emersed foliage. Stem plant tips start growing visibly; crypts push tiny curled leaves from the crown; swords unfurl narrow ribbon leaves. This is the moment most beginners exhale for the first time.
Week 4+: Established
New growth outpaces melt, and the plant is functionally yours. You can resume full-strength fertilizer, normal trimming, and stop treating it as fragile. Some slow growers (anubias, bucephalandra) take 6–8 weeks to show obvious progress — that’s their normal speed, not a problem.
Acclimating Different Plant Formats
Tissue-culture cups
Sterile, pest-free, and already adapted to high-humidity (not emersed) growth — tissue cultures melt the least of any format. Rinse the agar gel off gently (leftover gel rots and feeds fungus), split the portion into small plantlets, and plant per our planting guide. They establish slowly for the first two weeks, then accelerate. No dip needed, minimal acclimation stress — this is the premium experience you’re paying for.
Potted plants
Remove the pot and strip away the rockwool completely — leftover rockwool traps debris and rots. Tease the root mass apart gently; if it’s a dense mat, splitting it into 2–3 smaller portions actually establishes faster than planting one big clump (more growing points, better water flow around roots). Potted plants are usually emersed-grown, so expect the standard 2–4 week melt cycle.
Bare-root / bunched stems
Typically sold as weighted bunches. Remove any bands, foam, or weights, strip the lower leaves, and plant stems individually or in small groups. Bunched stems from the store are often already transitioning — check for new submersed growth at the tips, which tells you the plant is mid-adaptation and will settle quickly.
Hobbyist cuttings
Already submersed-grown and the fastest to establish — often showing new growth within days. The main acclimation factor is water-parameter difference between the two tanks. Float to temperature-match, plant promptly, and they’ll usually take off with minimal melt. This is why experienced hobbyists prefer trading cuttings over buying potted plants.
Frequently Asked Questions
Should I use a “plant starter” or transplant fertilizer?
Products marketed for transplant shock are mostly B-vitamins and mild hormones. They don’t hurt, but there’s no strong evidence they help aquarium plants specifically. Stable conditions and patience outperform any bottle. Save the money for more plants.
My new plant melted completely — bare crown, no leaves. Is it dead?
Probably not, if the crown or rhizome is firm. Crypts and swords routinely lose 100% of their leaves and regrow from the base within a month. The test is firmness: firm and pale/green means alive; mushy and brown/black means rot. Give firm-but-leafless plants a full 4 weeks before declaring them dead.
Can I speed up acclimation with extra light or CO2?
No — and trying usually backfires. A melting plant can’t use extra light; the excess just grows algae on its dying leaves. Keep light moderate and CO2 stable (not boosted) during acclimation. Growth speed comes from the plant’s own adaptation timeline, which you can’t rush, only avoid delaying.
Should new plants go straight into my main display tank?
After quarantine/dipping, yes — there’s no benefit to a separate “growing-in” tank for most plants. They acclimate to your water fastest in the tank they’ll live in. The exception is very delicate species going into a tank with boisterous fish; give those a few weeks in a calm corner or breeder box first.
The Patience Rule
The single most important acclimation skill is restraint: plant it right, set gentle conditions, remove decay, and then leave it alone for a month. The hobbyists with the best plant growth aren’t doing something clever in week one — they’re simply not interfering in weeks two through four while the plants do what they’ve evolved to do. Melt looks like failure and feels like failure, but in most cases it’s the visible part of a plant successfully becoming yours.