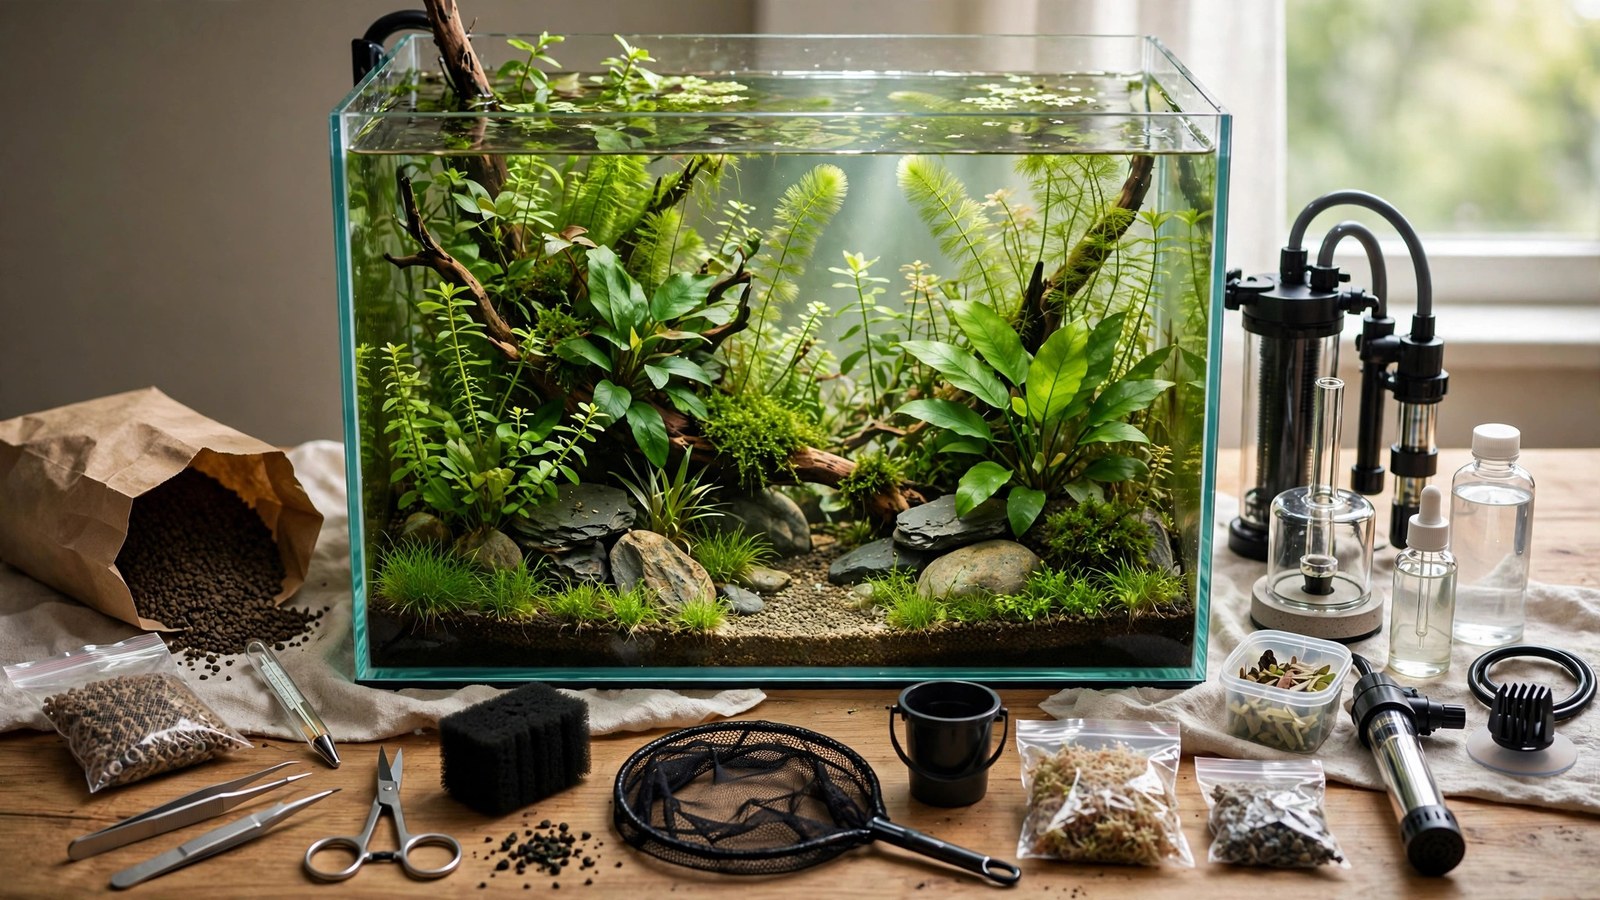
Walking into a fish store for your first planted tank without a list is how you come home with the wrong light, too little substrate, and a "bargain" filter that won't cut it — then make three more trips. This is the complete first planted tank shopping list: everything you need, nothing you don't, organized by priority, with what to buy quality and where it's safe to save.
How to Use This List
Items are grouped into essential (the tank doesn't work without it), highly recommended (buy now, thank yourself later), and skip for now (common upsells you don't need yet). Budget guidance assumes a 10–20 gallon first tank — scale quantities up for larger builds using our size guides: 10-gallon setup, 20-gallon setup, 40-gallon breeder.
Essential: The Tank Itself
- Aquarium (10 or 20-gallon long recommended) — the 10-gallon is cheapest to equip; the 20-long is more forgiving. Buy the tank with a glass lid or lid set — open tops evaporate fast and fish jump. If the kit includes a lid, great; otherwise add one.
- Stand or sturdy furniture — a filled 10-gallon weighs ~110 lbs, a 20-long ~225 lbs. Dedicated aquarium stands are cheapest insurance; solid wood dressers work if level and strong. Particle-board furniture is a flood waiting to happen.
Essential: Lighting (Buy Quality Here)
- Planted-tank LED fixture, full length of the tank — this is the single most impactful purchase. A proper planted LED (full-spectrum, ~6500K) grows plants; the dim kit light in all-in-one boxes grows algae and disappointment. Size the fixture to the tank length (20" for 10-gallon, 30" for 20-long).
- Outlet timer plug — non-negotiable. Consistent 7–8 hour photoperiods prevent algae; human-switched lights never stay consistent. A basic mechanical timer costs little and is the best algae prevention you can buy.
Where to save: skip Bluetooth/app-controlled lights for now — the timer plug does the job. Where not to save: the fixture itself. A weak light is the number-one reason first planted tanks fail.
Essential: Filtration
- Hang-on-back filter rated for your tank size — simple, effective, cheap. For 10–20 gallons, one HOB rated at or slightly above tank volume is plenty.
- Pre-filter sponge — fits over the intake tube; protects shrimp, fry, and betta fins, and adds biological capacity. A few dollars that prevents real losses.
- Filter media — most HOBs include adequate media; add a bag of ceramic bio-media if yours is cartridge-only (cartridges are a recurring-cost trap — switch to reusable sponge + bio-media).
Alternative: a sponge filter + air pump — the cheapest filtration that works, ideal for shrimp or betta tanks. Our planted shrimp tank setup uses this approach.
Essential: Heating and Monitoring
- Adjustable heater (50W for 10-gal, 100W for 20-gal) — adjustable, not preset. Preset heaters are inaccurate; adjustable with a thermostat holds temperature properly.
- Thermometer — a simple stick-on or glass thermometer. You can't manage what you don't measure.
- Liquid test kit (ammonia, nitrite, nitrate, pH) — the API-style master kit. Test strips are inaccurate; the liquid kit lasts a year and is the difference between guessing and knowing during the cycle. Our water parameters guide explains what the numbers mean.
- Water conditioner (dechlorinator) — treats tap water's chlorine/chloramine. One bottle lasts months.
Essential: Substrate
- Aquasoil (one 9L bag for 10–20 gallons) — the beginner-friendly choice: feeds plants for months, buffers pH gently, grows everything. One bag does a 10-gallon generously or a 20-long at 2 inches.
- Budget alternative: inert sand or gravel + root tabs — cheaper, works fine, just add root tabs under heavy root feeders and liquid fertilizer from the start.
Essential: Plants (Buy Heavy, Buy Once)
Buy 70%+ coverage on day one — sparse planting is the top beginner mistake. A starter plant order for a 10–20 gallon:
- Background stems (2–3 bunches): rotala, bacopa, ludwigia — fast growers that establish quickly
- Epiphytes (3–5 portions): anubias nana, java fern — tie to wood/rocks; indestructible
- Midground (3–4 pots): cryptocoryne wendtii — the beginner's best friend
- Foreground/carpet (2–4 pots): dwarf sagittaria or Monte Carlo
- Floating plants (one portion): frogbit or salvinia — instant algae-fighting shade
- Moss (one portion): java moss for wood and corners
Our planting quantity guide refines these numbers. Buy from a reputable online seller or local hobbyist — store plants are often half-melted. Tissue-culture cups cost more but arrive pest-free.
Essential: Hardscape
- One driftwood piece (sized to your tank) or 3–5 small stones — one focal hardscape element, not a rock collection. Malaysian driftwood and dragon stone are the safe classics.
Highly Recommended (Buy With the First Order)
- Aquascaping tweezers (long, curved tip) — planting without them in a filled tank is misery; with them it's precision. The single best tool purchase.
- Aquascaping scissors (curved) — trimming with kitchen scissors mangles stems; proper scissors make clean cuts that heal fast.
- Comprehensive liquid fertilizer — one bottle; with aquasoil you won't need it for 2–3 months, with inert substrate from day one. Buy it now so it's on hand.
- Root tabs — for swords and crypts in any substrate; cheap, last months.
- Algae scraper or magnetic cleaner — you'll need it within weeks; buy before you do.
- Small siphon/gravel vacuum — sized to your tank; water changes without one are miserable.
- Bucket (dedicated, never used with soap) — 2–3 gallons for a 10-gallon, 5 gallons for a 20-long.
- Fish net (small, soft mesh) — for the inevitable plant-trim rescues and eventual stocking.
Livestock (After Cycling — Not on Day One)
Don't buy fish with the setup. Cycle first (our faster cycling guide), then stock gradually. When ready, proven first-tank livestock:
- Cleanup crew first: 3–4 otocinclus or 5–10 cherry shrimp + 2–3 nerite snails
- School: 8–10 ember tetras, chili rasboras, or neon tetras — our schooling fish guide compares them
- Centerpiece (20-gallon): 1 honey gourami or a pair of German blue rams
- Centerpiece (10-gallon): 1 betta — our planted betta tank setup
Skip for Now (Common Upsells)
- CO2 system — wonderful later, unnecessary now. Master low-tech first; our low-tech guide proves what's possible without it.
- UV sterilizer — solves problems you shouldn't have yet; proper balance prevents green water.
- pH adjusters and "buffer" chemicals — cause the swings they claim to fix. Stable tap water beats chemically manipulated water.
- Specialty substrates additives, bacterial "cycle in a bottle" miracles — some help marginally; none replace the actual cycle.
- Expensive aquascaping rock sets — one good wood piece beats five mediocre stones.
- Automatic feeders, dosers — automation for a tank you're learning to read is premature.
The Shopping Strategy
- Order hardware online — lights, filters, heaters, substrate: better prices and selection than most stores.
- Buy hardscape in person if possible — wood and stone are character pieces; choosing in person matters.
- Order plants to arrive the day you set up — plant the same day they arrive; don't let them sit.
- Set up, plant, cycle — then buy fish locally after watching the tank mature. Never buy livestock on setup day.
- Keep receipts and boxes for 30 days — heaters and filters have meaningful defect rates; the return window matters.
Frequently Asked Questions
What's the minimum budget for a proper first planted tank?
A 10-gallon planted setup with quality light, decent filter, heater, aquasoil, plants, and basic tools is genuinely affordable — the light and plants are the big line items. The 20-long costs roughly 50% more to equip but is more forgiving. Either way, the "buy quality light, buy heavy plants" rule holds: skimping on those two is the false economy that kills first tanks.
Should I buy an all-in-one kit or piece it together?
Piece it together. All-in-one kits bundle weak lights, cartridge filters (recurring cost trap), and preset heaters — the three components most worth choosing properly. The kit's only advantage is convenience, and it costs you in upgrades within months. Buy the tank + lid as a box, choose everything else individually from this list.
Where's the best place to buy aquarium plants?
Reputable online aquatic-plant sellers and local hobbyist groups beat chain pet stores on health, variety, and price. Tissue-culture cups (pest-free, dense) are worth the premium for foregrounds. Local aquarium club auctions are the hobby's best-kept secret — healthy, cheap, locally adapted plants.
Do I really need the test kit? Can't I just wait a month?
The test kit is how you know the cycle is done instead of hoping. "Wait a month" works only if the cycle actually completed — and without testing, you can't distinguish a cycled tank from a stalled one. The liquid kit costs little, lasts a year, and prevents the number-one beginner disaster: stocking an uncycled tank.
What can I skip if money is really tight?
Buy used tanks and filters (leak-test tanks outdoors first), choose sand + root tabs over aquasoil, get plant trimmings from hobbyists free or cheap, and skip the aquascaping tools initially (tweezers first when you can). Never skip: the light quality, the test kit, the heater (for tropicals), or the dechlorinator. Those four are safety-critical.
When do I buy the fish?
After the tank is cycled and plants are growing — typically 2–4 weeks after setup, verified by zero ammonia/nitrite readings for a week. Buying fish on setup day is the classic beginner error; the empty planted tank is not a failure, it's the process working. Patience now prevents losses later.
The List, Condensed
Tank + lid + stand. Quality planted light + timer. HOB filter + pre-filter sponge. Adjustable heater + thermometer. Liquid test kit + dechlorinator. Aquasoil. Heavy plant order. One wood piece. Tweezers, scissors, fertilizer, root tabs, scraper, siphon, bucket, net. Cycle, then livestock. That's the complete first planted tank — everything on this list earns its place, nothing here is filler. Print it, shop it, build it.
Cross-check this list against the 2Hr Aquarist Planted Tank 101 beginner’s guide before you buy.
Tissue-culture plants are the exception — they’re grown in sterile gel and adapt with minimal melting, which is part of what you’re paying for. Plants bought submersed from another hobbyist’s tank also transition with little melt, since they’re already in the right form.
Which Plants Melt Most (and Least)
Heavy melters (expect significant leaf loss)
- Cryptocorynes — infamous for “crypt melt,” sometimes dropping every leaf after any disturbance. They almost always recover from the roots within weeks.
- Stem plants grown emersed — rotala, ludwigia, and hygrophila often shed lower emersed leaves while the growing tips transition.
- Amazon swords — emersed-grown swords typically lose their broad oval aerial leaves and replace them with longer submersed ribbon leaves.
Light melters
- Anubias, java fern, bucephalandra — slow-growing rhizome plants transition gradually; occasional old-leaf melt but rarely dramatic.
- Vallisneria — usually transitions well, though it dislikes the move itself and may sulk for a week.
- Floating plants — minimal melt since their leaves were already at the air-water interface.
The Acclimation Protocol
Step 1: Quarantine or dip first
Before acclimating to your tank’s conditions, make sure you’re not acclimating pests along with the plant. Run new arrivals through our quarantine and dip protocol — it adds days upfront but prevents months of regret.
Step 2: Float to temperature-match (30 minutes)
Float the bag or container in your tank for 20–30 minutes to equalize temperature. Plants are less temperature-sensitive than fish, but a 10°F shock on top of transplant stress is an avoidable insult.
Step 3: Trim before planting
Remove any leaves that are already damaged, yellowing, or heavily algae-covered — they won’t recover and they’ll rot in your tank, feeding algae. For stem plants, trim off the bottom inch and any emersed leaves that look unlikely to adapt; the plant wastes energy maintaining leaves it’s going to shed anyway. Keep the healthy growing tips — that’s where recovery starts.
Step 4: Plant correctly the first time
Follow our planting guide — right depth, crown exposed on rosettes, rhizomes unburied on epiphytes. Every uprooting and replanting restarts the acclimation clock, so get placement right on the first attempt. Decide where each plant goes before it goes in the water.
Step 5: Run a gentle first week
For the first 7 days after planting:
- Moderate light — run your normal photoperiod but consider dropping intensity 20–30% if your light is dimmable. Blast-level light on a melting plant grows algae on the dying leaves, not recovery.
- Stable CO2 — if you inject CO2, keep it consistent. Fluctuating CO2 during acclimation is a melt accelerator. If you’re low-tech, this doesn’t apply — see growing without CO2.
- Half-strength fertilizer — new plants with damaged leaves can’t use full dosing, and the excess feeds algae. Ramp to full strength over 2–3 weeks per our fertilizer schedule.
- No disturbance — don’t move, trim, or “check on” new plants for at least two weeks. Every touch resets root establishment. This is especially critical for crypts.
Step 6: Remove melt, keep the base
As emersed leaves melt, remove the mushy material promptly — decaying leaves release ammonia and grow fungus that can spread to healthy tissue. But never discard the plant while the crown, rhizome, or roots are firm and alive. A crypt that’s lost every leaf but has firm roots is a plant that’s about to recover, not a dead plant. Give it 3–4 weeks before judging.
Telling Normal Melt From Real Problems
Normal transition melt:
- Affects oldest/emersed leaves first, newest growth last
- New submersed leaves emerge even as old ones dissolve
- Roots and crown stay firm and white/green
- Timeline: 1–4 weeks, then obvious new growth
Concerning melt (see our full melting diagnosis guide):
- New growth also melts or emerges deformed
- Rhizome or crown turns mushy and brown — this is rot, not transition
- Entire plant dissolves within days with no new growth after 4+ weeks
- Melting spreads to established plants that weren’t recently moved
Buying Tips to Minimize Melt
- Buy submersed-grown when available — hobbyist-grown cuttings transition with almost no melt.
- Choose tissue culture for sensitive species — crypts and delicate stems establish far more reliably from sterile cups.
- Avoid plants already melting in the store tank — some melt is normal, but a plant that’s mostly mush at purchase has less energy for recovery.
- Transport carefully — keep plants damp and out of direct sun/heat. A plant that dries out or cooks in a hot car melts far worse than one transported properly.
The First-Month Timeline: What to Expect Week by Week
Knowing what’s normal when removes most acclimation anxiety. Here’s the typical timeline for a healthy plant adapting to a new tank:
Week 1: The quiet week
Almost nothing visible happens. The plant is growing roots you can’t see and assessing its new environment. Some species (vallisneria, stem plants) may start shedding their lowest leaves. This is normal. Resist the urge to “help” — no moving, no extra fertilizer, no light changes. The most common beginner mistake is intervening during a week when the correct action is nothing.
Week 2: Melt peaks
This is when emersed leaves give up in earnest. Crypts may drop everything; swords shed their broad aerial leaves; stem plants lose lower foliage. It looks catastrophic and it’s usually fine. Keep removing mushy material, keep conditions stable, and watch the crown and growing tips — if those are firm and green, recovery is already underway.
Week 3: The turn
New submersed-adapted leaves emerge — smaller, thinner, often a slightly different shade of green than the emersed foliage. Stem plant tips start growing visibly; crypts push tiny curled leaves from the crown; swords unfurl narrow ribbon leaves. This is the moment most beginners exhale for the first time.
Week 4+: Established
New growth outpaces melt, and the plant is functionally yours. You can resume full-strength fertilizer, normal trimming, and stop treating it as fragile. Some slow growers (anubias, bucephalandra) take 6–8 weeks to show obvious progress — that’s their normal speed, not a problem.
Acclimating Different Plant Formats
Tissue-culture cups
Sterile, pest-free, and already adapted to high-humidity (not emersed) growth — tissue cultures melt the least of any format. Rinse the agar gel off gently (leftover gel rots and feeds fungus), split the portion into small plantlets, and plant per our planting guide. They establish slowly for the first two weeks, then accelerate. No dip needed, minimal acclimation stress — this is the premium experience you’re paying for.
Potted plants
Remove the pot and strip away the rockwool completely — leftover rockwool traps debris and rots. Tease the root mass apart gently; if it’s a dense mat, splitting it into 2–3 smaller portions actually establishes faster than planting one big clump (more growing points, better water flow around roots). Potted plants are usually emersed-grown, so expect the standard 2–4 week melt cycle.
Bare-root / bunched stems
Typically sold as weighted bunches. Remove any bands, foam, or weights, strip the lower leaves, and plant stems individually or in small groups. Bunched stems from the store are often already transitioning — check for new submersed growth at the tips, which tells you the plant is mid-adaptation and will settle quickly.
Hobbyist cuttings
Already submersed-grown and the fastest to establish — often showing new growth within days. The main acclimation factor is water-parameter difference between the two tanks. Float to temperature-match, plant promptly, and they’ll usually take off with minimal melt. This is why experienced hobbyists prefer trading cuttings over buying potted plants.
Frequently Asked Questions
Should I use a “plant starter” or transplant fertilizer?
Products marketed for transplant shock are mostly B-vitamins and mild hormones. They don’t hurt, but there’s no strong evidence they help aquarium plants specifically. Stable conditions and patience outperform any bottle. Save the money for more plants.
My new plant melted completely — bare crown, no leaves. Is it dead?
Probably not, if the crown or rhizome is firm. Crypts and swords routinely lose 100% of their leaves and regrow from the base within a month. The test is firmness: firm and pale/green means alive; mushy and brown/black means rot. Give firm-but-leafless plants a full 4 weeks before declaring them dead.
Can I speed up acclimation with extra light or CO2?
No — and trying usually backfires. A melting plant can’t use extra light; the excess just grows algae on its dying leaves. Keep light moderate and CO2 stable (not boosted) during acclimation. Growth speed comes from the plant’s own adaptation timeline, which you can’t rush, only avoid delaying.
Should new plants go straight into my main display tank?
After quarantine/dipping, yes — there’s no benefit to a separate “growing-in” tank for most plants. They acclimate to your water fastest in the tank they’ll live in. The exception is very delicate species going into a tank with boisterous fish; give those a few weeks in a calm corner or breeder box first.
The Patience Rule
The single most important acclimation skill is restraint: plant it right, set gentle conditions, remove decay, and then leave it alone for a month. The hobbyists with the best plant growth aren’t doing something clever in week one — they’re simply not interfering in weeks two through four while the plants do what they’ve evolved to do. Melt looks like failure and feels like failure, but in most cases it’s the visible part of a plant successfully becoming yours.