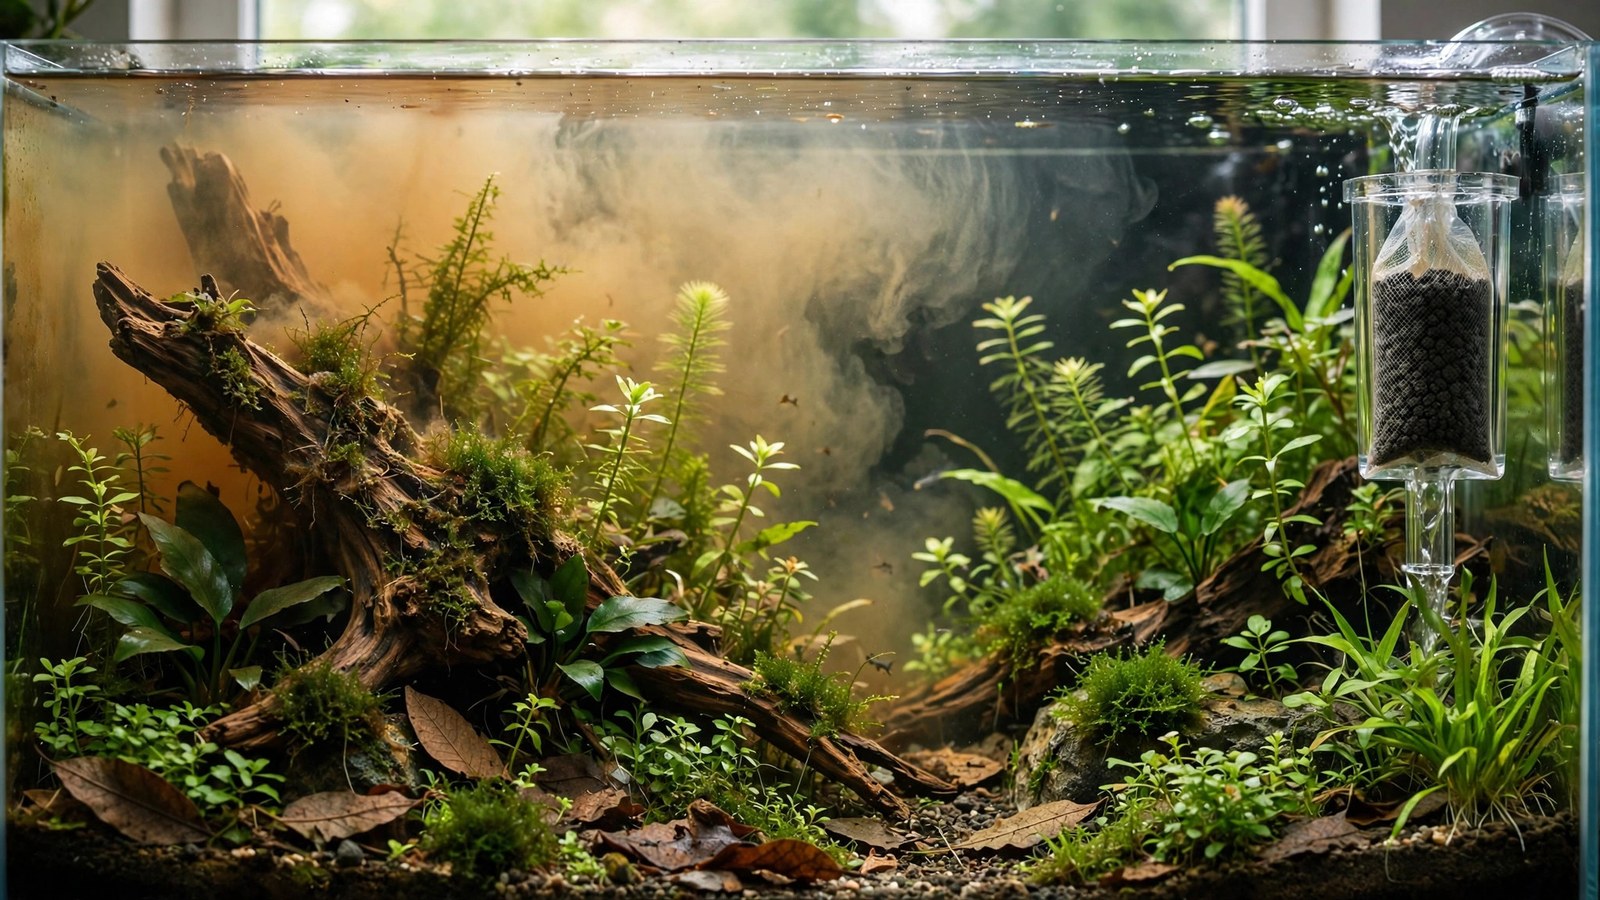
Your new driftwood turned the tank into a cup of tea. Before you rip it out in frustration: those tannins are not a problem to solve — they're a feature to manage. Tannins are the same compounds that make blackwater rivers the most biodiverse freshwater habitats on Earth, and many of your fish evolved in exactly this tea-colored water. This guide covers what tannins are, their real benefits, how to remove them if you hate the look, and how long the leaching actually lasts.
What Tannins Are
Tannins (tannic acid, humic acids, fulvic acids) are plant polyphenols — the compounds wood uses to resist decay. When driftwood sits in water, these compounds slowly dissolve out, tinting the water yellow to brown and mildly acidifying it. It's the same chemistry as brewing tea: hot water extracts faster, but even cold tank water pulls tannins steadily from fresh wood.
Every driftwood species leaches differently:
- Heavy leachers: Mopani (notoriously dark — see our Mopani guide), Malaysian driftwood, most grapewood.
- Moderate leachers: spider wood, manzanita (see spider wood vs manzanita).
- Light leachers: cholla wood (see cholla in planted tanks), well-aged/weathered wood of any species.
Our best driftwood roundup compares species across all dimensions, and driftwood preparation covers pre-soaking to reduce the initial flood.
The Benefits: Why Blackwater Keepers Pay for This
Entire segments of the hobby add tannins deliberately (catappa leaves, alder cones, blackwater extracts). Here's what the tea color buys you:
- Antibacterial and antifungal properties. Tannins and humic acids mildly inhibit many common fish pathogens — it's why wild blackwater fish have so few disease issues, and why breeders add catappa leaves to fry tanks. It's not medicine, but it's a genuine background immune assist.
- Stress reduction. Dim, tinted water mimics the shaded forest streams most tropical fish evolved in. Fish in tannin-tinted water consistently show better color, bolder behavior, and less skittishness than in stark clear water — especially tetras, rasboras, bettas, and dwarf cichlids.
- Gentle acidification. Tannins nudge pH down slightly (typically 0.2–0.5 units) — helpful, not dramatic. They won't replace a buffering substrate for serious pH control, but they push conditions in the right direction for soft-water species.
- Algae suppression. Tinted water filters light — particularly the blue/green wavelengths algae love. Heavily tannin-stained tanks grow noticeably less algae on glass and hardscape. (Your plants get less light too — it's a trade, not a free win.)
- Natural aesthetics. The blackwater look — amber water, dappled light, leaf litter — is one of aquascaping's most evocative styles. What reads as "dirty" in a bright Dutch tank reads as "Amazon" in a biotope.
The Timeline: How Long Leaching Lasts
The question everyone asks. Honest answer: it depends on the wood, and it's longer than you hope.
- Weeks 1–4: the flood. Fresh Mopani can stain a tank dark brown within days. This is the phase that panics people — it's normal and temporary.
- Months 2–6: steady decline. Water changes keep the tint light; the wood's surface tannins deplete.
- Months 6–18: the long tail. Most wood stops visibly tinting the water within a year, though dense pieces (thick Mopani) can leach faintly for 18+ months.
- Boiling accelerates everything — a few hours of boiling extracts what months of soaking would, dramatically shortening the timeline. See our preparation guide for the full protocol.
Rule of thumb: the darker the wood, the longer the leach. Pale spider wood clears in weeks; dense dark Mopani tests your patience for a year. Buy accordingly if the tea color bothers you.
Removal Methods: From Passive to Aggressive
If you've decided the tannins must go, here's the arsenal in order of effort:
1. Water changes (free, slow)
Regular water changes dilute tannins as fast as the wood releases them. In the early flood phase, 50% twice weekly keeps the tint manageable. It's the baseline method — free, safe, and eventually the wood just runs out. Pair with patience.
2. Activated carbon (easy, effective)
Activated carbon adsorbs tannins well — it's the standard solution. A bag of carbon in your filter clears moderate tinting in days. Limitations: it exhausts (replace every 2–4 weeks during heavy leaching), and it also adsorbs some liquid fertilizers and medications — don't run carbon continuously in a tank you're medicating, and expect to dose ferts slightly heavier.
3. Seachem Purigen (the premium option)
Purigen is a synthetic adsorbent resin that strips tannins (and general organic discoloration) dramatically — it turns visibly brown as it works, and it's rechargeable with bleach, making it economical long-term. For crystal-clear water with leaching wood, Purigen is the hobby's gold standard. It doesn't touch fertilizers the way carbon does, which is why planted-tank keepers prefer it.
4. Pre-treatment: boil and soak (preventive)
The best cure is prevention: boil new driftwood 1–3 hours (changing the dark water), then soak for a week or two with water changes. This extracts the bulk of surface tannins before the wood ever sees your tank. It won't eliminate leaching entirely — deep tannins keep coming — but it converts the flood into a trickle. Full protocol in our driftwood preparation guide.
What doesn't work
- UV sterilizers — they kill free-floating algae and pathogens, not dissolved tannins. No effect on color.
- More filtration — mechanical and biological filtration don't remove dissolved organics. Only chemical adsorption (carbon/Purigen) does.
- pH adjusters — irrelevant to tannin color; don't chase this with chemicals.
Living With Tannins: The Middle Path
Most experienced keepers land here: manage, don't eliminate. Pre-treat the wood, run Purigen or carbon for the first few months, do normal water changes — and accept a faint warm tint as character. A slight amber cast:
- Makes fish colors richer (try photographing cardinals in faintly tinted vs stark water — the tinted shots win).
- Signals healthy humic chemistry to anyone who knows blackwater habitats.
- Fades on its own timeline while you enjoy the tank instead of fighting it.
If you're scaping a bright, high-contrast aquascape where crystal water is the whole aesthetic (Iwagumi styles, for example), choose light-leaching wood from the start and run Purigen continuously. Match the wood to the vision — don't buy Mopani for a minimalist white-sand scape and then wage war on its nature.
Tannins and Your Other Tank Chemistry
- With aquasoil: tannins + buffering soil both push pH down — the combination is gentle and compatible. No conflict.
- With CO2: tannin tint slightly reduces light penetration; you may need marginally more light intensity for the same plant growth. Drop checkers still read fine.
- With medications: carbon removes both tannins and meds — if you're treating the tank, pull the carbon (tannins will return temporarily; deal with it after treatment).
- Test kits: heavy tannin staining can slightly tint test-kit color comparisons — read against a white background in good light.
Frequently Asked Questions
Are tannins harmful to fish or plants?
No — for the vast majority of tropical freshwater species, tannins are beneficial or neutral. They're the natural chemistry of blackwater habitats. The only caution: extremely heavy staining in a small tank can depress pH more than expected if your KH is near zero — test pH during the flood phase if you run very soft water.
Will tannins stain my silicone or decorations?
Silicone can take on a faint amber tint with prolonged heavy staining — it's cosmetic and usually fades if the water clears. White decorations and light sand can also pick up a warm cast. If pristine white matters to your scape, that's another reason to pre-treat wood aggressively or choose light leachers.
How do I get tannins OUT of wood faster?
Boiling is the fastest: 2–4 hours total (in batches, changing water when it goes dark) extracts months' worth. After boiling, soak in a bucket with daily water changes for a week. Pressure-cooking works even faster but isn't practical for large pieces. There's no chemical shortcut that's fish-safe — just heat, water, and patience.
My tank has been running 8 months and still tints. Is something wrong?
Probably not — dense Mopani and Malaysian wood commonly leach faintly for 12–18 months. If the tint is stable and light (a warm cast, not dark tea), that's just the wood's long tail. If it's still dark at 8 months, the piece may be exceptionally dense — consider pulling it for a boil-and-soak reset, or just run Purigen continuously.
Can I add tannins deliberately without driftwood?
Yes — catappa (Indian almond) leaves, alder cones, and commercial blackwater extracts all add tannins without wood. This is how blackwater biotope keepers dose precisely: a leaf or two per 10 gallons, replaced monthly. It's also the way to get tannin benefits in a tank with light-leaching wood.
Stop Fighting the Tea
Tannins are driftwood being driftwood — the same compounds that make blackwater rivers among the richest habitats on Earth. Pre-treat your wood, manage the early flood with water changes and Purigen, and then let the faint amber become part of the tank's character. Your fish evolved in this water. You might find you prefer it too.
Tissue-culture plants are the exception — they’re grown in sterile gel and adapt with minimal melting, which is part of what you’re paying for. Plants bought submersed from another hobbyist’s tank also transition with little melt, since they’re already in the right form.
Which Plants Melt Most (and Least)
Heavy melters (expect significant leaf loss)
- Cryptocorynes — infamous for “crypt melt,” sometimes dropping every leaf after any disturbance. They almost always recover from the roots within weeks.
- Stem plants grown emersed — rotala, ludwigia, and hygrophila often shed lower emersed leaves while the growing tips transition.
- Amazon swords — emersed-grown swords typically lose their broad oval aerial leaves and replace them with longer submersed ribbon leaves.
Light melters
- Anubias, java fern, bucephalandra — slow-growing rhizome plants transition gradually; occasional old-leaf melt but rarely dramatic.
- Vallisneria — usually transitions well, though it dislikes the move itself and may sulk for a week.
- Floating plants — minimal melt since their leaves were already at the air-water interface.
The Acclimation Protocol
Step 1: Quarantine or dip first
Before acclimating to your tank’s conditions, make sure you’re not acclimating pests along with the plant. Run new arrivals through our quarantine and dip protocol — it adds days upfront but prevents months of regret.
Step 2: Float to temperature-match (30 minutes)
Float the bag or container in your tank for 20–30 minutes to equalize temperature. Plants are less temperature-sensitive than fish, but a 10°F shock on top of transplant stress is an avoidable insult.
Step 3: Trim before planting
Remove any leaves that are already damaged, yellowing, or heavily algae-covered — they won’t recover and they’ll rot in your tank, feeding algae. For stem plants, trim off the bottom inch and any emersed leaves that look unlikely to adapt; the plant wastes energy maintaining leaves it’s going to shed anyway. Keep the healthy growing tips — that’s where recovery starts.
Step 4: Plant correctly the first time
Follow our planting guide — right depth, crown exposed on rosettes, rhizomes unburied on epiphytes. Every uprooting and replanting restarts the acclimation clock, so get placement right on the first attempt. Decide where each plant goes before it goes in the water.
Step 5: Run a gentle first week
For the first 7 days after planting:
- Moderate light — run your normal photoperiod but consider dropping intensity 20–30% if your light is dimmable. Blast-level light on a melting plant grows algae on the dying leaves, not recovery.
- Stable CO2 — if you inject CO2, keep it consistent. Fluctuating CO2 during acclimation is a melt accelerator. If you’re low-tech, this doesn’t apply — see growing without CO2.
- Half-strength fertilizer — new plants with damaged leaves can’t use full dosing, and the excess feeds algae. Ramp to full strength over 2–3 weeks per our fertilizer schedule.
- No disturbance — don’t move, trim, or “check on” new plants for at least two weeks. Every touch resets root establishment. This is especially critical for crypts.
Step 6: Remove melt, keep the base
As emersed leaves melt, remove the mushy material promptly — decaying leaves release ammonia and grow fungus that can spread to healthy tissue. But never discard the plant while the crown, rhizome, or roots are firm and alive. A crypt that’s lost every leaf but has firm roots is a plant that’s about to recover, not a dead plant. Give it 3–4 weeks before judging.
Telling Normal Melt From Real Problems
Normal transition melt:
- Affects oldest/emersed leaves first, newest growth last
- New submersed leaves emerge even as old ones dissolve
- Roots and crown stay firm and white/green
- Timeline: 1–4 weeks, then obvious new growth
Concerning melt (see our full melting diagnosis guide):
- New growth also melts or emerges deformed
- Rhizome or crown turns mushy and brown — this is rot, not transition
- Entire plant dissolves within days with no new growth after 4+ weeks
- Melting spreads to established plants that weren’t recently moved
Buying Tips to Minimize Melt
- Buy submersed-grown when available — hobbyist-grown cuttings transition with almost no melt.
- Choose tissue culture for sensitive species — crypts and delicate stems establish far more reliably from sterile cups.
- Avoid plants already melting in the store tank — some melt is normal, but a plant that’s mostly mush at purchase has less energy for recovery.
- Transport carefully — keep plants damp and out of direct sun/heat. A plant that dries out or cooks in a hot car melts far worse than one transported properly.
The First-Month Timeline: What to Expect Week by Week
Knowing what’s normal when removes most acclimation anxiety. Here’s the typical timeline for a healthy plant adapting to a new tank:
Week 1: The quiet week
Almost nothing visible happens. The plant is growing roots you can’t see and assessing its new environment. Some species (vallisneria, stem plants) may start shedding their lowest leaves. This is normal. Resist the urge to “help” — no moving, no extra fertilizer, no light changes. The most common beginner mistake is intervening during a week when the correct action is nothing.
Week 2: Melt peaks
This is when emersed leaves give up in earnest. Crypts may drop everything; swords shed their broad aerial leaves; stem plants lose lower foliage. It looks catastrophic and it’s usually fine. Keep removing mushy material, keep conditions stable, and watch the crown and growing tips — if those are firm and green, recovery is already underway.
Week 3: The turn
New submersed-adapted leaves emerge — smaller, thinner, often a slightly different shade of green than the emersed foliage. Stem plant tips start growing visibly; crypts push tiny curled leaves from the crown; swords unfurl narrow ribbon leaves. This is the moment most beginners exhale for the first time.
Week 4+: Established
New growth outpaces melt, and the plant is functionally yours. You can resume full-strength fertilizer, normal trimming, and stop treating it as fragile. Some slow growers (anubias, bucephalandra) take 6–8 weeks to show obvious progress — that’s their normal speed, not a problem.
Acclimating Different Plant Formats
Tissue-culture cups
Sterile, pest-free, and already adapted to high-humidity (not emersed) growth — tissue cultures melt the least of any format. Rinse the agar gel off gently (leftover gel rots and feeds fungus), split the portion into small plantlets, and plant per our planting guide. They establish slowly for the first two weeks, then accelerate. No dip needed, minimal acclimation stress — this is the premium experience you’re paying for.
Potted plants
Remove the pot and strip away the rockwool completely — leftover rockwool traps debris and rots. Tease the root mass apart gently; if it’s a dense mat, splitting it into 2–3 smaller portions actually establishes faster than planting one big clump (more growing points, better water flow around roots). Potted plants are usually emersed-grown, so expect the standard 2–4 week melt cycle.
Bare-root / bunched stems
Typically sold as weighted bunches. Remove any bands, foam, or weights, strip the lower leaves, and plant stems individually or in small groups. Bunched stems from the store are often already transitioning — check for new submersed growth at the tips, which tells you the plant is mid-adaptation and will settle quickly.
Hobbyist cuttings
Already submersed-grown and the fastest to establish — often showing new growth within days. The main acclimation factor is water-parameter difference between the two tanks. Float to temperature-match, plant promptly, and they’ll usually take off with minimal melt. This is why experienced hobbyists prefer trading cuttings over buying potted plants.
Frequently Asked Questions
Should I use a “plant starter” or transplant fertilizer?
Products marketed for transplant shock are mostly B-vitamins and mild hormones. They don’t hurt, but there’s no strong evidence they help aquarium plants specifically. Stable conditions and patience outperform any bottle. Save the money for more plants.
My new plant melted completely — bare crown, no leaves. Is it dead?
Probably not, if the crown or rhizome is firm. Crypts and swords routinely lose 100% of their leaves and regrow from the base within a month. The test is firmness: firm and pale/green means alive; mushy and brown/black means rot. Give firm-but-leafless plants a full 4 weeks before declaring them dead.
Can I speed up acclimation with extra light or CO2?
No — and trying usually backfires. A melting plant can’t use extra light; the excess just grows algae on its dying leaves. Keep light moderate and CO2 stable (not boosted) during acclimation. Growth speed comes from the plant’s own adaptation timeline, which you can’t rush, only avoid delaying.
Should new plants go straight into my main display tank?
After quarantine/dipping, yes — there’s no benefit to a separate “growing-in” tank for most plants. They acclimate to your water fastest in the tank they’ll live in. The exception is very delicate species going into a tank with boisterous fish; give those a few weeks in a calm corner or breeder box first.
The Patience Rule
The single most important acclimation skill is restraint: plant it right, set gentle conditions, remove decay, and then leave it alone for a month. The hobbyists with the best plant growth aren’t doing something clever in week one — they’re simply not interfering in weeks two through four while the plants do what they’ve evolved to do. Melt looks like failure and feels like failure, but in most cases it’s the visible part of a plant successfully becoming yours.