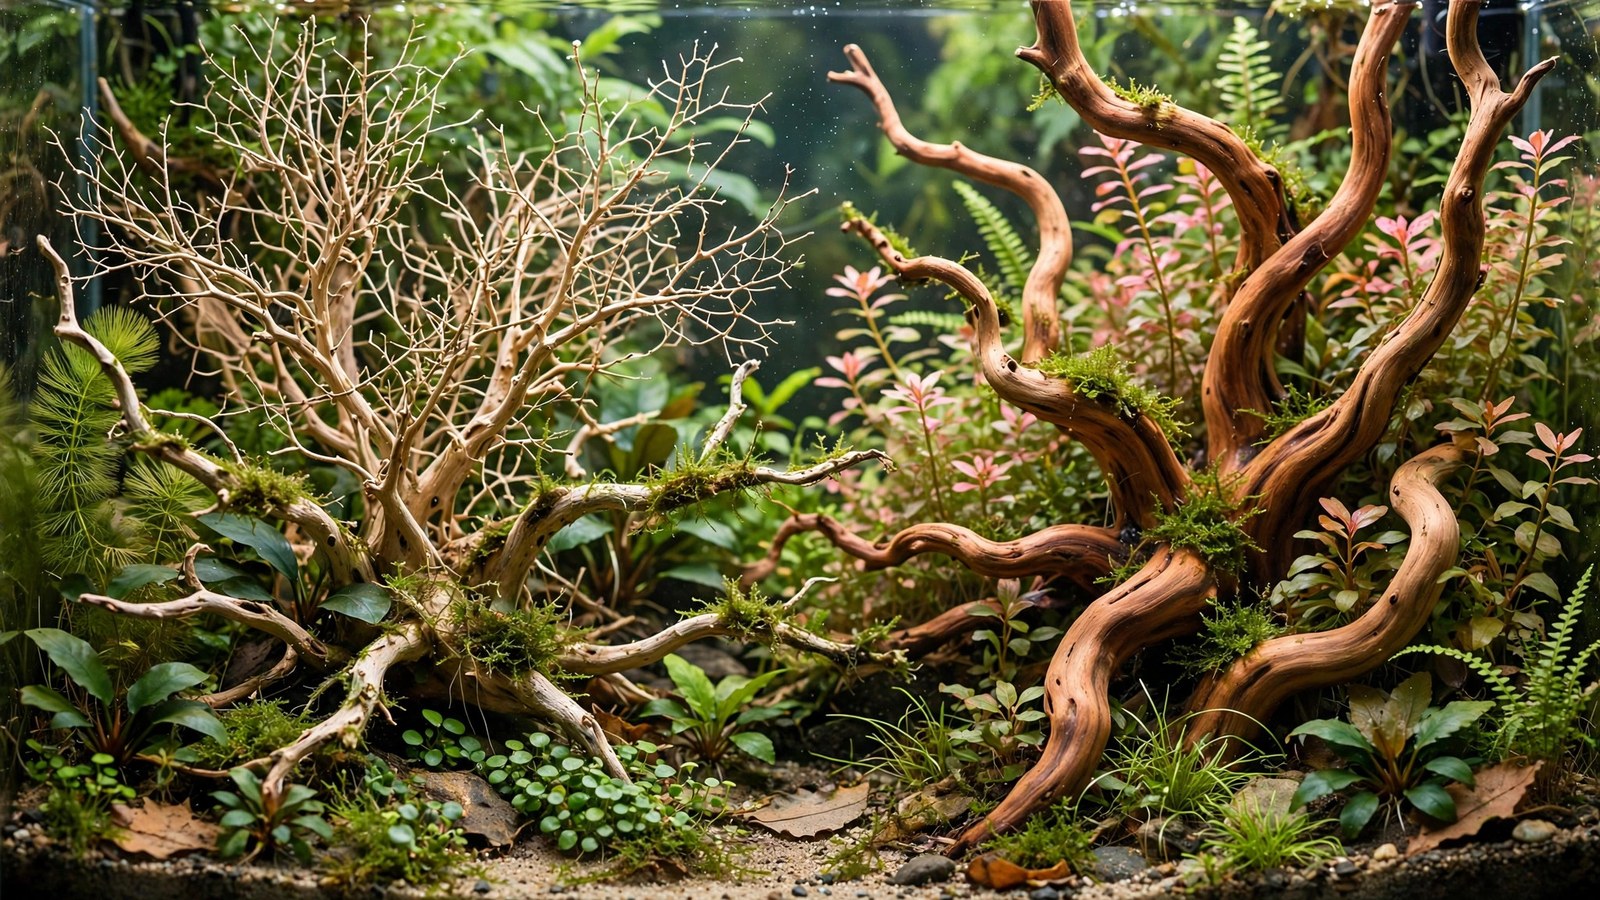
Two woods dominate serious aquascaping — spider wood with its wild branching tentacles, and manzanita with its elegant, sculptural limbs. They create completely different scapes, behave differently in water, and suit different visions. Pick the wrong one and you'll fight its nature for the life of the tank. This guide compares them honestly so you choose the wood that matches your aquascape, not just the prettiest piece in the store bin.
What Each Wood Is
Spider wood (often sold as "red moor wood" or azalea root) is the gnarled root wood of rhododendron/azalea-family shrubs. It's characterized by thin, twisting, multi-directional branches — dozens of fine limbs sprouting at chaotic angles, like a root system flash-frozen mid-growth. Color ranges from tan to reddish-brown, darkening with age underwater.
Manzanita is the wood of Arctostaphylos shrubs/trees native to the western US. It's denser, smoother, and more architectural — thicker limbs with elegant curves, a distinctive smooth reddish bark (usually sandblasted off for aquarium use), and a refined, almost bonsai-like character. It's the wood of award-winning nature aquariums.
Side-by-Side Comparison
| Trait | Spider Wood | Manzanita |
|---|---|---|
| Branch character | Many thin, chaotic, twiggy branches | Fewer, thicker, gracefully curved limbs |
| Density / sinking | Light — usually floats for weeks/months; often needs anchoring | Dense — sinks quickly, often immediately |
| Tannin leaching | Moderate — noticeable tint for 1–3 months | Light to moderate — clears relatively fast |
| Durability underwater | Good (2–4 years); thin tips soften first | Excellent (5+ years); very rot-resistant |
| Biofilm / fungus phase | Heavy white biofilm common on new pieces | Light — less dramatic slime phase |
| Price & availability | Cheap, widely available | Pricier, sometimes hard to find large pieces |
| Best scape styles | Jungle, root-tangle, blackwater, dramatic chaos | Nature style, bonsai trees, minimalist, elegant |
The Sinking Question (Spider Wood's Big Annoyance)
Let's address the elephant: spider wood floats. Fresh pieces can bob for weeks or even months before waterlogging. This is the #1 frustration with spider wood, and you need a plan:
- Pre-soak weighted down — bucket, heavy rock on top, 2–4 weeks. Boiling first accelerates it dramatically.
- Anchor in the scape — wedge between rocks, tie to slate bases with fishing line, or glue to stone. Many scapers build the hardscape with anchoring as part of the design.
- Just wait — in-tank, weighed down by substrate packed around the base, most pieces sink within a month. It's annoying, not fatal.
Manzanita, being far denser, usually sinks immediately or within days. If low-maintenance setup matters to you, this alone can decide it. Our driftwood preparation guide covers waterlogging techniques for both.
Aesthetics: What Each One Wants to Be
Spider wood wants chaos
Spider wood's branching is too busy for minimalism and perfect for wildness. It excels as:
- Root tangles — the classic "fallen tree root" scape, with the branch mass forming the visual center.
- Epiphyte hotels — dozens of branch junctions are ideal attachment points for anubias, bucephalandra, java fern, and moss. A spider wood piece loaded with epiphytes is a complete aquascape by itself.
- Blackwater/jungle tanks — the chaotic structure reads as flooded forest. Pair with tannin tinting for the full effect.
Where it struggles: clean Iwagumi-adjacent layouts (too fussy), and small tanks where a big branchy piece overwhelms everything (see our nano hardscape guide for small-tank wood strategy).
Manzanita wants elegance
Manzanita's smooth, sculptural limbs suit refined compositions:
- Bonsai trees — the iconic aquascaping trick: a manzanita trunk with moss glued to the branch tips as "foliage." Manzanita's branch structure is uniquely suited to this; spider wood is too chaotic for convincing bonsai.
- Nature-style centerpieces — a single dramatic manzanita branch arcing across the tank, in the Amano tradition.
- Minimalist layouts — one perfect piece, negative space, done. Manzanita's restraint rewards simplicity.
The Biofilm Phase
New driftwood grows a white/translucent biofilm (bacterial/fungal colonization of surface sugars) — harmless, ugly, temporary. Spider wood gets it worse: its high surface area and softer composition produce dramatic slime coats in weeks 2–6. Manzanita's denser, smoother wood grows much less. Management is the same for both: nerite snails, otocinclus, and shrimp graze it enthusiastically; it fades on its own in 4–8 weeks; manual scrubbing during water changes speeds it. It's not dangerous — just unsightly patience-testing.
Planting on Each Wood
Both are excellent epiphyte mounts, with different techniques:
- Spider wood: wedge rhizome plants into branch forks (no glue needed in many spots), tie moss into the twiggy sections where it catches naturally. The chaos holds plants without help.
- Manzanita: smoother limbs need cyanoacrylate glue or thread for secure attachment — plants slide off the polished wood otherwise. But once attached, the clean lines showcase the plants beautifully.
Price, Sourcing, and Sustainability
Spider wood is cheap and everywhere — most fish stores stock bins of it, and online sellers offer it by the pound. Manzanita costs more (often 2–4× per piece) and large showpiece branches can be genuinely expensive. One note: buy manzanita from aquarium suppliers, not craft stores — craft manzanita is sometimes treated with preservatives or pesticides. Also be aware that wild manzanita harvesting is restricted in some areas; reputable aquarium suppliers sell farmed or legally collected wood.
Buying Guide: Picking Pieces in the Store
Driftwood is the one hardscape material you should never buy blind online if you can avoid it — every piece is unique, and photos flatten the branch structure that makes or breaks a scape. In the store bin:
- For spider wood: look for pieces with branches radiating in multiple directions (flat pieces look two-dimensional in the tank). Check that thin branch tips aren't already soft or crumbling. Bigger is usually better — you can trim spider wood down, but you can't add branches. Avoid pieces that smell musty (incompletely dried, may rot faster).
- For manzanita: look for continuous smooth curves without kinks — the elegance is in the line. Check branch junctions for cracks (manzanita sometimes splits at forks as it dries). Sandblasted pieces (bark removed, smooth finish) are aquarium-ready; bark-on pieces need the bark stripped or it'll shed in the tank.
- The squint test: squint at the piece from 6 feet away. If the silhouette is interesting blurred, it'll be interesting in the tank. Detail disappears underwater; silhouette is everything.
- Buy bigger than the tank seems to need. Wood looks 20–30% smaller underwater than in air. The piece that looks "about right" dry will look small once submerged.
Combining Wood With Rock
Wood rarely stands alone in top-tier scapes — the wood-rock dialogue is where compositions get interesting:
- Spider wood + dragon stone: the classic nature-style pairing. Stone provides the solid "mountain," wood the organic "forest" weaving through it. The warm brown tones harmonize naturally.
- Manzanita + Seiryu: the refined Iwagumi-adjacent pairing — cool gray stone against warm smooth wood, minimal planting, maximum negative space.
- Rule of thirds for materials: let one material dominate (roughly 70/30). Equal wood and rock usually looks indecisive; a clear hierarchy looks designed.
- Bury the junction: where wood meets rock or substrate, bury the contact point — floating junctions (wood visibly resting on rock) look placed, not grown. Substrate or moss hides the seam.
Frequently Asked Questions
Can I use spider wood and manzanita together?
You can, but it's hard to do well — their characters clash (chaotic vs refined) and the combination often looks accidental rather than designed. If you mix, use one as the clear dominant (80% of the wood mass) and the other as a small accent. Most award-level scapes commit to one wood species for visual coherence.
Which is better for a betta tank?
Both work, but spider wood's branch tangle creates the broken sightlines and resting spots bettas love near the surface. Manzanita's open elegance suits a display betta tank where you're showcasing the fish. Either way, sand sharp branch tips — betta fins tear on rough wood.
How do I keep spider wood from floating?
Boil it (accelerates waterlogging), then soak weighted for 2–4 weeks before scaping. In the tank, anchor the base under heavy rocks or glue it to a slate tile buried in the substrate. Most pieces eventually stay down on their own — you're bridging the first month.
Does manzanita leach tannins?
Lightly — much less than Mopani or Malaysian wood. You'll get a faint tint for a few weeks, easily managed with water changes or Purigen. If you want a blackwater look, manzanita won't get you there alone; add catappa leaves or choose a heavier leacher.
Which lasts longer underwater?
Manzanita, by a clear margin — its dense hardwood resists softening for 5+ years, while spider wood's thinner branches begin softening at 2–4 years (the thick base lasts longer). Neither rots catastrophically; they just gradually lose crispness. For a tank you plan to keep a decade, manzanita is the lower-maintenance choice.
Choose the Wood That Matches Your Vision
There is no "better" here — there's only better for your scape. Want wild, jungly, epiphyte-loaded chaos on a budget? Spider wood, with patience for the floating phase. Want refined, sculptural, bonsai-capable elegance that sinks on day one? Manzanita, at a premium. The wood is the skeleton of your aquascape — pick the skeleton that wants to become the tank you're imagining.
Tissue-culture plants are the exception — they’re grown in sterile gel and adapt with minimal melting, which is part of what you’re paying for. Plants bought submersed from another hobbyist’s tank also transition with little melt, since they’re already in the right form.
Which Plants Melt Most (and Least)
Heavy melters (expect significant leaf loss)
- Cryptocorynes — infamous for “crypt melt,” sometimes dropping every leaf after any disturbance. They almost always recover from the roots within weeks.
- Stem plants grown emersed — rotala, ludwigia, and hygrophila often shed lower emersed leaves while the growing tips transition.
- Amazon swords — emersed-grown swords typically lose their broad oval aerial leaves and replace them with longer submersed ribbon leaves.
Light melters
- Anubias, java fern, bucephalandra — slow-growing rhizome plants transition gradually; occasional old-leaf melt but rarely dramatic.
- Vallisneria — usually transitions well, though it dislikes the move itself and may sulk for a week.
- Floating plants — minimal melt since their leaves were already at the air-water interface.
The Acclimation Protocol
Step 1: Quarantine or dip first
Before acclimating to your tank’s conditions, make sure you’re not acclimating pests along with the plant. Run new arrivals through our quarantine and dip protocol — it adds days upfront but prevents months of regret.
Step 2: Float to temperature-match (30 minutes)
Float the bag or container in your tank for 20–30 minutes to equalize temperature. Plants are less temperature-sensitive than fish, but a 10°F shock on top of transplant stress is an avoidable insult.
Step 3: Trim before planting
Remove any leaves that are already damaged, yellowing, or heavily algae-covered — they won’t recover and they’ll rot in your tank, feeding algae. For stem plants, trim off the bottom inch and any emersed leaves that look unlikely to adapt; the plant wastes energy maintaining leaves it’s going to shed anyway. Keep the healthy growing tips — that’s where recovery starts.
Step 4: Plant correctly the first time
Follow our planting guide — right depth, crown exposed on rosettes, rhizomes unburied on epiphytes. Every uprooting and replanting restarts the acclimation clock, so get placement right on the first attempt. Decide where each plant goes before it goes in the water.
Step 5: Run a gentle first week
For the first 7 days after planting:
- Moderate light — run your normal photoperiod but consider dropping intensity 20–30% if your light is dimmable. Blast-level light on a melting plant grows algae on the dying leaves, not recovery.
- Stable CO2 — if you inject CO2, keep it consistent. Fluctuating CO2 during acclimation is a melt accelerator. If you’re low-tech, this doesn’t apply — see growing without CO2.
- Half-strength fertilizer — new plants with damaged leaves can’t use full dosing, and the excess feeds algae. Ramp to full strength over 2–3 weeks per our fertilizer schedule.
- No disturbance — don’t move, trim, or “check on” new plants for at least two weeks. Every touch resets root establishment. This is especially critical for crypts.
Step 6: Remove melt, keep the base
As emersed leaves melt, remove the mushy material promptly — decaying leaves release ammonia and grow fungus that can spread to healthy tissue. But never discard the plant while the crown, rhizome, or roots are firm and alive. A crypt that’s lost every leaf but has firm roots is a plant that’s about to recover, not a dead plant. Give it 3–4 weeks before judging.
Telling Normal Melt From Real Problems
Normal transition melt:
- Affects oldest/emersed leaves first, newest growth last
- New submersed leaves emerge even as old ones dissolve
- Roots and crown stay firm and white/green
- Timeline: 1–4 weeks, then obvious new growth
Concerning melt (see our full melting diagnosis guide):
- New growth also melts or emerges deformed
- Rhizome or crown turns mushy and brown — this is rot, not transition
- Entire plant dissolves within days with no new growth after 4+ weeks
- Melting spreads to established plants that weren’t recently moved
Buying Tips to Minimize Melt
- Buy submersed-grown when available — hobbyist-grown cuttings transition with almost no melt.
- Choose tissue culture for sensitive species — crypts and delicate stems establish far more reliably from sterile cups.
- Avoid plants already melting in the store tank — some melt is normal, but a plant that’s mostly mush at purchase has less energy for recovery.
- Transport carefully — keep plants damp and out of direct sun/heat. A plant that dries out or cooks in a hot car melts far worse than one transported properly.
The First-Month Timeline: What to Expect Week by Week
Knowing what’s normal when removes most acclimation anxiety. Here’s the typical timeline for a healthy plant adapting to a new tank:
Week 1: The quiet week
Almost nothing visible happens. The plant is growing roots you can’t see and assessing its new environment. Some species (vallisneria, stem plants) may start shedding their lowest leaves. This is normal. Resist the urge to “help” — no moving, no extra fertilizer, no light changes. The most common beginner mistake is intervening during a week when the correct action is nothing.
Week 2: Melt peaks
This is when emersed leaves give up in earnest. Crypts may drop everything; swords shed their broad aerial leaves; stem plants lose lower foliage. It looks catastrophic and it’s usually fine. Keep removing mushy material, keep conditions stable, and watch the crown and growing tips — if those are firm and green, recovery is already underway.
Week 3: The turn
New submersed-adapted leaves emerge — smaller, thinner, often a slightly different shade of green than the emersed foliage. Stem plant tips start growing visibly; crypts push tiny curled leaves from the crown; swords unfurl narrow ribbon leaves. This is the moment most beginners exhale for the first time.
Week 4+: Established
New growth outpaces melt, and the plant is functionally yours. You can resume full-strength fertilizer, normal trimming, and stop treating it as fragile. Some slow growers (anubias, bucephalandra) take 6–8 weeks to show obvious progress — that’s their normal speed, not a problem.
Acclimating Different Plant Formats
Tissue-culture cups
Sterile, pest-free, and already adapted to high-humidity (not emersed) growth — tissue cultures melt the least of any format. Rinse the agar gel off gently (leftover gel rots and feeds fungus), split the portion into small plantlets, and plant per our planting guide. They establish slowly for the first two weeks, then accelerate. No dip needed, minimal acclimation stress — this is the premium experience you’re paying for.
Potted plants
Remove the pot and strip away the rockwool completely — leftover rockwool traps debris and rots. Tease the root mass apart gently; if it’s a dense mat, splitting it into 2–3 smaller portions actually establishes faster than planting one big clump (more growing points, better water flow around roots). Potted plants are usually emersed-grown, so expect the standard 2–4 week melt cycle.
Bare-root / bunched stems
Typically sold as weighted bunches. Remove any bands, foam, or weights, strip the lower leaves, and plant stems individually or in small groups. Bunched stems from the store are often already transitioning — check for new submersed growth at the tips, which tells you the plant is mid-adaptation and will settle quickly.
Hobbyist cuttings
Already submersed-grown and the fastest to establish — often showing new growth within days. The main acclimation factor is water-parameter difference between the two tanks. Float to temperature-match, plant promptly, and they’ll usually take off with minimal melt. This is why experienced hobbyists prefer trading cuttings over buying potted plants.
Frequently Asked Questions
Should I use a “plant starter” or transplant fertilizer?
Products marketed for transplant shock are mostly B-vitamins and mild hormones. They don’t hurt, but there’s no strong evidence they help aquarium plants specifically. Stable conditions and patience outperform any bottle. Save the money for more plants.
My new plant melted completely — bare crown, no leaves. Is it dead?
Probably not, if the crown or rhizome is firm. Crypts and swords routinely lose 100% of their leaves and regrow from the base within a month. The test is firmness: firm and pale/green means alive; mushy and brown/black means rot. Give firm-but-leafless plants a full 4 weeks before declaring them dead.
Can I speed up acclimation with extra light or CO2?
No — and trying usually backfires. A melting plant can’t use extra light; the excess just grows algae on its dying leaves. Keep light moderate and CO2 stable (not boosted) during acclimation. Growth speed comes from the plant’s own adaptation timeline, which you can’t rush, only avoid delaying.
Should new plants go straight into my main display tank?
After quarantine/dipping, yes — there’s no benefit to a separate “growing-in” tank for most plants. They acclimate to your water fastest in the tank they’ll live in. The exception is very delicate species going into a tank with boisterous fish; give those a few weeks in a calm corner or breeder box first.
The Patience Rule
The single most important acclimation skill is restraint: plant it right, set gentle conditions, remove decay, and then leave it alone for a month. The hobbyists with the best plant growth aren’t doing something clever in week one — they’re simply not interfering in weeks two through four while the plants do what they’ve evolved to do. Melt looks like failure and feels like failure, but in most cases it’s the visible part of a plant successfully becoming yours.