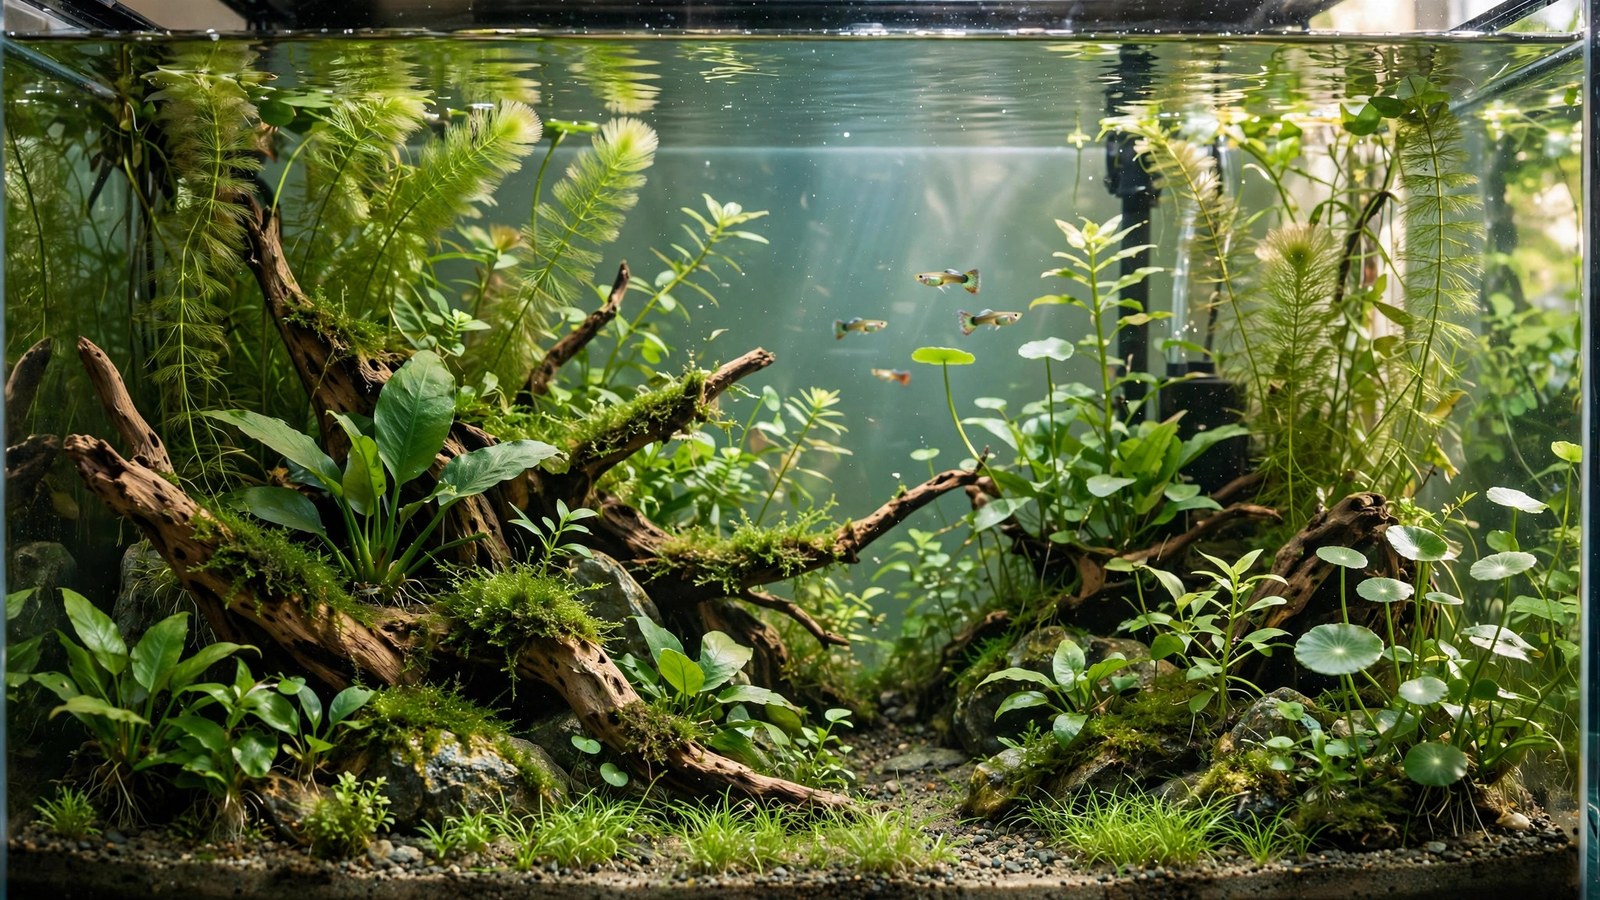
Guppies are the fish that launched a million aquariums — and also the fish most often kept in sad, bare tanks where they merely survive. A planted guppy tank setup changes everything: males color up dramatically against green, females drop fry that actually survive, and the tank practically maintains itself. Here's how to build one that shows guppies at their best.
Why Guppies and Plants Are a Perfect Match
Guppies evolved in vegetation-choked streams and ditches in South America, and their behavior still expects cover. In a planted tank, males display constantly — flaring fins, dancing for females — because plants break sightlines and give subordinate males somewhere to retreat. In a bare tank, one dominant male harasses everyone into a corner.
Plants also solve the guppy keeper's eternal equation: guppies breed constantly, and fry need somewhere to hide. Dense planting — especially fine-leaved stem plants and floating plants — turns a guppy tank from a fry-eating arena into a self-sustaining colony. Add that plants absorb the considerable nitrate a breeding colony produces, and the match is complete. For general planting principles that apply here, our low-tech planted tank setup guide is the right foundation.
Tank Size and Shape
A 10-gallon tank is the minimum for a real guppy colony — it holds a starter trio comfortably and gives fry room to grow. A 20-gallon long is the sweet spot: the long footprint gives males display space, dilutes the bioload of constant breeding, and offers room for the dense planting a colony needs. Our full 20-gallon planted tank setup walks through equipment for this size in detail.
Breeding math matters: a single female drops 20–50 fry every month. A 10-gallon hits capacity within a few months; a 20-gallon buys you time. Plan your colony's endpoint — local store trade-ins, a second tank, or a predator tank — before you're overrun, not after.
Male-to-female ratio
Keep 1 male to 2–3 females. A single male with one female harasses her relentlessly; the ratio spreads his attention. All-male tanks work too and are stunning — no fry, no population explosion, just a dozen displaying males in a planted tank. Many keepers find all-male colonies the most enjoyable guppy setup of all.
Water Parameters: Guppies Like It Hard and Alkaline
Guppies are one of the few popular fish that prefer hard, alkaline water — the opposite of what most "planted tank" advice assumes:
| Parameter | Target range |
|---|---|
| Temperature | 72–78°F (22–26°C) |
| pH | 7.0–8.0 |
| GH | 8–12 dGH |
| KH | 4–8 dKH |
| Ammonia / nitrite | 0 ppm |
| Nitrate | Under 40 ppm |
This has a direct substrate implication: use inert substrate (sand or gravel), not active buffering soil that drags pH down. Guppies in soft acidic water get sick, stop breeding, and develop clamped fins. If your tap water is naturally soft, add a little crushed coral or aragonite to the filter to hold hardness up. Our planted tank water parameters guide covers the chemistry in depth.
Substrate and Hardscape
Pool filter sand or fine gravel, 1.5–2 inches deep, in a natural tan or dark color. Dark substrate makes guppy colors pop — reds, blues, and yellows all intensify over dark backgrounds the way they wash out over white sand. Add root tabs under heavy root feeders like Amazon swords.
Hardscape lightly: a piece of driftwood or a few smooth stones gives structure, but guppy tanks are about the plants, not the rocks. Leave open swimming space in the front third — males need display room — and plant densely in the back two-thirds.
The Guppy Plant List
Choose plants that do three jobs: fry cover, nitrate absorption, and visual backdrop. All of these thrive in hard, alkaline water without CO2:
Fry cover (the non-negotiables)
- Guppy grass (Najas guadalupensis) — named for exactly this job. Fine, dense, fast-growing; fry vanish into it. Float it or plant it; either way it works.
- Hornwort — the classic fry refuge. Grows inches per week, sucks up nitrate, and needs nothing. Float bunches at the surface where newborn fry instinctively go.
- Java moss — shrimplet-grade hiding density for the tiniest fry. Attach to wood in the lower tank where fry hide from adults.
- Water sprite — float it for a root tangle that fry live in, or plant it for a feathery background. One of the fastest nutrient sponges available.
Background and midground structure
- Amazon sword — broad leaves give females resting spots out of the males' line of sight. A big sword anchors the whole scape.
- Vallisneria — tall grass-like leaves create the vertical lines that make guppy colors stand out. Spreads by runners to fill the background.
- Anubias and java fern on wood — indestructible, low-light, and their broad leaves are grazing surfaces. Attach, don't bury.
- Floating plants — frogbit or salvinia dims the light (guppies color up better in slightly dimmer tanks), absorbs excess nutrients, and trailing roots shelter fry. See our floating plant guide for species options.
Plant heavily from day one — aim for 60–70% of the substrate planted. Our how many plants for a new aquarium guide helps you estimate quantities. Dense initial planting outcompetes algae and gives the colony instant cover.
Filtration and Flow
Guppies like gentle flow — they're not strong swimmers and long-finned males struggle in currents. A sponge filter is ideal for a breeding colony: fry-safe, gentle, and cheap. A hang-on-back filter with a pre-filter sponge over the intake works for display setups. Whatever you choose, baffle the output if it creates a jet — you want the whole tank usable, not one calm corner.
Fry and filter intakes: any intake gets a sponge cover, period. Newborn guppy fry are exactly intake-sized. This is the same rule as our planted shrimp tank setup — shrimplets and fry share the same vulnerability.
Lighting: Keep It Moderate
A basic LED on a timer, 7–8 hours daily, is all a guppy tank needs. These plants all grow under moderate light; blasting high light just grows algae on the slow growers. Floating plants will shade portions naturally — that's fine, even desirable. Guppies show their best color under slightly subdued lighting with a dark background.
Feeding a Planted Guppy Colony
Guppies are enthusiastic omnivores that will eat constantly if allowed. Feed a quality micro-pellet or crushed flake twice daily, only what disappears in 2 minutes. Supplement 2–3 times weekly with frozen daphnia or baby brine shrimp — live or frozen foods trigger breeding condition and intensify color far more than any "color-enhancing" flake.
Fry feeding: newborn fry eat from day one. Crushed flake powder, powdered fry food, or newly hatched baby brine shrimp 2–3 times daily in small amounts. In a mature planted tank, fry also graze biofilm and infusoria off plant surfaces — another reason dense planting raises more fry with less work.
Cycling and Adding Fish
Plant first, cycle second, fish third. Heavily planted tanks often cycle in 1–2 weeks because plants consume ammonia directly — our faster cycling guide explains the plant-assisted method. Add the starter trio only when ammonia and nitrite read zero for several consecutive days.
Quarantine new guppies for 2–3 weeks before adding them to the colony. Guppies from pet stores frequently carry parasites and infections; one sick fish can wipe a colony. This is doubly important because guppy strains have been weakened by generations of inbreeding — buy from reputable breeders when you can.
Managing the Population Explosion
This is the part nobody warns beginners about: a healthy planted guppy tank produces more guppies than it can hold. Have a plan:
- Trade with local stores — many buy or credit healthy home-bred guppies.
- All-male display tank — move excess males to a second planted tank; it's gorgeous and population-stable.
- Let nature take some — in a community setup, a few fry get eaten. That's normal population control, not cruelty.
- Separate the sexes — the only guaranteed stop. Females store sperm for months, so separation takes a while to take effect.
What doesn't work: "the pet store will take them" without asking first, flushing (never — it's cruel and ecologically reckless), or hoping the problem solves itself. Plan before the first drop of fry, not during the fifth.
Maintenance Routine
- 25% weekly water change — breeding colonies are nitrate factories; plants help but don't replace water changes.
- Trim fast growers every 2–3 weeks — hornwort, guppy grass, and water sprite can choke a tank if ignored. Compost the trimmings or trade them.
- Vacuum lightly — hover the siphon over the substrate rather than digging in; fry hide in the gravel.
- Thin floating plants weekly — they double fast and will block all light if neglected.
- Watch the males' fins — ragged fins in a planted tank usually mean fin-nipping tankmates or poor water, not disease.
Frequently Asked Questions
Can guppies live in a planted tank with CO2 injection?
Yes — guppies tolerate CO2-injected tanks fine as long as levels stay reasonable and oxygen stays high. But it's unnecessary: every plant on the guppy list thrives without CO2. Save the high-tech gear for demanding species; a low-tech guppy tank is cheaper, more stable, and the fish don't care about the difference.
Will guppies eat my plants?
Healthy guppies don't eat healthy plants. They graze algae and biofilm off leaves, which keeps plants cleaner. They may nibble soft new growth if starving, but well-fed guppies leave plants alone. Duckweed, however, they will devour — which is actually a useful way to control it.
How do I stop guppies from overpopulating the tank?
The reliable methods are separating males from females, keeping an all-male tank, or regularly rehoming fry through local stores and hobbyist groups. Dense planting actually increases survival, so if overpopulation worries you, plant less fry cover — but most keepers find they'd rather manage numbers than watch fry get eaten in a bare tank.
What tankmates work in a planted guppy tank?
Peaceful community fish that share hard-water preferences: platies, mollies, corydoras, and small peaceful tetras. Avoid fin-nippers like tiger barbs and serpae tetras — they'll shred guppy tails. Cherry shrimp coexist fine with guppies, though guppies will eat newborn shrimplets. See our schooling fish guide for more community options.
My guppies' colors faded after I brought them home. Why?
Stress and environment. Store lighting is designed to make fish glow; home tanks often have dimmer light and pale substrate. Give them 2–4 weeks in a planted tank with dark substrate, good food (especially frozen foods), and stable water — colors almost always intensify beyond store levels. Persistent fading with clamped fins means water quality or illness, not aesthetics.
Do I need a heater for guppies?
In most homes, yes — guppies want 72–78°F consistently. Room temperature tanks that swing between 68°F at night and 76°F by day stress them and invite disease. A small adjustable heater with a thermostat costs little and removes the single biggest variable in guppy health.
The Guppy Tank at Its Best
A planted guppy tank done right is pure motion and color: males dancing through vallisneria, fry darting in the hornwort, females grazing peacefully on sword leaves. It asks little — moderate light, weekly water changes, occasional trims — and gives back one of the liveliest displays in the hobby. Build it plant-first, stock it thoughtfully, and plan for the fry, and you'll wonder why anyone keeps guppies any other way.
For the wild-habitat data behind these water parameters, see SeriouslyFish’s guppy species profile.
Tissue-culture plants are the exception — they’re grown in sterile gel and adapt with minimal melting, which is part of what you’re paying for. Plants bought submersed from another hobbyist’s tank also transition with little melt, since they’re already in the right form.
Which Plants Melt Most (and Least)
Heavy melters (expect significant leaf loss)
- Cryptocorynes — infamous for “crypt melt,” sometimes dropping every leaf after any disturbance. They almost always recover from the roots within weeks.
- Stem plants grown emersed — rotala, ludwigia, and hygrophila often shed lower emersed leaves while the growing tips transition.
- Amazon swords — emersed-grown swords typically lose their broad oval aerial leaves and replace them with longer submersed ribbon leaves.
Light melters
- Anubias, java fern, bucephalandra — slow-growing rhizome plants transition gradually; occasional old-leaf melt but rarely dramatic.
- Vallisneria — usually transitions well, though it dislikes the move itself and may sulk for a week.
- Floating plants — minimal melt since their leaves were already at the air-water interface.
The Acclimation Protocol
Step 1: Quarantine or dip first
Before acclimating to your tank’s conditions, make sure you’re not acclimating pests along with the plant. Run new arrivals through our quarantine and dip protocol — it adds days upfront but prevents months of regret.
Step 2: Float to temperature-match (30 minutes)
Float the bag or container in your tank for 20–30 minutes to equalize temperature. Plants are less temperature-sensitive than fish, but a 10°F shock on top of transplant stress is an avoidable insult.
Step 3: Trim before planting
Remove any leaves that are already damaged, yellowing, or heavily algae-covered — they won’t recover and they’ll rot in your tank, feeding algae. For stem plants, trim off the bottom inch and any emersed leaves that look unlikely to adapt; the plant wastes energy maintaining leaves it’s going to shed anyway. Keep the healthy growing tips — that’s where recovery starts.
Step 4: Plant correctly the first time
Follow our planting guide — right depth, crown exposed on rosettes, rhizomes unburied on epiphytes. Every uprooting and replanting restarts the acclimation clock, so get placement right on the first attempt. Decide where each plant goes before it goes in the water.
Step 5: Run a gentle first week
For the first 7 days after planting:
- Moderate light — run your normal photoperiod but consider dropping intensity 20–30% if your light is dimmable. Blast-level light on a melting plant grows algae on the dying leaves, not recovery.
- Stable CO2 — if you inject CO2, keep it consistent. Fluctuating CO2 during acclimation is a melt accelerator. If you’re low-tech, this doesn’t apply — see growing without CO2.
- Half-strength fertilizer — new plants with damaged leaves can’t use full dosing, and the excess feeds algae. Ramp to full strength over 2–3 weeks per our fertilizer schedule.
- No disturbance — don’t move, trim, or “check on” new plants for at least two weeks. Every touch resets root establishment. This is especially critical for crypts.
Step 6: Remove melt, keep the base
As emersed leaves melt, remove the mushy material promptly — decaying leaves release ammonia and grow fungus that can spread to healthy tissue. But never discard the plant while the crown, rhizome, or roots are firm and alive. A crypt that’s lost every leaf but has firm roots is a plant that’s about to recover, not a dead plant. Give it 3–4 weeks before judging.
Telling Normal Melt From Real Problems
Normal transition melt:
- Affects oldest/emersed leaves first, newest growth last
- New submersed leaves emerge even as old ones dissolve
- Roots and crown stay firm and white/green
- Timeline: 1–4 weeks, then obvious new growth
Concerning melt (see our full melting diagnosis guide):
- New growth also melts or emerges deformed
- Rhizome or crown turns mushy and brown — this is rot, not transition
- Entire plant dissolves within days with no new growth after 4+ weeks
- Melting spreads to established plants that weren’t recently moved
Buying Tips to Minimize Melt
- Buy submersed-grown when available — hobbyist-grown cuttings transition with almost no melt.
- Choose tissue culture for sensitive species — crypts and delicate stems establish far more reliably from sterile cups.
- Avoid plants already melting in the store tank — some melt is normal, but a plant that’s mostly mush at purchase has less energy for recovery.
- Transport carefully — keep plants damp and out of direct sun/heat. A plant that dries out or cooks in a hot car melts far worse than one transported properly.
The First-Month Timeline: What to Expect Week by Week
Knowing what’s normal when removes most acclimation anxiety. Here’s the typical timeline for a healthy plant adapting to a new tank:
Week 1: The quiet week
Almost nothing visible happens. The plant is growing roots you can’t see and assessing its new environment. Some species (vallisneria, stem plants) may start shedding their lowest leaves. This is normal. Resist the urge to “help” — no moving, no extra fertilizer, no light changes. The most common beginner mistake is intervening during a week when the correct action is nothing.
Week 2: Melt peaks
This is when emersed leaves give up in earnest. Crypts may drop everything; swords shed their broad aerial leaves; stem plants lose lower foliage. It looks catastrophic and it’s usually fine. Keep removing mushy material, keep conditions stable, and watch the crown and growing tips — if those are firm and green, recovery is already underway.
Week 3: The turn
New submersed-adapted leaves emerge — smaller, thinner, often a slightly different shade of green than the emersed foliage. Stem plant tips start growing visibly; crypts push tiny curled leaves from the crown; swords unfurl narrow ribbon leaves. This is the moment most beginners exhale for the first time.
Week 4+: Established
New growth outpaces melt, and the plant is functionally yours. You can resume full-strength fertilizer, normal trimming, and stop treating it as fragile. Some slow growers (anubias, bucephalandra) take 6–8 weeks to show obvious progress — that’s their normal speed, not a problem.
Acclimating Different Plant Formats
Tissue-culture cups
Sterile, pest-free, and already adapted to high-humidity (not emersed) growth — tissue cultures melt the least of any format. Rinse the agar gel off gently (leftover gel rots and feeds fungus), split the portion into small plantlets, and plant per our planting guide. They establish slowly for the first two weeks, then accelerate. No dip needed, minimal acclimation stress — this is the premium experience you’re paying for.
Potted plants
Remove the pot and strip away the rockwool completely — leftover rockwool traps debris and rots. Tease the root mass apart gently; if it’s a dense mat, splitting it into 2–3 smaller portions actually establishes faster than planting one big clump (more growing points, better water flow around roots). Potted plants are usually emersed-grown, so expect the standard 2–4 week melt cycle.
Bare-root / bunched stems
Typically sold as weighted bunches. Remove any bands, foam, or weights, strip the lower leaves, and plant stems individually or in small groups. Bunched stems from the store are often already transitioning — check for new submersed growth at the tips, which tells you the plant is mid-adaptation and will settle quickly.
Hobbyist cuttings
Already submersed-grown and the fastest to establish — often showing new growth within days. The main acclimation factor is water-parameter difference between the two tanks. Float to temperature-match, plant promptly, and they’ll usually take off with minimal melt. This is why experienced hobbyists prefer trading cuttings over buying potted plants.
Frequently Asked Questions
Should I use a “plant starter” or transplant fertilizer?
Products marketed for transplant shock are mostly B-vitamins and mild hormones. They don’t hurt, but there’s no strong evidence they help aquarium plants specifically. Stable conditions and patience outperform any bottle. Save the money for more plants.
My new plant melted completely — bare crown, no leaves. Is it dead?
Probably not, if the crown or rhizome is firm. Crypts and swords routinely lose 100% of their leaves and regrow from the base within a month. The test is firmness: firm and pale/green means alive; mushy and brown/black means rot. Give firm-but-leafless plants a full 4 weeks before declaring them dead.
Can I speed up acclimation with extra light or CO2?
No — and trying usually backfires. A melting plant can’t use extra light; the excess just grows algae on its dying leaves. Keep light moderate and CO2 stable (not boosted) during acclimation. Growth speed comes from the plant’s own adaptation timeline, which you can’t rush, only avoid delaying.
Should new plants go straight into my main display tank?
After quarantine/dipping, yes — there’s no benefit to a separate “growing-in” tank for most plants. They acclimate to your water fastest in the tank they’ll live in. The exception is very delicate species going into a tank with boisterous fish; give those a few weeks in a calm corner or breeder box first.
The Patience Rule
The single most important acclimation skill is restraint: plant it right, set gentle conditions, remove decay, and then leave it alone for a month. The hobbyists with the best plant growth aren’t doing something clever in week one — they’re simply not interfering in weeks two through four while the plants do what they’ve evolved to do. Melt looks like failure and feels like failure, but in most cases it’s the visible part of a plant successfully becoming yours.