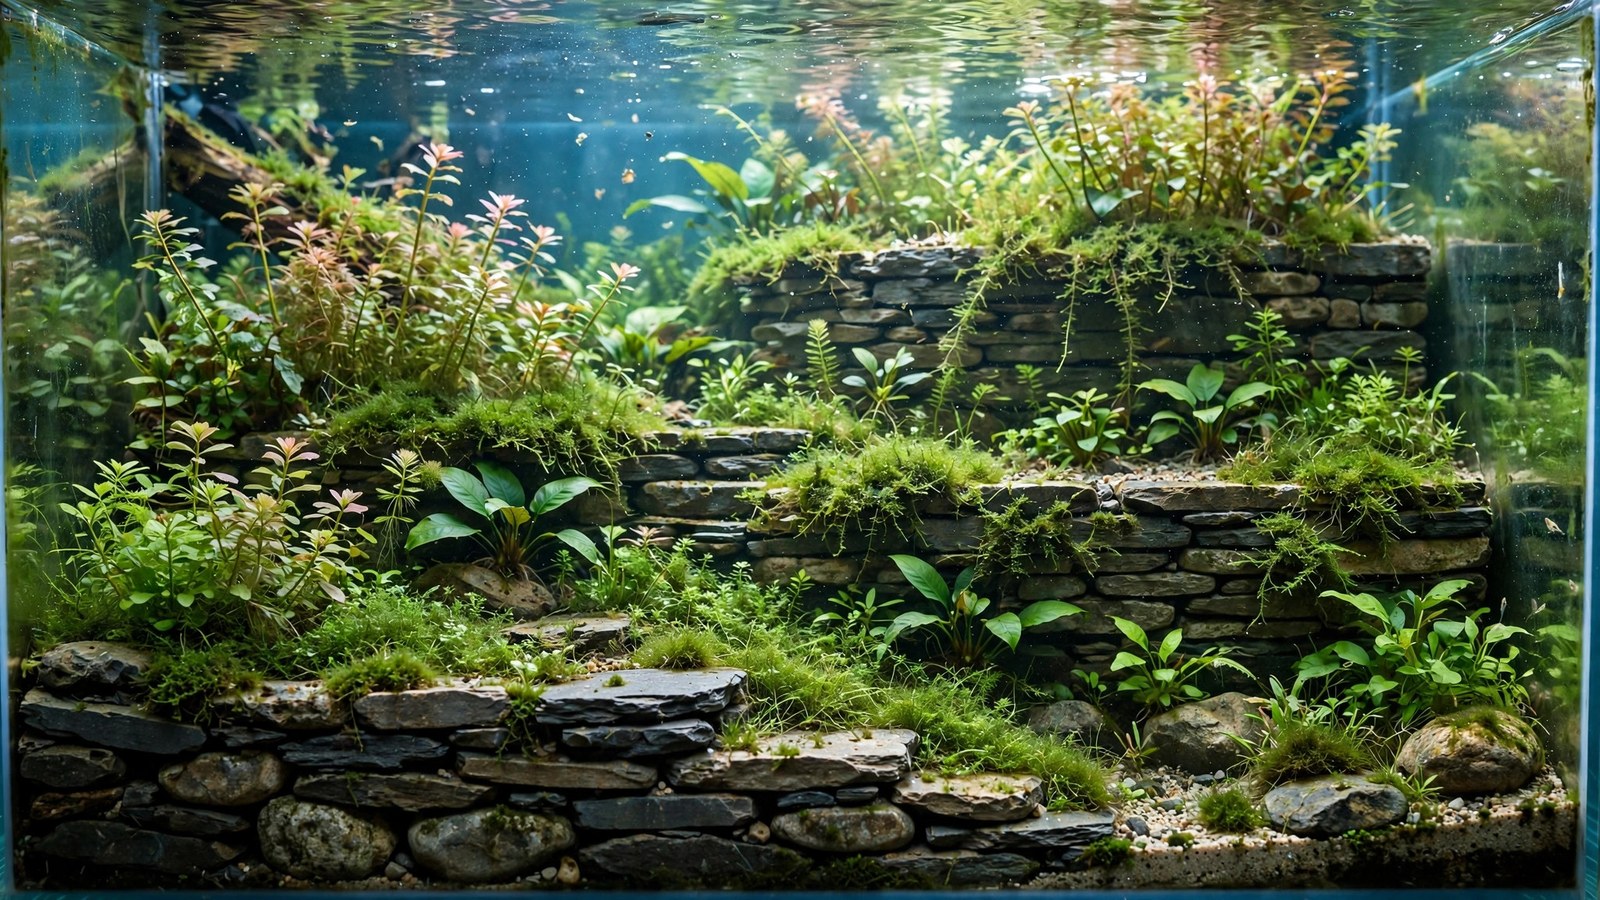
Flat is boring. The aquascapes that stop you mid-scroll — the valleys, the plateaus, the dramatic hillsides — all use elevation, and elevation in an aquarium means terraces: retaining walls holding substrate at different heights. Without retention, every slope you build slowly avalanches flat within months. This guide covers designing, building, and planting terraces that hold for years.
Why Slopes Fail (and Terraces Don't)
Substrate has an angle of repose — the steepest slope it holds before sliding. For aquarium substrates that's roughly 30–35° for gravel, less for sand. Anything steeper migrates downhill with every water change, fish activity, and planting disturbance. The classic beginner mistake: building a dramatic 6-inch hill of aquasoil on day one and finding a gentle 2-inch mound by month three.
Terraces solve this by breaking one tall slope into a staircase of short, retained steps. Each terrace wall holds back a manageable height (3–5 inches), the substrate behind each wall sits nearly level, and the whole structure is stable indefinitely. It's civil engineering at aquarium scale — retaining walls are how humans have held back hillsides for millennia.
Designing Your Terraces
Plan on paper first
Sketch the tank from the front and side. Decide:
- How many levels? Two levels (foreground low, background high) is the classic and the easiest. Three levels gives a proper valley/plateau composition. More than three gets fussy in most tank sizes.
- Height per terrace: 3–5 inches of retained substrate per wall. Taller walls need stronger construction and look less natural.
- The sightline: terraces should step up away from the viewer (front low, back high) — this creates forced perspective that makes the tank look deeper than it is. Side-to-side terracing suits peninsula tanks.
- Where the walls show: visible stone walls are a design feature (ancient terraced hillside); hidden walls (buried, planted over) create "impossible" smooth hills. Decide which aesthetic you're building.
Materials for walls
- Slate — the terrace champion: flat, stackable, glueable, cheap. Our slate guide covers wall-building technique in detail.
- Dragon stone slabs — prettier than slate, more expensive, needs glue for stability. The natural choice for visible feature walls.
- Lava rock chunks — rough, grippy, cheap; good for hidden structural walls where looks don't matter. See our lava rock guide.
- Substrate supports (plastic) — commercial honeycomb "soil supports" hold aquasoil slopes invisibly. Effective but pricey; DIY alternatives (plastic canvas, egg crate) work similarly.
- Wood: driftwood pieces laid horizontally make naturalistic terrace edging — less precise than stone, more organic looking.
Building Terraces: Step by Step
Build before adding substrate or water — terracing into an established tank is miserable.
- Place the back wall first. Position your tallest retaining wall where the highest terrace will be. For slate: dry-stack pieces 2–3 layers, each set back half an inch (battered wall — leans into the hill). For walls over 5 inches, glue layers with the tissue method and let cure.
- Backfill behind the wall with substrate — fill to just below the wall's top. Backfill as you build upward: wall layer, substrate behind it, next wall layer, more substrate. Building the full wall then pouring substrate behind washes out through the gaps.
- Pack firmly. Tamp each substrate lift (2-inch layers) gently — settled substrate doesn't slump later. Don't compress into concrete; just eliminate big air pockets.
- Build the next terrace forward and lower. Each wall's base sits on the previous terrace's substrate surface (or on the glass for the front-most wall).
- Cap the terrace surfaces with your visible substrate — the backfill can be cheap material (even plain gravel); only the top inch needs to be your display substrate. This saves money on aquasoil in big builds.
- Plant before flooding. Terrace edges are prime planting real estate (see below) — get plants in while you can reach everything.
- Flood slowly. Pour over a plate; the first fill tests every wall. Minor slumping is normal — top up substrate and re-seat stones before calling it done.
What Goes Wrong (and How to Prevent It)
- Wall blowout: substrate pressure pushes the wall forward. Prevention: batter walls (lean into the hill), keep retained height under 5 inches per wall, glue tall walls, and never backfill with waterlogged mud (build dry, flood after).
- Substrate leaking through wall gaps: line the back of the wall with filter floss, weed fabric, or fine mesh before backfilling — lets water through, holds substrate back. This single trick prevents 90% of terrace mess.
- Terraces visible as "steps": if you wanted smooth hills, plant the wall faces heavily (moss, anubias, creeping plants) — vegetation erases the staircase within months.
- Anaerobic pockets behind walls: deep backfill zones with no plant roots can go anaerobic. Keep backfill under 5–6 inches deep, and plant the terrace surfaces densely — roots are the aeration system.
- Fish undermining walls: digging cichlids and loaches excavate at wall bases. In digger tanks, bury wall bases deeper and accept some maintenance, or skip terraces — flat and stable beats tall and collapsed.
Planting Terraces
Terraces create microhabitats — use them:
- Wall faces: moss, anubias petite, bucephalandra — epiphytes that colonize the stone and soften the architecture. Glue moss directly to wall faces for instant coverage.
- Terrace edges (the lip): carpeting plants spilling over the edge (Monte Carlo, hairgrass, Marsilea) create the classic "waterfall of green" — the single most attractive terrace effect.
- Terrace tops: the main planting zones — treat each level as its own bed. Tall stems on the highest terrace, midground on the middle, carpet on the lowest: the terracing amplifies the natural foreground-to-background progression.
- Behind walls (hidden): fast-growing stems — they don't need to be pretty back there; their roots stabilize the backfill and uptake nutrients.
Terraces for Special Cases
Nano tanks
Terracing shines in small tanks — a 2-level terrace in a 10-gallon creates depth impossible with flat substrate. Keep walls low (2–3 inches) and use small slate chips or dragon stone fragments. See our nano hardscape guide.
Sand waterfalls and "rivers"
The advanced terraced effect: a hidden pump pushes sand up a tube concealed in the back wall; sand cascades down a terraced channel like a waterfall, collected and recirculated. It requires precise construction (the channel must be smooth, the collection basin hidden) but it's the most eye-catching water feature in freshwater aquascaping. Build the terraces first, then integrate the waterfall channel as a design element, not an afterthought.
Island scapes
A single raised island (substrate mound retained by a ring wall of stone) in an otherwise flat sandy tank — the minimalist's terrace. One wall, one level, dramatic negative space around it. Very effective, very buildable.
Terrace Maintenance: The First Year
Terraces need attention early, then settle into stability:
- Week 1–2: inspect walls after every water change — the first fills and disturbances reveal weak spots. Re-seat any shifted stones, top up slumped substrate, reinforce wobbly sections with glue.
- Month 1–3: watch for substrate migration at wall bases (fine particles sifting through gaps). Add mesh backing where you see leakage. Plant roots are beginning to lock things in — help them by planting densely from the start.
- Month 3–6: the structure should now be stable — roots have colonized the backfill, biofilm has cemented small gaps, and the walls have "settled in." Reduce inspections to monthly.
- Month 6+: terraces are now self-maintaining. Annual check: probe behind walls for excessive mulm buildup (siphon what you can reach), verify no wall has shifted, trim plants that are undermining wall faces with aggressive roots.
- Rescape caution: uprooting large plants from terrace tops can pull substrate over the wall lip and start a cascade. Trim and replant tops rather than yanking established root balls near wall edges.
Frequently Asked Questions
How tall can I safely build terraces?
Total elevation of 6–10 inches is achievable in standard tanks with proper walls (multiple 3–5 inch retained steps). Beyond that you're engineering, not aquascaping — the weight, pressure, and anaerobic risk climb steeply. Most award-winning terraced scapes top out around 8 inches of total rise.
Will terrace walls be visible? I want natural hills.
Only if you let them. Bury wall tops just below the substrate surface, plant the faces with moss and epiphytes, and let carpeting plants spill over the lips — within 3–6 months the structure vanishes under vegetation and you have "impossible" smooth hills. Or leave walls exposed deliberately for the terraced-rice-paddy aesthetic — both are valid styles.
Can I add terraces to an established tank?
Painfully, but yes: drain 75% of the water, corral livestock, build mini-walls section by section, backfill carefully. It's 3× the work of building dry and the results are rarely as clean. If you're rescaping anyway, do the terraces during the teardown — never as an afterthought to a finished scape.
What stops substrate sliding off the terrace tops?
Nothing needs to — terrace tops are nearly level (that's the point of the staircase). Only the walls retain anything, and each wall holds just its 3–5 inch step. Keep terrace surfaces level or very gently sloped and plant them densely; roots lock everything in place within weeks.
Do I need special substrate for terraces?
No — but heavier, angular substrates hold shape better during construction. Aquasoil and 2–3 mm gravel terrace well; fine sand slumps more (use lower walls with sand). The backfill behind walls can be anything cheap — save the premium substrate for the visible top inch.
Build Up, Not Just Out
Most tanks use only two dimensions — length and width — and waste the third. Terraces unlock vertical aquascaping: valleys with real depth, plateaus with real presence, compositions that read as landscapes instead of gardens. The construction is straightforward (walls, backfill, mesh, plants), the engineering is ancient, and the payoff is the difference between a tank you glance at and a tank you stare into. Build up.
Tissue-culture plants are the exception — they’re grown in sterile gel and adapt with minimal melting, which is part of what you’re paying for. Plants bought submersed from another hobbyist’s tank also transition with little melt, since they’re already in the right form.
Which Plants Melt Most (and Least)
Heavy melters (expect significant leaf loss)
- Cryptocorynes — infamous for “crypt melt,” sometimes dropping every leaf after any disturbance. They almost always recover from the roots within weeks.
- Stem plants grown emersed — rotala, ludwigia, and hygrophila often shed lower emersed leaves while the growing tips transition.
- Amazon swords — emersed-grown swords typically lose their broad oval aerial leaves and replace them with longer submersed ribbon leaves.
Light melters
- Anubias, java fern, bucephalandra — slow-growing rhizome plants transition gradually; occasional old-leaf melt but rarely dramatic.
- Vallisneria — usually transitions well, though it dislikes the move itself and may sulk for a week.
- Floating plants — minimal melt since their leaves were already at the air-water interface.
The Acclimation Protocol
Step 1: Quarantine or dip first
Before acclimating to your tank’s conditions, make sure you’re not acclimating pests along with the plant. Run new arrivals through our quarantine and dip protocol — it adds days upfront but prevents months of regret.
Step 2: Float to temperature-match (30 minutes)
Float the bag or container in your tank for 20–30 minutes to equalize temperature. Plants are less temperature-sensitive than fish, but a 10°F shock on top of transplant stress is an avoidable insult.
Step 3: Trim before planting
Remove any leaves that are already damaged, yellowing, or heavily algae-covered — they won’t recover and they’ll rot in your tank, feeding algae. For stem plants, trim off the bottom inch and any emersed leaves that look unlikely to adapt; the plant wastes energy maintaining leaves it’s going to shed anyway. Keep the healthy growing tips — that’s where recovery starts.
Step 4: Plant correctly the first time
Follow our planting guide — right depth, crown exposed on rosettes, rhizomes unburied on epiphytes. Every uprooting and replanting restarts the acclimation clock, so get placement right on the first attempt. Decide where each plant goes before it goes in the water.
Step 5: Run a gentle first week
For the first 7 days after planting:
- Moderate light — run your normal photoperiod but consider dropping intensity 20–30% if your light is dimmable. Blast-level light on a melting plant grows algae on the dying leaves, not recovery.
- Stable CO2 — if you inject CO2, keep it consistent. Fluctuating CO2 during acclimation is a melt accelerator. If you’re low-tech, this doesn’t apply — see growing without CO2.
- Half-strength fertilizer — new plants with damaged leaves can’t use full dosing, and the excess feeds algae. Ramp to full strength over 2–3 weeks per our fertilizer schedule.
- No disturbance — don’t move, trim, or “check on” new plants for at least two weeks. Every touch resets root establishment. This is especially critical for crypts.
Step 6: Remove melt, keep the base
As emersed leaves melt, remove the mushy material promptly — decaying leaves release ammonia and grow fungus that can spread to healthy tissue. But never discard the plant while the crown, rhizome, or roots are firm and alive. A crypt that’s lost every leaf but has firm roots is a plant that’s about to recover, not a dead plant. Give it 3–4 weeks before judging.
Telling Normal Melt From Real Problems
Normal transition melt:
- Affects oldest/emersed leaves first, newest growth last
- New submersed leaves emerge even as old ones dissolve
- Roots and crown stay firm and white/green
- Timeline: 1–4 weeks, then obvious new growth
Concerning melt (see our full melting diagnosis guide):
- New growth also melts or emerges deformed
- Rhizome or crown turns mushy and brown — this is rot, not transition
- Entire plant dissolves within days with no new growth after 4+ weeks
- Melting spreads to established plants that weren’t recently moved
Buying Tips to Minimize Melt
- Buy submersed-grown when available — hobbyist-grown cuttings transition with almost no melt.
- Choose tissue culture for sensitive species — crypts and delicate stems establish far more reliably from sterile cups.
- Avoid plants already melting in the store tank — some melt is normal, but a plant that’s mostly mush at purchase has less energy for recovery.
- Transport carefully — keep plants damp and out of direct sun/heat. A plant that dries out or cooks in a hot car melts far worse than one transported properly.
The First-Month Timeline: What to Expect Week by Week
Knowing what’s normal when removes most acclimation anxiety. Here’s the typical timeline for a healthy plant adapting to a new tank:
Week 1: The quiet week
Almost nothing visible happens. The plant is growing roots you can’t see and assessing its new environment. Some species (vallisneria, stem plants) may start shedding their lowest leaves. This is normal. Resist the urge to “help” — no moving, no extra fertilizer, no light changes. The most common beginner mistake is intervening during a week when the correct action is nothing.
Week 2: Melt peaks
This is when emersed leaves give up in earnest. Crypts may drop everything; swords shed their broad aerial leaves; stem plants lose lower foliage. It looks catastrophic and it’s usually fine. Keep removing mushy material, keep conditions stable, and watch the crown and growing tips — if those are firm and green, recovery is already underway.
Week 3: The turn
New submersed-adapted leaves emerge — smaller, thinner, often a slightly different shade of green than the emersed foliage. Stem plant tips start growing visibly; crypts push tiny curled leaves from the crown; swords unfurl narrow ribbon leaves. This is the moment most beginners exhale for the first time.
Week 4+: Established
New growth outpaces melt, and the plant is functionally yours. You can resume full-strength fertilizer, normal trimming, and stop treating it as fragile. Some slow growers (anubias, bucephalandra) take 6–8 weeks to show obvious progress — that’s their normal speed, not a problem.
Acclimating Different Plant Formats
Tissue-culture cups
Sterile, pest-free, and already adapted to high-humidity (not emersed) growth — tissue cultures melt the least of any format. Rinse the agar gel off gently (leftover gel rots and feeds fungus), split the portion into small plantlets, and plant per our planting guide. They establish slowly for the first two weeks, then accelerate. No dip needed, minimal acclimation stress — this is the premium experience you’re paying for.
Potted plants
Remove the pot and strip away the rockwool completely — leftover rockwool traps debris and rots. Tease the root mass apart gently; if it’s a dense mat, splitting it into 2–3 smaller portions actually establishes faster than planting one big clump (more growing points, better water flow around roots). Potted plants are usually emersed-grown, so expect the standard 2–4 week melt cycle.
Bare-root / bunched stems
Typically sold as weighted bunches. Remove any bands, foam, or weights, strip the lower leaves, and plant stems individually or in small groups. Bunched stems from the store are often already transitioning — check for new submersed growth at the tips, which tells you the plant is mid-adaptation and will settle quickly.
Hobbyist cuttings
Already submersed-grown and the fastest to establish — often showing new growth within days. The main acclimation factor is water-parameter difference between the two tanks. Float to temperature-match, plant promptly, and they’ll usually take off with minimal melt. This is why experienced hobbyists prefer trading cuttings over buying potted plants.
Frequently Asked Questions
Should I use a “plant starter” or transplant fertilizer?
Products marketed for transplant shock are mostly B-vitamins and mild hormones. They don’t hurt, but there’s no strong evidence they help aquarium plants specifically. Stable conditions and patience outperform any bottle. Save the money for more plants.
My new plant melted completely — bare crown, no leaves. Is it dead?
Probably not, if the crown or rhizome is firm. Crypts and swords routinely lose 100% of their leaves and regrow from the base within a month. The test is firmness: firm and pale/green means alive; mushy and brown/black means rot. Give firm-but-leafless plants a full 4 weeks before declaring them dead.
Can I speed up acclimation with extra light or CO2?
No — and trying usually backfires. A melting plant can’t use extra light; the excess just grows algae on its dying leaves. Keep light moderate and CO2 stable (not boosted) during acclimation. Growth speed comes from the plant’s own adaptation timeline, which you can’t rush, only avoid delaying.
Should new plants go straight into my main display tank?
After quarantine/dipping, yes — there’s no benefit to a separate “growing-in” tank for most plants. They acclimate to your water fastest in the tank they’ll live in. The exception is very delicate species going into a tank with boisterous fish; give those a few weeks in a calm corner or breeder box first.
The Patience Rule
The single most important acclimation skill is restraint: plant it right, set gentle conditions, remove decay, and then leave it alone for a month. The hobbyists with the best plant growth aren’t doing something clever in week one — they’re simply not interfering in weeks two through four while the plants do what they’ve evolved to do. Melt looks like failure and feels like failure, but in most cases it’s the visible part of a plant successfully becoming yours.